That moment you open your pantry door and face a chaotic wall of mismatched containers—flour dusting the shelf, sugar in a mystery jar, three containers labeled “pasta” but only one actually holding penne. This daily frustration sends thousands of homeowners searching for permanent, elegant solutions that won’t peel, fade, or look like a kindergarten craft project after six months. Painted canister labels offer that rare combination of bespoke beauty and bulletproof durability, transforming your food storage into a curated system that works as beautifully as it looks. Unlike adhesive stickers that bubble and chalkboard paint that smudges, painted labels become part of the container itself, creating a seamless, washable, and timeless organization system that elevates the entire kitchen experience.
Understanding Painted Canister Labels for Pantry Organization
Top 10 Painted Canister Labels for Pantry
Detailed Product Reviews
1. Kuocodall 288 Pantry Labels for Food Containers, Preprinted Minimalist Waterproof Stickers for Organizing Storage Bins, Jars and Kitchen
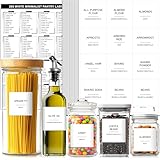
Overview: The Kuocodall 288 Pantry Labels provide a comprehensive white-label solution for kitchen organization enthusiasts. This extensive set includes 183 preprinted labels for common pantry staples, 9 customizable blanks, and 96 expiration date stickers. Each matte white square measures 2.5 inches, featuring crisp black text for maximum readability. The waterproof construction ensures longevity while remaining completely removable without residue, making them ideal for glass jars, plastic containers, and storage baskets.
What Makes It Stand Out: This set’s exceptional quantity distinguishes it from competitors—288 labels cover even the most extensive pantry collections. The included alphabetical catalog eliminates hunting frustration, allowing instant identification. The minimalist aesthetic creates a uniform, magazine-worthy appearance that elevates any kitchen decor. The adhesive strikes a perfect balance: durable enough to withstand moisture and daily handling, yet flexible enough for repositioning without damaging surfaces or leaving sticky residue behind.
Value for Money: At $8.99, you’re paying just over three cents per label—outstanding value for a specialized organization system. Comparable sets typically cost 50-100% more or contain significantly fewer labels. The addition of 96 expiration date stickers provides practical functionality rarely included at this price point. This represents a budget-friendly investment that delivers professional-level organization without the premium cost of custom labeling systems.
Strengths and Weaknesses: Strengths include the massive quantity, waterproof durability, clean minimalist design, easy removability, and thoughtful alphabetical catalog. Weaknesses involve limited customization beyond nine blanks, the fixed square shape that may not conform to all container types, and the white background potentially showing dirt in high-traffic areas. Jars are not included, requiring separate purchase.
Bottom Line: This set offers exceptional value for anyone seeking a clean, white minimalist labeling system. The comprehensive selection and user-friendly design make it an ideal choice for transforming pantry chaos into organized elegance without overspending.
2. Kuocodall 288 Pantry Labels for Food Containers, Black Preprinted Minimalist Waterproof Stickers for Organizing Storage Bins, Jars and Kitchen
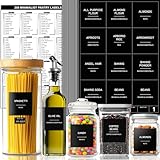
Overview: The black variant of Kuocodall’s popular label series delivers the same impressive 288-count set with a dramatic, modern twist. Featuring 183 preprinted pantry items, 9 customizable blanks, and 96 expiration date stickers, these 2.5-inch square labels showcase white text on a matte black background. The waterproof, removable adhesive ensures durability on glass, plastic, or metal surfaces while allowing clean removal when needed. This version caters to those seeking a bolder aesthetic for their kitchen organization system.
What Makes It Stand Out: The striking black-on-white color scheme creates a sophisticated, high-contrast look that pops against light-colored containers and shelves. Like its white counterpart, the set includes a comprehensive alphabetical catalog for quick reference. The black matte finish resists fingerprints better than glossy alternatives and adds a contemporary edge to pantry aesthetics. The identical quantity and feature set ensure you’re not sacrificing functionality for style.
Value for Money: Priced at $9.99, this black version costs only one dollar more than the white set, maintaining excellent value at approximately 3.5 cents per label. The premium for the black colorway is minimal considering the specialized printing process. You still receive the same extensive selection and expiration date stickers, making it competitively priced against other colored label sets that often charge significantly more for darker backgrounds.
Strengths and Weaknesses: Strengths mirror the white version: massive quantity, waterproof construction, easy removability, and comprehensive catalog. The black design offers superior contrast on light containers and hides stains effectively. Weaknesses include the same limited customization options, fixed square dimensions, and lack of included jars. The dark background may fade slightly with prolonged direct sunlight exposure, and readability decreases on dark containers.
Bottom Line: Perfect for those wanting a bold, modern black aesthetic without compromising on quantity or quality. This set delivers the same exceptional organization value as the white version, making it ideal for contemporary kitchens with lighter-colored storage containers.
3. Talented Kitchen Pantry Labels for Food Containers - 157-Piece, Black Script Vinyl - Jar & Bin Labels & Food Storage Organization Stickers
Overview: Talented Kitchen’s 157-piece set emphasizes elegant design with black script lettering on clear vinyl backgrounds. This collection includes labels for common pantry items plus symbols like numbers, ampersands, and plus signs for customized combinations. The water-resistant vinyl construction provides durability while maintaining a sophisticated, hand-lettered appearance. Available in various sizes to accommodate different text lengths, these labels create a cohesive yet personalized organization system for jars, bins, and canisters.
What Makes It Stand Out: The script font offers a decorative, premium aesthetic that elevates pantry organization from functional to stylish. Unlike block-print alternatives, these labels resemble custom calligraphy. The inclusion of numeric and symbol stickers allows creative combinations like “Flour & Sugar” or numbered containers. The clear background seamlessly integrates with any container color or material, creating a floating text effect that maintains visual focus on the contents.
Value for Money: At $10.90 ($0.07 per label), this set commands a premium over basic options but justifies the cost through superior aesthetics and versatility. Custom calligraphy labels would cost significantly more, making this an affordable luxury. The varied sizing ensures professional-looking results without awkward white space. While fewer labels than budget options, the quality and design sophistication make it worthwhile for design-conscious organizers.
Strengths and Weaknesses: Strengths include the elegant script design, water-resistant durability, versatile sizing, clear background versatility, and customization symbols. The aesthetic appeal transforms pantries into showcase spaces. Weaknesses involve the higher price per label, script font potentially being harder to read quickly, limited quantity compared to value sets, and water-resistance rather than full waterproofing. The delicate appearance may not suit utilitarian kitchens.
Bottom Line: Ideal for homeowners prioritizing style alongside function. These labels deliver a custom, upscale look at a fraction of professional pricing, making them perfect for open shelving displays where aesthetics matter as much as organization.
4. Talented Kitchen 135 Pantry Labels for Food Containers, Clear Preprinted Pantry Labels for Organizing Storage Canisters & Jars, White Cursive Numbers Stickers (Water Resistant)

Overview: This budget-friendly 135-label set from Talented Kitchen features white cursive text on clear vinyl, offering an affordable entry into organized pantry aesthetics. The collection includes 117 common ingredient labels, 8 numbered stickers, 6 ampersands, and 5 plus signs. Each label uses water-resistant transparent vinyl with varying dimensions based on text length, creating a custom appearance. The self-adhesive design allows easy application and removal on large glass canisters, plastic containers, and storage jars without messy handwriting.
What Makes It Stand Out: The exceptional price point makes professional-looking pantry organization accessible to budget-conscious shoppers. The cursive font provides a softer, more traditional aesthetic than block letters. Variable label sizing ensures each ingredient name receives appropriate space, eliminating awkward uniform squares that might look empty with short words or cramped with long ones. The clear backing maintains focus on container contents while providing necessary identification.
Value for Money: At $4.04 ($0.03 per count), this represents the best per-label value in the Talented Kitchen lineup and matches the cheapest options on the market. Despite the low price, you still receive water-resistant vinyl and a thoughtful selection of symbols for customization. The alphabetical organization list adds premium convenience typically found in higher-priced sets. This is an unbeatable entry-level option for testing pantry labeling without significant investment.
Strengths and Weaknesses: Strengths include the incredibly low price, water-resistant durability, variable sizing for professional appearance, included symbols for customization, and clear background versatility. The cursive style adds decorative flair. Weaknesses involve the cursive potentially reducing quick-scan readability, limited total quantity compared to 200+ label sets, and water-resistance rather than full waterproof protection. The variable sizes, while aesthetically pleasing, may appear less uniform on strict grid layouts.
Bottom Line: The ultimate budget choice for clear-label enthusiasts. While sacrificing some quantity and waterproofing, it delivers impressive style and functionality at a price point that makes pantry organization accessible to everyone. Perfect for renters or organization newcomers.
5. Talented Kitchen Clear Vinyl Pantry Labels for Food Containers - Waterproof & Repositionable for Kitchen Jars - Farmhouse Pantry Organization - Preprinted Baking Labels - Pack of 154, Assorted Sizes

Overview: Talented Kitchen’s premium farmhouse-style collection offers 154 waterproof, repositionable labels with bold text on clear backing. This comprehensive set includes common pantry items, baking-specific labels, and expiration date stickers designed for glass containers and food storage solutions. The assorted sizes accommodate various container shapes while maintaining a cohesive farmhouse aesthetic. The waterproof adhesive can be repositioned multiple times without losing stickiness, making it ideal for evolving storage needs or rental kitchens where flexibility is essential.
What Makes It Stand Out: The repositionable feature sets this apart from permanent-adhesive competitors, allowing guilt-free adjustments as your pantry changes. The farmhouse style combines rustic charm with modern functionality, featuring bolder typography that’s easier to read than script alternatives. The inclusion of baking-specific labels and expiration date stickers creates a complete system. The waterproof construction surpasses water-resistant options, ensuring durability in humid environments or when containers require washing.
Value for Money: At $14.61 ($0.09 per label), this is the most expensive option but justifies the premium through superior features. The repositionable adhesive alone adds significant value, preventing waste from misaligned applications. Full waterproofing extends lifespan compared to water-resistant alternatives. When factoring in the specialized baking labels and farmhouse aesthetic that eliminates need for separate decorative accessories, the price becomes reasonable for a premium, flexible system.
Strengths and Weaknesses: Strengths include full waterproof protection, repositionable adhesive, farmhouse aesthetic, comprehensive label selection, bold readable text, and included expiration stickers. The flexibility prevents application errors and supports changing organizational needs. Weaknesses involve the highest cost per label, farmhouse style not suiting modern minimalist kitchens, and fewer total labels than 200+ count value sets. The premium features may be unnecessary for static pantries that rarely change.
Bottom Line: The top-tier choice for those prioritizing flexibility and durability. The repositionable, waterproof design makes it perfect for active kitchens, renters, or anyone wanting a stylish farmhouse aesthetic with the freedom to reorganize without waste. A worthwhile splurge for serious home organizers.
6. Thistle Brook Cottage Flour Coffee Sugar Tea Decal Stickers Labeling for Jars Kitchen Organization 10 Pack Canisters Pantry Label
Overview: The Thistle Brook Cottage decal set offers ten meticulously crafted vinyl labels for kitchen canisters, targeting fundamental pantry staples like flour, coffee, sugar, and tea. Hand-produced in the USA using premium Oracal vinyl, these decals prioritize quality over quantity, delivering a boutique organizational solution for discerning homeowners seeking refined jar labeling.
What Makes It Stand Out: The handmade American craftsmanship distinguishes this set from mass-produced alternatives. The absence of a clear edge around letters creates a seamless, painted-on appearance that elevates aesthetic appeal. Each decal features precise sizing tailored to specific items, ranging from compact tea labels to broader flour designs, ensuring proportional elegance on various container sizes.
Value for Money: At $9.99 ($1.00 per label), this premium-priced set justifies its cost through superior material quality and artisanal production. While competitors offer bulk quantities at lower unit prices, Oracal vinyl’s durability and professional finish provide long-term value, resisting peeling and fading better than standard options.
Strengths and Weaknesses: Strengths include exceptional vinyl quality, seamless letter edges, clear application instructions, and patriotic manufacturing. The curated selection covers essential pantry items effectively. However, the ten-label quantity limits comprehensive pantry overhauls, and the $1.00 per label cost exceeds budget alternatives. The fixed label set lacks customization options for unique storage needs.
Bottom Line: Ideal for those prioritizing craftsmanship and aesthetic finesse over bulk value, these labels excel in smaller kitchens or as premium accents. Consider this set if you seek durable, professional-looking decals and support American manufacturing, but explore larger sets for extensive pantry organization projects.
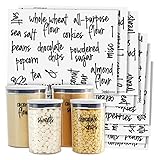
7. Talented Kitchen Chalkboard Pantry Labels - Water-Resistant Vinyl for Kitchen Organization - Preprinted Food Container Labels - Blank Container Decals for Custom Labeling - Pack of 158, 8.5 x 11 in

Overview: Talented Kitchen’s 158-label chalkboard set delivers comprehensive pantry organization through a sophisticated white-on-black design. This versatile collection combines 130 preprinted essential food labels with 28 blank decals, enabling both immediate implementation and custom categorization for dynamic kitchen storage systems.
What Makes It Stand Out: The water-resistant vinyl construction withstands kitchen humidity and cleaning, while the removable adhesive allows repositioning without residue damage. At just $0.50 per label, it offers exceptional affordability without sacrificing durability. The set’s holiday organization emphasis and sophisticated aesthetic make it dual-purpose for everyday use and festive presentation.
Value for Money: At $3.99 for 158 labels, this represents remarkable economy—costing merely half a cent per label. The inclusion of both preprinted and blank options eliminates separate purchases, while water-resistant durability extends lifespan beyond paper alternatives. Comparable quality sets typically cost 3-4 times more, positioning this as a budget-friendly powerhouse.
Strengths and Weaknesses: Strengths include massive quantity, water resistance, removability, blank customization options, and unbeatable price point. The white-on-black design ensures high readability. However, the chalkboard aesthetic may not suit all kitchen decors, and the 8.5" x 11" sheet format requires manual separation. Some users may find the adhesive less aggressive on textured surfaces.
Bottom Line: An outstanding value proposition for large-scale pantry makeovers, this set suits budget-conscious organizers needing flexibility. The chalkboard style favors modern and rustic kitchens alike. While not the most premium material available, its durability and customization options make it a smart purchase for most households.
8. Talented Kitchen Preprinted Chalkboard Pantry Labels - Waterproof Vinyl Storage Container Stickers - Kitchen Bin Organization - Easy-Read Sugar & Flour Labels for Pantry Containers - 128-Pack, X-Large

Overview: This 128-pack of X-Large preprinted chalkboard labels from Talented Kitchen provides elegant organization for pantry containers with uniform sizing and sophisticated cursive typography. Designed for clear item identification, these waterproof vinyl stickers extend beyond kitchen application to laundry, bathroom, and office storage solutions.
What Makes It Stand Out: The elegant cursive font differentiates these from utilitarian labels, adding decorative flair while maintaining readability. The X-Large sizing ensures visibility on bigger containers and bins, addressing a common shortcoming of smaller labels. Waterproof construction guarantees longevity in moisture-prone environments, and multi-room versatility maximizes utility.
Value for Money: Priced at $5.73 ($0.72 per label), this set balances affordability with premium features. While slightly more expensive than standard chalkboard sets, the uniform X-Large sizing, elegant font, and waterproof rating justify the modest premium. The 128-label quantity accommodates extensive organization projects without overwhelming users with excess decals.
Strengths and Weaknesses: Strengths include waterproof durability, stylish cursive design, generous uniform sizing, multi-room versatility, and removable adhesive. The preprinted selection covers most pantry staples comprehensively. However, the cursive font may challenge quick readability for some users, and the lack of blank labels limits customization. The aesthetic may not complement ultra-modern minimalist kitchens.
Bottom Line: Perfect for those seeking functional elegance, these labels excel in visible storage applications where style matters. The waterproof feature and generous size make them ideal for high-traffic pantries. Choose this set if you value aesthetic cohesion and durability, but consider alternatives with blanks if custom labeling is essential.
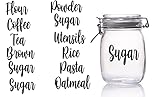
9. Kitchen Pantry Organization Label Decal Stickers for Jars, Containers, and Canisters Flour, Coffee, Sugar, Tea 40 Pack

Overview: This 40-pack of premium decal stickers delivers robust labeling for jars, containers, and canisters, emphasizing durability for both indoor and outdoor applications. Manufactured in the USA from top-tier sign vinyl, these waterproof and fade-resistant labels promise longevity while covering essential pantry items like flour, coffee, sugar, and tea.
What Makes It Stand Out: The indoor/outdoor versatility is unique among pantry labels, suggesting exceptional UV and weather resistance. The strong adhesive ensures secure bonding to various surfaces, while the made-in-USA guarantee supports domestic manufacturing. The premium sign vinyl construction exceeds typical pantry label durability standards.
Value for Money: At $12.99 for 40 labels ($0.32 per label), the pricing reflects mid-range value. While more expensive than budget chalkboard options, the superior material quality, fade resistance, and dual-environment capability justify the cost. The American manufacturing and robust customer support add intangible value.
Strengths and Weaknesses: Strengths include exceptional durability, waterproof and fade-resistant properties, versatile surface application, strong adhesive, and domestic production. The 40-label quantity suits moderate pantry organization. However, the higher upfront cost may deter budget shoppers, and the fixed 40-label set lacks customization blanks. Limited design aesthetic information suggests a utilitarian appearance.
Bottom Line: An excellent choice for those prioritizing durability and American-made quality, these labels suit households needing long-lasting organization. The weather resistance makes them ideal for garage or outdoor kitchen storage. While not the cheapest option, their longevity and material quality provide solid value for serious organizers.
10. Hebayy 308 Pantry Food Labels, 280 Preprinted Flour Pasta Lentil Grain Condiment Oil Stickers, 28 Blank Ones, Waterproof Oil&Tear Resistant, No Residue for Kitchen Containers Jars(White on Black)

Overview: Hebayy’s comprehensive 308-label set dominates the quantity category, offering 280 preprinted pantry labels plus 28 blanks for custom creation. The white-on-black design utilizes waterproof, oil-resistant PVC material with tear-resistant properties, delivering industrial-grade durability for kitchen containers while enabling complete pantry systematization.
What Makes It Stand Out: The sheer volume and variety cover an unprecedented range—from flour and pasta to lentils, oils, and condiments—eliminating manual writing. The included alphabetical index card streamlines label location, transforming organization from chore to efficient system. The no-residue removable design allows container repurposing without surface damage.
Value for Money: At $8.99 for 308 labels ($0.03 per label), this set offers extraordinary economy. The near-zero per-label cost combined with premium PVC construction, oil resistance, and dishwasher safety creates unmatched value. Competitors cannot match this price-to-performance ratio at such scale.
Strengths and Weaknesses: Strengths include massive quantity, comprehensive preprinted variety, blank customization options, waterproof/oil-resistant PVC, tear resistance, no-residue removal, dishwasher safety, and organizational index card. The large 3" x 1.4" size ensures readability. However, the all-caps design may feel less elegant than cursive alternatives, and the overwhelming quantity could be excessive for smaller kitchens. Storage of unused labels requires planning.
Bottom Line: The ultimate solution for extensive pantry organization projects, this set suits large families, serious home cooks, and bulk shoppers. The absurdly low per-label cost and comprehensive coverage make it a no-brainer for those needing maximum labels. Minor aesthetic limitations pale against functional superiority and unbeatable value.
What Are Painted Canister Labels?
Painted canister labels are permanent or semi-permanent markings applied directly to food storage containers using specialized paints, enamels, or ceramic coatings. These aren’t simple stickers or decals—they’re integrated design elements created through techniques like hand-painting, stenciling, or factory-fired applications that bond at a molecular level with the container’s surface. Think of them as tattoos for your pantryware: designed to last years, withstand daily handling, and maintain their clarity through countless washes. The substrate might be glass, ceramic, powder-coated metal, or even certain plastics, each requiring specific paint formulations to ensure proper adhesion and food safety.
How Do Painted Labels Differ From Other Labeling Methods?
The fundamental distinction lies in permanence and integration. Adhesive labels sit on top of the surface, creating a micro-environment where moisture, heat, and oils eventually cause lifting edges and yellowing. Chalkboard labels, while reusable, transfer chalk dust onto hands and lack the crisp, intentional aesthetic of painted designs. Vinyl decals offer more durability but can still peel and leave stubborn adhesive residue. Painted labels, conversely, become part of the container’s architecture—no edges to lift, no adhesive to fail, and no background material to discolor. They offer a tactile depth that mass-produced alternatives simply cannot replicate, with paint that can be felt subtly beneath the fingertip.
The “Quick Build” Concept in Pantry Labeling
“Quick build” doesn’t mean rushed or sloppy—it refers to systematic approaches that let you transform an entire pantry in a single weekend. This methodology relies on pre-planned design templates, standardized sizing protocols, and batch-processing techniques. Instead of painting one label at a time, you prepare all containers simultaneously: clean every surface, position all stencils, paint in assembly-line fashion, then cure together. A quick build strategy might involve creating a master template for common pantry staples—flour, sugar, coffee, rice—and replicating it across 15-20 containers in under four hours of active work time, plus curing.
Key Benefits of Using Painted Canister Labels
Aesthetic Cohesion and Visual Appeal
Painted labels create a unified visual language throughout your pantry. When every container features the same typography style, color palette, and placement geometry, the space transforms from storage area to design feature. This cohesion works across mixed container brands—you can pair a vintage ceramic canister with a modern glass jar, and the consistent painted labeling ties them together like a curated collection. The aesthetic flexibility spans farmhouse charm with distressed lettering, minimalist sans-serif modernism, or ornate script for traditional kitchens.
Longevity and Durability Compared to Adhesive Options
A properly applied and sealed painted label will outlast adhesive alternatives by a factor of five to ten years. Where stickers crack and fade within 12-18 months in active kitchens, painted labels resist the enemies of longevity: UV light from nearby windows, temperature fluctuations near ovens, humidity from dishwashers, and the mechanical abrasion of being moved, lifted, and washed. The paint remains colorfast because it’s either fired into ceramic glazes at 1,200°F or sealed with automotive-grade clear coats that resist chemical breakdown.
Customization Potential for Any Pantry Style
Painted labeling systems offer infinite customization without the premium cost of bespoke manufacturing. You control every variable: font weight, letter spacing (kerning), color matching to your kitchen’s exact hex code, label dimensions proportional to your specific canister sizes, and even multilingual labels for international ingredient names. This means your “farina” canister can match your “flour” one perfectly, maintaining visual rhythm while serving functional needs. Advanced techniques allow for decorative flourishes, small iconography (a wheat sheaf for flour, coffee bean for coffee), or color-coded rims that correspond to baking versus cooking ingredients.
Tactile Quality and Premium Feel
There’s an undeniable psychological impact when you grasp a canister and feel the subtle texture of raised enamel lettering beneath your fingers. This tactile dimension signals quality and permanence, turning a mundane action—scooping sugar—into a more intentional experience. The paint’s micro-texture provides a slight grip enhancement, making glass jars less slippery when hands are busy cooking. This sensory feedback reinforces the value of the organization system, encouraging household members to maintain the system rather than revert to chaotic habits.
Critical Features to Evaluate When Choosing Painted Labels
Material Composition and Substrate Quality
The foundation of any painted label system is what lies beneath the paint. For DIY applications, this means selecting canisters with surfaces that accept paint readily: unglazed ceramic bisque, etched glass, or metal with a phosphate conversion coating. Factory-labeled containers use substrates engineered at the molecular level for paint adhesion—glass with tin oxide treatments, ceramics with specific bisque porosity, or metals with pre-treated powder coats. The substrate’s coefficient of expansion matters; if glass and paint expand at different rates when heated, micro-cracks will form. Quality systems match these properties precisely.
Paint Type and Finish Options
Not all paints belong near food. Evaluate options based on your canister material and usage:
- Ceramic underglaze: Fired into the vessel, completely food-safe, matte finish
- Enamel paint: Air-dried but extremely hard, glass-like finish, hand-wash only
- Acrylic enamel hybrids: Water-based, lower VOCs, good for metal and glass
- Two-part epoxy paints: Industrial durability, chemical resistance, requires mixing
Finish choices—matte, satin, semi-gloss, or high-gloss—affect both aesthetics and maintenance. Matte finishes hide fingerprints but absorb oils; gloss finishes wipe clean easily but show every smudge. For pantries, satin or semi-gloss typically offers the best balance, providing washability without excessive reflectivity.
Application Method: Hand-Painted vs. Factory-Applied
Hand-painted labels offer ultimate customization but require skill and time. This approach suits artistic homeowners wanting organic variation—slight letter imperfections become character. Factory application via screen printing, pad printing, or ceramic firing ensures absolute consistency and superior durability. Screen printing deposits precise paint thicknesses, while ceramic firing creates a glass-like enamel that’s literally molten into the surface. For quick builds, factory-labeled sets provide instant cohesion, while stenciling kits offer a middle ground—hand-applied but guided for uniformity.
Design Style and Typography Considerations
Typography in painted labels must balance aesthetics with legibility from six feet away—the typical pantry viewing distance. Sans-serif fonts like Futura or Helvetica work for modern kitchens, offering clarity at smaller sizes. Serif fonts like Garamond convey tradition but require larger sizing. Script fonts demand careful sizing to maintain readability; a good rule is minimum 1/2-inch letter height for script, 3/8-inch for sans-serif. Letter spacing should increase 10-15% over digital defaults to prevent visual crowding when painted. Consider the “grocery store test”—can you read the label as easily as a store-bought product while moving?
Size Scaling and Proportion Guidelines
Label size must correlate with canister dimensions and viewing angle. A 4-inch jar needs a 1.5-2-inch wide label maximum, leaving adequate negative space. Tall, narrow canisters suit vertical label orientations, while wide, squat jars accommodate horizontal layouts. The golden ratio (1:1.618) applies surprisingly well—multiply your jar’s diameter by 0.618 to find ideal label width. For sets, establish a master scale: perhaps small (spices) use 1-inch labels, medium (grains) use 2-inch, large (flour) use 3-inch, creating visual hierarchy that speeds ingredient identification.
Sealant and Protective Coating Standards
Unsealed painted labels will fail. Quality systems include a clear topcoat that must be:
- Food-safe: NSF/ANSI 51 certification for food contact surfaces
- Non-yellowing: UV inhibitors prevent amber discoloration
- Flexible: Must accommodate substrate expansion without cracking
- Chemical resistant: Withstands alcohol (vanilla extract splashes) and acids (lemon juice)
Options include water-based polyurethane (easy application, moderate durability), two-part epoxy (maximum protection, complex application), and automotive acrylic clear coats (professional results, requires ventilation). Application method matters—spray coats provide even coverage without brush marks, while brush-on offers thicker protection.
Compatibility With Canister Materials
Each substrate demands specific paint chemistry:
- Glass: Requires silane coupling agents in paint for molecular bonding; otherwise, labels can be scraped off with a fingernail
- Ceramic: Needs porous bisque or specially formulated glazes; fully vitrified ceramic repels paint
- Stainless steel: Demands etching primer or conversion coating; smooth metal sheds paint like water off a duck
- Plastic: Only certain types (PET, HDPE) accept paint; many plastics off-gas plasticizers that prevent adhesion
Test compatibility by painting a hidden spot and performing a “tape test”—press painter’s tape firmly over cured paint, then rip it off. If paint lifts, the system will fail.
Temperature and Humidity Resistance Ratings
Pantry environments fluctuate dramatically—near the stove, temperatures can spike to 120°F; near a poorly sealed door, humidity might hit 70%. Quality painted labels withstand temperature cycling from -20°F (freezer storage) to 150°F (near-cooktop). Look for paint systems with a Tg (glass transition temperature) above 150°F, ensuring they remain hard and don’t become tacky. Humidity resistance means the paint won’t absorb moisture and blister; this requires a cross-linked polymer structure that water molecules cannot penetrate.
Common Pitfalls and Mistakes to Avoid
Mismatched Design Aesthetics
The most frequent error is selecting label styles that clash with kitchen decor. A sleek, minimalist kitchen with handleless cabinets demands similarly clean label design—think Helvetica Neue in matte charcoal. Conversely, a rustic farmhouse with open shelving and reclaimed wood calls for hand-lettered serif fonts in warm, earthy tones. The mistake isn’t personal taste; it’s failing to create a cohesive visual conversation between the label and its environment. Before committing, print paper mockups and tape them to canisters, living with the look for 48 hours to assess compatibility with lighting and surrounding elements.
Ignoring Proportional Sizing
Oversized labels overwhelm small jars, making them look like kindergarten projects. Undersized labels on large canisters get lost, defeating their purpose. The common mistake is using one label size across all containers. instead, create a sizing matrix: measure each canister’s visible face area, calculate 25-30% of that area for label size, then group similar sizes. A 32-ounce jar might use a 2x3-inch label, while a 16-ounce jar gets 1.5x2.25 inches. This scaling maintains visual rhythm while ensuring readability at distance.
Overlooking Material Compatibility
Applying standard craft paint to a slick glass jar guarantees failure within weeks. The paint chips, peels, or washes off because no mechanical or chemical bond exists. Another critical oversight is thermal expansion mismatch—using rigid enamel paint on flexible plastic causes cracking when the plastic expands with heat. Always verify the paint’s Technical Data Sheet (TDS) for compatible substrates and conduct a 30-day test on one canister before committing to a full set.
Skipping Protective Sealants
Even the most durable paint needs protection in a kitchen’s harsh environment. Unsealed paints absorb cooking oils, turmeric stains, and acidic splashes, becoming permanently discolored. The sealant also provides scratch resistance from rings, utensils, and other canisters. The mistake is treating painted labels like wall art instead of functional surfaces. Always apply at least two thin coats of food-safe clear sealant, allowing full curing between coats—typically 24 hours per coat at 70°F and 50% humidity.
Poor Placement and Alignment
Misaligned labels create visual chaos that undermines the entire organization effort. The eye perceives even 1/8-inch misalignments as sloppy. The quick-build solution is creating a placement jig—a simple cardboard template that fits over the canister, showing exactly where the label edges should sit. For hand-painted labels, mark light pencil guidelines that erase after paint cures. For factory labels, use a laser level to project a horizontal line across all canisters during application, ensuring perfect alignment across the entire pantry shelf.
Installation and Application Best Practices
Surface Preparation Techniques
Proper prep determines 80% of label success. Clean surfaces with isopropyl alcohol, not soap, which leaves residue. For glass, wipe with vinegar first to remove invisible oil films. Lightly scuff non-porous surfaces with 400-grit wet/dry sandpaper to create microscopic tooth—just enough to cloud the surface, not scratch deeply. Remove all dust with a tack cloth, then handle only with gloves to prevent fingerprint oils. Prime if required: use self-etching primer for metal, adhesion promoter for plastic. Let primer cure fully—rushing this step causes inter-coat adhesion failure.
Placement Planning and Layout Strategies
Before painting anything, lay all empty canisters on a table and arrange them in pantry order. Photograph the layout, then print the image. Sketch label positions directly on the printout, considering handle locations, curved versus flat faces, and how labels will read when stacked two deep on shelves. Create a “label map”—a spreadsheet listing each canister, its contents, label dimensions, and exact placement coordinates (e.g., “2 inches from top, centered”). This planning prevents mid-project decisions that lead to inconsistency.
Application Tools and Methods
For stenciling, invest in adhesive-backed stencils that conform to curved surfaces without gaping. Use cosmetic wedges or stencil brushes, not foam brushes, which force paint under stencil edges. Apply paint in pouncing motions, building thin layers rather than one thick coat that bleeds. For freehand work, use liner brushes with fine points and paint thickened with a medium to prevent running. Factory-style results at home require an airbrush system with 0.5mm nozzle and low-pressure settings (15-20 PSI) for controlled, even coverage without drips.
Curing and Setting Timeframes
Patience separates professional results from amateur disappointments. While paint may feel dry to the touch in hours, full cure takes days or weeks. Ceramic paints require kiln firing—typically cone 04 (1,945°F) for 6-8 hours plus cooling. Air-dry enamels need 7-10 days to reach maximum hardness. Acrylic hybrids cure in 48-72 hours but remain vulnerable to scratching for a full week. During curing, maintain stable temperature and humidity—fluctuations cause paint to expand and contract, creating micro-fissures. Never stack curing canisters; weight causes paint deformation.
Maintenance and Long-Term Care
Cleaning Protocols for Painted Surfaces
Treat painted labels like fine china, not industrial dishware. Hand washing is non-negotiable—dishwasher detergents contain harsh alkalis that etch clear coats. Use mild dish soap and soft microfiber cloths; abrasive sponges create micro-scratches that dull finishes. For stubborn stains like turmeric or beet juice, make a paste of baking soda and water, apply for 60 seconds, then rinse gently—never scrub. Clean spills immediately; acidic substances like vinegar or lemon juice can penetrate even good sealants if left for hours. Dry with a lint-free cloth, never air dry, which leaves water spots that can mineralize on the paint surface.
Touch-Up Strategies for Wear and Tear
Even durable labels eventually show wear—tiny chips at edges, hairline cracks, or slight fading. Keep a “touch-up kit” with the exact paint used, stored in an airtight container to prevent drying. For chips, lightly sand the area with 600-grit paper, clean, then apply paint with a fine-tipped brush using magnifying glasses for precision. For cracks, use a fine-line brush to flow thinned paint into the crack, then immediately seal with clear coat. Color matching is critical; even the same paint can shift slightly after curing, so test on the canister bottom first. Professional restorers use artist-grade pigments to custom-match faded colors, but for home use, storing original paint prevents this complexity.
Seasonal Inspection and Upkeep
Twice yearly, perform a “pantry audit” focusing on label integrity. Check for edge lifting (run a fingernail along borders), fading (compare to a photo taken at installation), and sealant wear (look for dull spots where gloss has rubbed away). Tighten any loose lids that cause canisters to be handled more roughly, accelerating wear. Rotate canisters on shelves to ensure even light exposure—UV degradation is cumulative, and rotating prevents one side from fading while the other remains pristine. This 20-minute inspection catches issues before they become irreversible, extending label life by years.
Design Inspiration and Style Pairings
Matching Labels to Pantry Themes
Your pantry’s architectural style should dictate label design. For a Scandinavian-minimalist pantry with white oak shelving and hidden lighting, choose single-color labels (matte black or deep charcoal) in a clean sans-serif font, positioned asymmetrically for visual interest. Industrial lofts with exposed brick and metal shelving demand bold, stencil-style lettering in raw metal tones—think gunmetal grey on clear glass. Traditional pantries with raised-panel cabinetry and crown molding call for scripted fonts in rich, classic colors like deep forest green or burgundy, with subtle decorative flourishes. The key is extracting 2-3 design elements from your kitchen—cabinet hardware finish, countertop material, lighting style—and echoing them in your label design.
Color Psychology in Food Storage Spaces
Color influences appetite, mood, and even taste perception. Blues and greens, associated with freshness, work beautifully for herbs, spices, and healthy grains. Warm terracottas and ochres evoke earthiness for legumes and baking ingredients. Reds and oranges stimulate appetite, making them ideal for pasta and comfort foods. However, high-saturation colors can cause visual fatigue when viewing 20+ canisters. The solution: use muted, desaturated versions—sage instead of emerald, rust instead of fire engine red. For universal appeal, stick to a monochromatic scheme with one accent color for high-use items like coffee or sugar, creating a visual waypoint in your pantry.
Font Pairing Principles for Readability
Mixing fonts adds sophistication but requires discipline. Limit yourself to two fonts maximum: one for primary ingredient names, another for optional secondary text (origin, date, weight). Pair fonts with high contrast—script for the main label, sans-serif for details, but ensure the script’s x-height (lowercase letter size) is at least 1.5x larger than the sans-serif to maintain hierarchy. Avoid fonts with extreme weight variations (very thick and thin strokes) as they become illegible when painted small. Test readability by printing the font at actual size, taping it to a canister, and viewing from across the room in dim pantry lighting—if you squint, the font fails.
Cost Considerations and Value Assessment
Understanding Price Tiers and What Drives Cost
Painted label systems fall into three price categories. Budget tier ($2-5 per canister) includes DIY stencils and craft paint, suitable for low-humidity pantries and careful handlers. Mid-tier ($8-15 per canister) features professional-grade materials, pre-cut adhesive stencils, and food-safe sealants—ideal for most homeowners wanting durability without commissioning art. Premium tier ($20-40 per canister) encompasses factory-fired ceramic labels, custom typography design, and multi-color applications with metallic accents. Cost drivers include paint type (ceramic glazes cost 10x acrylics), application complexity (each color adds a layer and labor), and substrate preparation requirements. A 20-canister pantry might cost $60 DIY, $200 mid-tier, or $600+ premium.
ROI: When Premium Options Justify Investment
Premium painted labels deliver return through longevity and home value. If a $400 professional labeling system lasts 15 years versus replacing $40 adhesive labels every 18 months, the painted system costs less over time. More significantly, a beautifully organized pantry is a documented home selling feature—real estate studies show organized kitchens increase perceived home value by 3-5%. For avid bakers or home chefs who interact with their pantry multiple times daily, the tactile pleasure and efficiency of a perfectly designed system amortizes the cost across thousands of uses. The breakpoint: if you’ll use the pantry more than 5 times daily and plan to stay in your home over 3 years, premium labeling offers tangible ROI.
Frequently Asked Questions
What’s the difference between hand-painted and factory-applied canister labels for pantry use?
Hand-painted labels offer unlimited customization but depend entirely on your skill level and patience. Each label becomes a unique piece, with slight variations that add character. Factory-applied labels use industrial processes like screen printing or ceramic firing, ensuring absolute consistency and superior durability—ceramic labels are literally molten glass fused to the vessel, making them dishwasher-safe and permanent. For quick builds, factory labels provide instant, professional results, while hand-painting suits artistic homeowners who value the process as much as the product.
How do I ensure painted labels are food-safe for kitchen storage?
Food safety hinges on two factors: paint composition and sealant integrity. Only use paints explicitly labeled FDA-compliant for food contact surfaces—typically water-based acrylic enamels or ceramic underglazes. Avoid oil-based paints containing heavy metal driers. The critical step is sealing: apply 2-3 thin coats of NSF/ANSI 51 certified clear coat, ensuring complete coverage with no pinholes. Test by filling the canister with water and letting it sit 24 hours; if the label’s backside shows moisture darkening, the seal is compromised. For absolute safety, keep labels on the canister exterior, not interior surfaces.
What paint finish works best for pantry labels in humid climates?
High-humidity environments demand semi-gloss or gloss finishes with built-in mildewcides. Matte finishes absorb atmospheric moisture, causing paint to soften and become tacky—labels can literally stick to shelving. Choose a two-part epoxy or polyurethane with a minimum 85% gloss rating; these create a non-porous barrier that sheds moisture. In coastal areas with salt air, specify marine-grade formulas designed for boat exteriors. The finish should bead water like a waxed car; if water sheets and spreads, the coating is inadequate.
Can painted labels be applied to glass, ceramic, and plastic canisters equally well?
No—each material requires specific preparation and paint types. Glass needs silane-based adhesion promoters and paints formulated for non-porous surfaces; without these, labels peel like sunburned skin. Ceramic accepts paint readily if unglazed, but glazed ceramic requires etching with hydrofluoric acid (professionally applied) or special bonding primers. Most plastics are paint-resistant; only PET (#1) and HDPE (#2) accept paint after flame treatment or corona discharge. Polypropylene (#5) and polycarbonate (#7) reject paint entirely. Always check the plastic’s resin identification code and test adhesion before committing.
How long do painted canister labels typically last compared to chalkboard stickers?
Quality painted labels last 10-15 years with proper care, while chalkboard stickers typically survive 1-2 years before edges lift and the surface becomes permanently ghosted with previous writing. The failure mechanism differs: painted labels fail through gradual wear (slow and predictable), while chalkboard stickers fail catastrophically (sudden peeling, often when you’re pouring ingredients). Ceramic-fired labels essentially last the lifetime of the canister, as the label is glass fused to glass. The cost-per-year heavily favors painted systems: $30 for a painted label over 12 years equals $2.50/year versus $8/year replacing chalkboard stickers.
What’s the average curing time for painted labels before I can use my pantry containers?
Touch-dry time is deceptive. While paint feels dry in 2-4 hours, it reaches 90% hardness in 7 days and full cure in 30 days. You can use canisters gently after 48 hours, but avoid washing or stacking until day 7. Two-part epoxies cure faster—full hardness in 72 hours—but require precise mixing and warm temperatures (above 65°F) to catalyze properly. Ceramic glazes need firing plus 24-hour cooling, then are immediately ready. For quick builds, plan the painting on a Friday evening, let cure over the weekend, and use gently starting Monday, with full washing capability the following weekend.
How do I remove painted labels if I want to relabel my canisters?
Removal difficulty depends on application quality—ironically, the better the label, the harder it is to remove. For acrylic paints, use a plastic scraper and isopropyl alcohol to soften paint over several hours. Enamel paints require paint stripper containing methylene chloride (use with extreme ventilation). Ceramic-fired labels cannot be removed; they’re permanent. A practical compromise is painting a base coat in a neutral color, then applying the actual label on top. When redesign is needed, sand the top layer off while leaving the base intact, then repaint. This “label sandwich” approach allows for 2-3 redesigns over the canister’s life.
Are there specific typography rules for painted pantry labels to maximize readability?
Yes—follow these rules for functional clarity: minimum 3/8-inch letter height for sans-serif fonts, 1/2-inch for scripts. Increase letter spacing (tracking) by 15% over digital defaults to prevent crowding. Use high-contrast color combinations: dark charcoal on clear glass, ivory on dark ceramic, never mid-tone on mid-tone. Limit text to one or two words maximum—“All-Purpose Flour” becomes simply “FLOUR” with perhaps “AP” underneath in smaller type. All-caps reads better at distance than mixed case, but avoid extreme weight fonts (ultra-light or black) as they disappear or blob. Test by viewing a printed mockup from 6 feet away in dim light—if you hesitate, redesign.
What maintenance is required to keep painted labels looking fresh in a busy kitchen?
Monthly, wipe labels with a damp microfiber cloth to remove cooking grease film before it builds up. Quarterly, apply a rejuvenating coat of food-safe mineral oil on wooden canister lids—this prevents oil from drying and cracking, which can affect label edges. Annually, inspect sealant integrity by dripping water on the label; if it doesn’t bead, apply a thin refresher coat of clear sealant. Never use abrasive cleaners or scrubbing pads. For stubborn stains, baking soda paste applied for 60 seconds is the maximum aggression allowed. Keep a small bottle of touch-up paint stored in the pantry for immediate chip repair—prompt attention prevents moisture infiltration that causes wider failure.
How much should I expect to invest in quality painted canister labeling for a standard pantry?
A typical 20-canister pantry costs $150-$400 depending on approach. DIY using premium materials runs $150-200 (stencils, specialty paints, sealants, tools). Mid-tier professional services charge $8-15 per canister, totaling $160-300 for 20 pieces. Premium ceramic-firing services cost $20-40 per canister, putting a full set at $400-800. Factor in 10-15% extra for practice materials and mistakes. The investment scales linearly—adding 10 more canisters adds roughly 50% to cost due to bulk efficiency. For most homeowners, budgeting $200-250 yields a durable, attractive system that transforms pantry function and kitchen aesthetics for a decade or more.