Opening your pantry to grab cake flour shouldn’t feel like excavating an archaeological site. Yet for passionate bakers, the reality is often a chaotic landscape of mismatched bags, mysterious containers, and that one unmarked canister you’re afraid to open. Painted canister labels offer a permanent, elegant solution that transforms your baking pantry from functional storage into a curated workspace. Unlike temporary stickers or chalkboard tags that smudge at the slightest touch, properly executed painted labels become part of the container itself—weathering years of flour dusting, humid summers, and the occasional sugar spill while maintaining their crisp, professional appearance.
What Are Painted Canister Labels and How Do They Transform Your Baking Pantry?
Top 10 Painted Canister Labels for Pantry
Detailed Product Reviews
1. Kuocodall 288 Pantry Labels for Food Containers, Preprinted Minimalist Waterproof Stickers for Organizing Storage Bins, Jars and Kitchen
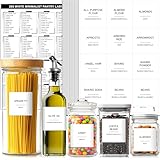
Overview: The Kuocodall 288 Pantry Labels deliver a comprehensive organization solution with their clean, minimalist white design. This extensive set includes 183 preprinted labels for common pantry staples, 9 customizable blanks, and 96 expiration date stickers, providing complete coverage for most household pantries. The 2.5-inch square format fits standard containers, jars, and bins universally.
What Makes It Stand Out: The sheer volume of labels distinguishes this set, covering nearly every conceivable pantry item from pasta to baking powder. True waterproof construction ensures these withstand kitchen humidity and spills while removing cleanly without residue. The included alphabetical catalog eliminates frustrating searches, letting you locate specific labels in seconds. The matte white finish provides excellent contrast on both clear and solid containers.
Value for Money: At $8.99 for 288 pieces, you’re paying approximately 3.1 cents per label—exceptional value for a specialized organization product. Premium competitors often charge twice as much for fewer labels, making this economical for large pantries. The inclusion of expiration date stickers adds functionality typically sold separately.
Strengths and Weaknesses: Strengths include massive quantity, genuine waterproof durability, clean minimalist aesthetic, and practical expiration tracking. The square shape maximizes text space. Weaknesses: only 9 blank labels restrict customization, white backgrounds can show stains over time, and the fixed size may overwhelm tiny spice jars. The minimalist design might feel too clinical for rustic kitchens.
Bottom Line: This set delivers outstanding value for serious organizers. The combination of quantity, quality, and thoughtful design makes it ideal for large families or meticulous planners seeking a modern, uniform pantry aesthetic without premium cost.
2. Kuocodall 288 Pantry Labels for Food Containers, Black Preprinted Minimalist Waterproof Stickers for Organizing Storage Bins, Jars and Kitchen
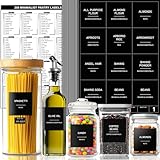
Overview: The Kuocodall Black Pantry Labels provide identical organizational power to their white counterpart with a bold, inverted aesthetic. This 288-piece set features 183 preprinted items, 9 blanks, and 96 expiration date labels, offering complete pantry coverage for those preferring a dramatic, modern appearance that conceals smudges and stains effectively.
What Makes It Stand Out: The black matte background with crisp white text creates striking visual impact while hiding kitchen grime better than lighter alternatives. Like the white version, it includes the invaluable alphabetical catalog and true waterproof durability. The darker design particularly excels on clear glass containers, making contents pop while maintaining sophisticated order.
Value for Money: Priced at $9.99 (about 3.5 cents per label), this commands a $1 premium over the white variant. The marginal price increase is justified for the aesthetic upgrade and practical stain resistance, though functionality remains identical. This positions it as a style-conscious yet still budget-friendly option.
Strengths and Weaknesses: Major strengths include superior stain-hiding capability, extensive preprinted selection, robust waterproof construction, and modern visual appeal. However, white text can be slightly less readable on light-colored containers. The limited 9 blank labels restrict custom additions, and the aesthetic may clash with bright or rustic decors. The black background could absorb heat if near cooking areas.
Bottom Line: Choose these black labels if your kitchen leans modern or industrial. They offer identical functionality to the white version with enhanced stain resistance, making them worth the small premium for style-conscious organizers prioritizing low maintenance.
3. Talented Kitchen Chalkboard Pantry Labels - Water-Resistant Vinyl for Kitchen Organization - Preprinted Food Container Labels - Blank Container Decals for Custom Labeling - Pack of 158, 8.5 x 11 in

Overview: Talented Kitchen’s Chalkboard Pantry Labels deliver classic style at an accessible price point. This 158-piece set features a distinctive white-on-black design reminiscent of traditional chalkboard writing, offering a decorative approach to pantry organization. The 8.5 x 11-inch sheet format allows easy storage and systematic application.
What Makes It Stand Out: The nostalgic chalkboard aesthetic differentiates this from minimalist competitors, adding character to kitchen storage. At $3.99, it’s the most budget-friendly option among major brands. The water-resistant vinyl construction handles typical kitchen moisture adequately, and the inclusion of blank decals allows meaningful customization for unique ingredients.
Value for Money: Costing approximately 2.5 cents per label, this set offers exceptional affordability. While not fully waterproof like premium options, the price makes it accessible for renters or those wanting to test labeling systems before investing heavily. The lower count suits small to medium pantries without overwhelming users.
Strengths and Weaknesses: Strengths include unbeatable price, unique design aesthetic, and adequate quantity for most households. The sheet format is convenient for storage. Weaknesses include water-resistance rather than full waterproofing, limiting suitability for high-humidity areas or freezer use. The design may feel dated in ultra-modern kitchens, and the adhesive may be less robust than premium alternatives. Fewer labels mean less comprehensive coverage.
Bottom Line: An excellent entry-level option for budget-conscious organizers or those seeking rustic charm. Perfect for apartments, first homes, or anyone wanting to organize without significant financial commitment, though serious bakers should consider more durable alternatives.
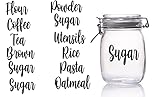
4. Talented Kitchen Pantry Labels for Food Containers - 157-Piece, Black Script Vinyl - Jar & Bin Labels & Food Storage Organization Stickers
Overview: Talented Kitchen’s Black Script Labels elevate pantry organization to a design statement. This 157-piece set features elegant black script lettering on clear backgrounds, creating a floating text effect that lets container contents shine through while maintaining sophisticated order. Multiple sizes accommodate various container proportions.
What Makes It Stand Out: The flowing script font transforms utilitarian labels into decorative elements. Clear backgrounds provide ultimate versatility, working with any container color or material. The set includes numbers, ampersands, and plus signs for creative combinations, allowing custom labels like “Flour & Sugar” or “Pasta #2.” This designer approach suits visible pantries where aesthetics matter.
Value for Money: At $10.90 (roughly 6.9 cents per label), this commands premium pricing reflecting its aesthetic focus. This costs more than double budget options but delivers designer appeal that cheaper alternatives lack. The investment makes sense for open shelving or glass-front cabinetry where labels contribute to decor.
Strengths and Weaknesses: Strengths include high-end script typography, versatile clear design, water-resistant durability, and thoughtful symbol inclusion. Varied sizes ensure proper scaling. Weaknesses: script font may challenge readability for some users or children, the clear background can clash with busy patterns, and the premium price may not suit purely functional organizers. The adhesive could show through on transparent containers, and the lower count may require selective labeling.
Bottom Line: Ideal for design-conscious homeowners who view organization as part of their decor. Worth the investment if you prioritize aesthetics alongside functionality for visible storage, though practical users with closed pantries will find better value elsewhere.
5. Talented Kitchen 135 Pantry Labels for Food Containers, Clear Preprinted Pantry Labels for Organizing Storage Canisters & Jars, White Cursive Numbers Stickers (Water Resistant)

Overview: Talented Kitchen’s 135 Clear Labels offer subtle organization with white cursive text on transparent backgrounds. This set includes 117 common ingredient labels plus 8 numbered stickers, 6 ampersands, and 5 plus signs, providing a versatile solution for those wanting organization without visual clutter or background color constraints.
What Makes It Stand Out: The transparent design creates a custom-printed appearance, making labels appear integrated with containers rather than applied. White cursive adds elegance while remaining more readable than script alternatives. The numbered stickers allow creative inventory systems or bin organization, and the clear format works seamlessly with any decor style from modern to farmhouse.
Value for Money: At $4.04 for 135 labels (approximately 3 cents each), this hits a sweet spot between budget and premium options. You get designer-inspired aesthetics without the designer price tag, making it accessible for most households while delivering elevated style.
Strengths and Weaknesses: Strengths include versatile clear background, elegant cursive font, useful numbered stickers, water-resistant durability, and clean removability. The font sizing (1-1.5 inches) ensures readability. Weaknesses: cursive style may still challenge some readers, label size variation based on text length can create inconsistency on uniform containers, and the 135-count may be insufficient for extensive pantries. The clear material might not stand out on busy backgrounds or cluttered shelves.
Bottom Line: A smart compromise between style and affordability. Perfect for organizers wanting a refined look without premium cost, though those needing maximum legibility for children or seniors, or requiring hundreds of labels, should consider the Kuocodall sets instead.
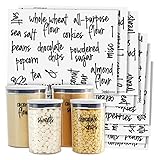
6. Talented Kitchen Clear Vinyl Pantry Labels for Food Containers - Waterproof & Repositionable for Kitchen Jars - Farmhouse Pantry Organization - Preprinted Baking Labels - Pack of 154, Assorted Sizes

Overview: The Talented Kitchen Clear Vinyl Pantry Labels deliver a comprehensive organization solution with 154 repositionable stickers designed for contemporary farmhouse kitchens. These waterproof labels feature bold black text on transparent backing, creating a floating effect that integrates seamlessly with glass jars, plastic containers, and ceramic canisters. The set includes specialized stickers for baking ingredients, pantry staples, and expiration dates.
What Makes It Stand Out: The repositionable adhesive technology distinguishes this product, allowing multiple adjustments without residue or surface damage. The clear vinyl construction ensures universal compatibility with any container color or material, while the farmhouse typography adds rustic elegance. An alphabetized reference list enables quick location of specific labels, and the assorted sizes accommodate various container dimensions from spice jars to large canisters.
Value for Money: At $0.10 per label, this collection offers significant savings over custom-printed alternatives. The waterproof, durable construction ensures longevity, while repositionability extends usability across multiple reorganizations, maximizing return on investment.
Strengths and Weaknesses: Strengths include exceptional repositionability, comprehensive 154-label assortment, waterproof durability, and versatile farmhouse aesthetic. The clear design maintains container visibility. Weaknesses involve potential visibility issues on light-colored contents, possible adhesive fatigue after extensive repositioning, and the need for careful planning to optimize assorted sizes.
Bottom Line: Ideal for farmhouse-style enthusiasts seeking flexible, comprehensive pantry organization. The repositionable feature and extensive variety make it a worthwhile investment for evolving storage needs.
7. Talented Kitchen Preprinted Chalkboard Pantry Labels - Waterproof Vinyl Storage Container Stickers - Kitchen Bin Organization - Easy-Read Sugar & Flour Labels for Pantry Containers - 128-Pack, X-Large

Overview: Talented Kitchen’s Preprinted Chalkboard Pantry Labels bring vintage-inspired organization to modern kitchens with 128 waterproof vinyl stickers. The X-Large format and elegant cursive font create a sophisticated labeling system for pantry containers, storage bins, and beyond. This set transforms basic storage into a curated, cohesive display.
What Makes It Stand Out: The chalkboard aesthetic delivers instant rustic charm without the mess of real chalk. These X-Large labels maximize readability from a distance, while the removable adhesive enables application throughout the home. The elegant cursive font elevates ordinary storage into a curated display, making organization visually appealing. Multi-room versatility extends utility beyond kitchen spaces.
Value for Money: At $5.73 total, this set offers an accessible entry point into coordinated labeling. Though $0.72 per label seems higher than some competitors, the 128-count provides substantial coverage for most pantries at a low overall investment, making it budget-friendly.
Strengths and Weaknesses: Strengths include distinctive chalkboard style, waterproof durability, versatile multi-room use, and strong visual impact. The preprinted design saves time. Weaknesses: cursive font may challenge readability for some users, X-Large size could overwhelm smaller containers, and the dark background requires light-colored surfaces for optimal contrast. Limited to 128 specific terms.
Bottom Line: A stylish, budget-friendly option for those prioritizing aesthetics. Best suited for larger containers and users who appreciate vintage charm. Consider your container sizes and font preferences before purchasing.
8. Thistle Brook Cottage Flour Coffee Sugar Tea Decal Stickers Labeling for Jars Kitchen Organization 10 Pack Canisters Pantry Label
Overview: Thistle Brook Cottage delivers artisanal-quality pantry labeling with this 10-pack of handmade decal stickers. Crafted in the USA from premium Oracal vinyl, these labels feature a clean, no-clear-edge design for flour, coffee, sugar, tea, and other baking essentials. The size range from 1.7" to 2.3" high accommodates various container dimensions.
What Makes It Stand Out: Each label is meticulously handmade, ensuring quality control absent in mass-produced alternatives. The absence of a clear border creates a professional, painted-on appearance that elevates kitchen aesthetics. Using industry-standard Oracal vinyl guarantees durability and colorfastness. The included application instructions facilitate bubble-free installation.
Value for Money: At $1.00 per label, this represents a premium pricing tier. However, the handmade quality, American manufacturing, and superior materials justify the cost for discerning buyers prioritizing craftsmanship over quantity. It’s an investment in aesthetic precision.
Strengths and Weaknesses: Strengths include exceptional USA-made quality, premium Oracal vinyl construction, seamless no-edge design, and precise sizing for standard canisters. Weaknesses: only 10 labels limits comprehensive organization, specific term selection may not match all needs, and premium pricing restricts value. The small pack size requires multiple purchases for full pantry coverage.
Bottom Line: Perfect for selective organization or as a starter set for baking essentials. Ideal for those valuing American craftsmanship and premium materials. Consider purchasing multiple packs for complete pantry labeling, but expect higher total investment.
9. Kitchen Pantry Organization Label Decal Stickers for Jars, Containers, and Canisters Flour, Coffee, Sugar, Tea 40 Pack

Overview: These Kitchen Pantry Organization Labels deliver premium durability with 40 waterproof decal stickers designed for jars, containers, and canisters. Manufactured in the USA from top-tier sign vinyl, these labels withstand indoor and outdoor conditions while maintaining vibrant colors. The set covers essential pantry categories like flour, coffee, sugar, and tea.
What Makes It Stand Out: The commercial-grade sign vinyl construction sets these apart from standard pantry labels, offering exceptional fade-resistance and weatherproofing. This indoor/outdoor versatility extends utility beyond kitchen use to garage storage, outdoor kitchens, or patio organization. The strong adhesive ensures permanent, reliable application on various clean surfaces.
Value for Money: At $12.99 for 40 labels ($0.32 each), pricing sits in the mid-range. The premium materials and USA manufacturing justify the cost, though the smaller quantity limits comprehensive pantry coverage compared to larger sets. It’s a quality-over-quantity proposition.
Strengths and Weaknesses: Strengths include superior durability, waterproof and fade-resistant properties, strong adhesive, and American craftsmanship. The peel-and-stick application is straightforward. Weaknesses: limited 40-label count restricts full pantry organization, permanent adhesive lacks repositionability, and the specific term selection may not cover all needs. Higher cost per label than bulk options.
Bottom Line: Excellent choice for high-traffic or outdoor-adjacent storage areas where durability is paramount. Best for supplementing existing systems or organizing specific categories. The premium construction justifies the investment for demanding environments.
10. Hebayy 308 Pantry Food Labels, 280 Preprinted Flour Pasta Lentil Grain Condiment Oil Stickers, 28 Blank Ones, Waterproof Oil&Tear Resistant, No Residue for Kitchen Containers Jars(White on Black)

Overview: Hebayy’s 308 Pantry Food Labels provide a comprehensive organization system with 280 preprinted stickers plus 28 customizable blanks. The white-on-black design creates high contrast for easy reading, while waterproof, oil-resistant PVC material ensures durability. Most labels measure 3"x1.4" for optimal visibility.
What Makes It Stand Out: The massive quantity and included blanks offer unmatched customization potential. The alphabetical index card streamlines label location, saving time during application. Unique shape designs add visual interest, while the residue-free removal allows container repurposing. Dishwasher and fridge safety extend practical utility across all kitchen environments.
Value for Money: At $0.03 per label, this set delivers extraordinary value. The combination of preprinted convenience and DIY flexibility, plus premium materials at this price point, makes it arguably the best budget-conscious comprehensive solution available. The 308-count covers entire pantries in one purchase.
Strengths and Weaknesses: Strengths include exceptional quantity (308 total), 28 blank labels for customization, oil and tear resistance, easy-to-read white-on-black design, residue-free removal, and dishwasher safety. The index card is highly practical. Weaknesses: all-caps font may feel aggressive to some, black background limits visibility on dark containers, and the large quantity might be excessive for smaller pantries.
Bottom Line: The ultimate value choice for complete pantry overhauls. Perfect for organizers wanting both preprinted convenience and customization options. Unbeatable cost-per-label ratio makes this ideal for large families or extensive storage collections.
Painted canister labels aren’t merely decorative accents; they’re a fusion of art and organization that permanently bonds identification directly to your storage vessels. Think of them as tattoos for your containers—designed to last the lifetime of the piece while expressing your personal aesthetic. This approach eliminates the cyclical frustration of peeling stickers and fading tags, creating a cohesive visual system that makes ingredient retrieval instantaneous.
The Anatomy of a Painted Canister Label
A durable painted label comprises three critical layers: the substrate (your canister’s surface), the bonding primer or adhesion promoter, and the pigmented coating itself. Each layer must be chemically compatible with the others. For glass canisters, this means using specialized glass-bonding primers that create microscopic etchings for paint to grip. Ceramic containers require different preparatory compounds, while metal tins need rust-inhibiting base coats. The topcoat—whether enamel, acrylic, or urethane—determines scratch resistance and cleanability.
How Painted Labels Differ from Other Labeling Methods
Unlike vinyl decals that rely on adhesive layers vulnerable to temperature fluctuations, or chalkboard paint that remains porous and stain-prone, true painted labels undergo a chemical curing process that makes them part of the container’s surface. Waterproof labels may resist moisture but eventually lift at edges; painted labels have no edges to lift. Removable labels serve renters well, but baking enthusiasts building a permanent collection need solutions that survive dishwasher cycles and decades of use.
Why Invest in Painted Canister Labels for Your Baking Setup?
The investment extends beyond aesthetics into functional psychology and long-term value. A properly labeled baking pantry reduces cognitive load during complex recipes, prevents costly ingredient mix-ups (baking powder versus baking soda disasters), and creates a professional-grade environment that elevates your entire baking practice.
Aesthetic Cohesion and Kitchen Design
Painted labels allow complete customization of typography, color palette, and iconography to match your kitchen’s design language. Whether your space embodies modern farmhouse charm with serif scripts and muted tones, or minimalist sophistication with sans-serif fonts and monochrome schemes, painted labels integrate seamlessly. This cohesion transforms disparate containers—thrifted glass jars, inherited ceramic crocks, commercial stainless steel bins—into a unified collection that looks intentionally designed rather than haphazardly assembled.
Long-Term Durability in High-Traffic Pantries
Baking environments subject labels to unique stresses: fine powders infiltrate tiny crevices, oily fingerprints require frequent cleaning, and temperature swings from oven heat to cool storage. High-quality painted labels, when properly cured, withstand scrubbing with mild abrasives, resist staining from turmeric or cocoa, and maintain legibility despite UV exposure from nearby windows. This durability translates to a one-time effort rather than an annual re-labeling chore.
Enhanced Functionality for Serious Bakers
Professional bakers understand that mise en place begins with organization. Painted labels can incorporate more than just ingredient names—they can include conversion reminders (“1 cup = 120g”), origin notes (“Italian ‘00’ Flour”), or allergen warnings (“Contains Almonds”). This transforms passive storage into an active reference system, reducing recipe interruptions and measurement errors.
Critical Features to Evaluate When Choosing Painted Canister Labels
Selecting the right painted label system requires evaluating technical specifications that most craft blogs gloss over. Your pantry’s microclimate, container materials, and usage patterns dictate which features deserve priority.
Material Substrates: What Surface Are You Actually Painting?
Glass offers non-porous smoothness but demands silane-based coupling agents for paint adhesion. Ceramic’s slight porosity requires filler primers to prevent paint absorption and uneven finish. Metal tins need etching primers to prevent oxidation from creeping beneath the label. Even “glass” canisters vary—soda-lime glass (common in jars) differs chemically from borosilicate, affecting primer choice. Always test your bonding system on a jar’s bottom first.
Paint Type and Formulation: Decoding Durability
Acrylic enamel paints provide excellent color retention and food safety once fully cured, but require 21-30 days to reach maximum hardness. Urethane-modified alkyds offer faster curing and superior flexibility, reducing cracking on thin metal tins that expand and contract with temperature. Two-part epoxy paints deliver museum-quality durability but demand precise mixing and ventilation. For pantry use, prioritize paints explicitly rated “non-toxic when cured” rather than simply “non-toxic,” as the curing process eliminates volatile compounds.
Adhesion Science: Why Some Labels Last Decades While Others Peel in Months
Adhesion failure follows predictable patterns. Cohesive failure occurs when paint lifts from primer; adhesive failure when primer lifts from substrate. The weakest link is usually surface contamination—fingerprints leave oils that prevent bonding, while residual manufacturing lubricants on new canisters create invisible barriers. Proper cleaning with degreasing agents like isopropyl alcohol (not soap, which leaves films) is non-negotiable. For ultimate durability, consider plasma treatment for glass surfaces, which creates molecular-level roughness without visible texture.
Design Flexibility: Customization vs. Pre-Made Options
Hand-painted labels offer unlimited creativity but require steady hands and practice with liner brushes. Stencil systems provide consistency but limit font choices and intricate details. Pre-cut vinyl mask stencils, when used with etching cream before painting, create recessed labels that are virtually indestructible. For those seeking professional results without artistic skill, custom laser-cut adhesive stencils from design files allow replication of complex logos or handwriting styles with precision.
Size and Scale Considerations for Various Canister Types
Label dimensions should correlate with container volume and viewing distance. A 4-liter flour canister needs a 3-inch high label visible from across the kitchen, while spice jars require 0.75-inch labels readable at arm’s length. Consider the “thumb test”: labels should be legible when the canister is held naturally by its body, not requiring rotation or close inspection. For deep pantry shelves, orient labels with a slight upward tilt to catch light and remain visible from below.
Finish and Texture: Matte, Satin, or Gloss?
Matte finishes hide minor application imperfections and reduce glare under bright LED pantry lights, but absorb oils and stains more readily. Gloss finishes create a wipeable, non-porous surface that repels flour dust but highlight every brushstroke and require meticulous surface prep. Satin offers the best compromise—cleanable enough for pantry use while forgiving of minor texture variations. For ultimate practicality, consider a matte base with a gloss overcoat on just the lettering, creating subtle dimension that catches light without full reflectivity.
Common Pitfalls That Undermine Painted Label Projects
Even seasoned DIYers encounter failures when painting canister labels, usually from rushing preparation or mismatching materials. Understanding these failure modes prevents wasted effort and ruined containers.
Skipping Surface Preparation: The Cardinal Sin
New canisters ship with mold-release agents invisible to the eye but lethal to paint adhesion. Vintage finds harbor decades of absorbed kitchen oils. The preparation sequence matters: wash with hot water and trisodium phosphate (TSP) substitute to cut grease, rinse thoroughly, dry completely, then wipe with lint-free cloths soaked in 91% isopropyl alcohol just before painting. Any delay between cleaning and painting allows airborne oils to resettle. In humid climates, consider a final wipe with acetone, which evaporates instantly and leaves no residue.
Mismatching Paint Chemistry to Container Material
Applying oil-based paint directly to polyethylene plastic containers results in paint that never dries, remaining tacky indefinitely. Using water-based acrylics on unprimed metal leads to rust bleeding through within weeks. The solution is a compatibility chart: oil-based primers work universally but take days to cure; shellac-based primers adhere to anything but yellow over time; plastic-specific primers use adhesion promoters that chemically weld to polymer surfaces. Always verify the paint system’s technical data sheet for substrate compatibility, not just the front label marketing claims.
Underestimating Environmental Factors: Humidity, Heat, and Light
Curing paint in high humidity traps water molecules within the film, causing clouding and softness that never resolves. Oven heat can cause outgassing, where trapped solvents create bubbles beneath the surface. UV exposure through pantry windows degrades pigments, turning rich burgundy labels pink within months. The ideal curing environment maintains 45-55% relative humidity, temperatures between 65-75°F, and darkness for the first 48 hours. For pantries with window exposure, specify UV-stabilized pigments or apply a clear UV-blocking topcoat.
Overlooking Curing Time and Process
“Dry to the touch” means nothing for durability. Most paints achieve 90% hardness in 7 days but require 30 days for full chemical cross-linking. Prematurely stacking canisters or washing them traps moisture and causes imprinting—where the label texture transfers to the contacting surface. Mark your calendar and resist the urge to use labeled canisters for at least two weeks. For immediate use, apply labels only to canister lids, which can cure separately while the jars remain in service.
Proven Strategies for Successful Label Application and Maintenance
Achieving professional results requires treating the process as a multi-day project with specific protocols, not a weekend craft. These strategies separate heirloom-quality work from Pinterest fails.
Step-by-Step Surface Preparation Protocol
Begin by creating a contamination-free workspace: no cooking for 24 hours prior, run an air purifier to capture dust, and wear nitrile gloves throughout. For glass, follow the cleaning sequence above, then flame-polish the label area with a butane torch (briefly, without overheating) to burn off residual organics. For ceramics, lightly sand with 400-grit wet/dry paper to create microscopic tooth. For metal, treat with phosphoric acid solution to etch and inhibit rust simultaneously. Prime within 30 minutes of preparation while the surface energy remains high.
Application Techniques for Flawless Results
Use the “tack coat” method: apply an ultra-thin mist coat that dries in 5 minutes, creating a grippy surface for subsequent full coats. For lettering, load a liner brush with paint, then offload most onto paper towel—dry-brushing prevents bleeding under stencil edges. Apply paint in multiple thin passes rather than one heavy coat, allowing 10 minutes flash time between layers. For large solid areas, use a foam roller with 1/8" nap to eliminate texture. Keep a lint roller handy to remove airborne dust between coats.
Curing and Setting: The Waiting Game That Pays Off
After final application, transfer canisters to a dust-free cabinet for initial curing. Place them on wire racks to allow air circulation underneath. Resist covering with cloth, which traps fibers. At day 7, perform the “fingernail test” in an inconspicuous area—if you can’t dent the paint, it’s ready for light use. At day 30, labels achieve maximum hardness equivalent to factory finishes. During curing, handle only with clean cotton gloves to prevent skin oils from interfering with the final cross-linking.
Cleaning and Upkeeping Without Damaging Your Labels
Use only pH-neutral cleaners like diluted dish soap; avoid citrus-based degreasers that soften paint films. Microfiber cloths are ideal—never abrasive scrubbers. For flour dust, a soft pastry brush removes particles without contact. If a label becomes stained, make a paste of baking soda and water, apply for 30 seconds, then rinse gently. Never soak labeled canisters; clean lids and jars separately. For metal tins showing rust at label edges, touch up immediately with artist’s brushes to prevent underfilm corrosion from spreading.
Frequently Asked Questions
1. Can I paint labels on plastic canisters, or will the paint eventually chip off?
Yes, but success depends on using plastic-specific adhesion promoters that chemically bond to polymer surfaces. Standard primers fail because they can’t penetrate the non-porous structure. Look for products labeled “for use on polypropylene/polyethylene” containing chlorinated polyolefin. These create a molecular anchor that prevents chipping even when the plastic flexes. Always test flexibility by bending a painted sample—if you see white stress marks, the system lacks proper elasticity.
2. What’s the difference between hand-painted labels and using a stencil with paint?
Hand-painted labels offer unlimited artistic expression but require significant skill to achieve consistent letterforms and spacing. Stencil systems provide uniformity and speed, especially for multiple canisters, but limit design complexity. The hybrid approach—using laser-cut adhesive stencils based on custom typography—delivers professional results without freehand expertise. Stencils also prevent paint bleed, creating sharper edges than most painters can achieve manually.
3. How do I ensure my painted labels are food-safe for pantry use?
Food safety concerns focus on two areas: direct contact and off-gassing. For direct contact (labels inside canisters), use only FDA-compliant epoxy coatings rated for food contact surfaces. For exterior labels, any paint labeled “non-toxic when fully cured” is safe after the complete curing period. The key is full cure—volatile organic compounds (VOCs) evaporate during this process. Test by smelling the cured label; any odor indicates incomplete curing. When in doubt, apply a clear food-safe resin topcoat for absolute barrier protection.
4. Why do my painted labels feel tacky even after a week of drying?
Tackiness indicates one of three issues: insufficient air circulation during curing, incompatible paint chemistry, or application thickness. Paint cures from the outside in; if the surface skin traps solvents underneath, they can’t evaporate. Improve airflow with a fan (not blowing directly on labels) and reduce humidity with a dehumidifier. If using oil-based paint on plastic, tackiness may be permanent—strip and restart with appropriate plastic primer. For thick applications, wait longer; mass slows evaporation.
5. Can I use regular acrylic craft paint for canister labels, or do I need specialty products?
Craft acrylics work for decorative purposes but lack the hardness and chemical resistance for pantry duty. They’re formulated for low-contact items like picture frames. For canisters, upgrade to artist-grade acrylics with lightfastness ratings (ASTM I or II) and add a hardening medium. Better yet, use single-stage enamel paints designed for model cars—these cure rock-hard and resist handling. The cost difference is minimal compared to the time investment, and durability increases tenfold.
6. How do I remove old painted labels if I want to repurpose a canister?
Removal difficulty correlates with preparation quality—well-bonded labels are nearly permanent. For poorly adhered paint, heat guns soften the film for scraping. For properly executed labels, chemical strippers containing methylene chloride work but require extreme ventilation and protective gear. A safer method involves sanding with progressively finer grits (120 to 600) followed by polishing compounds to restore clarity to glass. For ceramic, consider painting over with a bonding primer and new design rather than complete removal.
7. What’s the best way to label canisters with both metric and imperial measurements?
Design your label layout with primary ingredient name in large type (24-36pt), then add measurement conversions in smaller type (10-12pt) beneath. Use icons: a scale silhouette for grams, a measuring cup for cups. Arrange conversions in a column format for quick scanning. For frequently used ratios, consider a separate small label on the canister’s side or lid interior. Painted labels allow permanent, precise placement that vinyl decals can’t match for multi-line text.
8. Do painted labels hold up in freezer storage for baking ingredients like nuts or butter?
Thermal cycling tests show that properly cured enamel labels survive freezer-to-room-temperature transitions better than vinyl, which becomes brittle and cracks. However, the substrate matters more—glass handles thermal shock poorly and may crack before the label fails. For freezer use, apply labels only to flexible plastic containers designed for low temperatures, and use urethane-modified paints that remain pliable at -20°F. Avoid rigid stencils that create stress concentration points; instead, use freehand or flexible vinyl mask stencils.
9. How can I match painted labels to my existing kitchen color scheme?
Paint matching offers advantages over pre-made labels. Take a cabinet door or paint swatch to an art supply store and use their pigment mixing service to create custom colors. For existing painted surfaces, use a color-matching app like Benjamin Moore’s Color Capture, then convert the digital match to paint formulas using artist color theory. Test the mixed color on a hidden jar area and view it under your pantry’s specific lighting—LED, fluorescent, and natural light each shift color perception dramatically.
10. Is it better to paint labels before or after filling canisters with baking ingredients?
Always label empty, clean canisters. Filled containers risk ingredient contamination from paint fumes (during curing) and make handling awkward during application. Additionally, any spillage during filling can stain uncured paint. The optimal sequence: clean canisters, paint and cure labels for 30 days, then fill. For canisters already in use, transfer contents to temporary storage, clean thoroughly to remove oil residues from contents, then proceed with labeling. This prevents the “chicken and egg” problem of trying to protect fresh paint while pouring flour.