Grating shouldn’t feel like a culinary combat sport, especially when you’re just starting out. Remember that first attempt? The cheese stubbornly refusing to shred, the inevitable knuckle scrape that made you question your life choices, or the mountain of cleanup that left you wondering if pre-shredded was really so bad? Many beginners abandon the hand grater altogether, convinced it’s an archaic tool designed solely to inflict minor kitchen trauma. But here’s the secret the pros know: the right hand grater, chosen with your specific needs in mind, transforms this frustrating chore into a satisfying, almost meditative part of cooking. It unlocks vibrant flavors and textures pre-packaged versions simply can’t replicate, from the delicate snow of fresh Parmesan over pasta to the bright zest that elevates a simple salad.
The key isn’t just having a grater; it’s having the right grater for you as a beginner. Forget overwhelming lists of top picks – the “best” grater is deeply personal. It depends entirely on what you cook most often, your comfort level with kitchen tools, the space you have, and even how your hands feel after ten minutes of use. This guide cuts through the noise, focusing purely on the features and considerations that matter most when you’re building your foundational kitchen toolkit. We’ll explore the different grating styles, decode material choices, prioritize safety essentials, and provide practical tips to help you find a tool that feels intuitive, effective, and encourages you to keep grating, not dread it. Let’s turn that kitchen anxiety into confident, flavorful results.
Top 10 Hand Graters for Beginners
Detailed Product Reviews
1. Anddgrous Upgraded Lemon Zester & Cheese Grater, Food Grade Stainless Steel None-Slip Hand Fine Grater for Garlic, Ginger, and Chocolate, Durable and Easy-To-Clean(Dishwasher Safe)

Overview: This compact handheld grater excels as a versatile microplane for fine tasks. Crafted from food-grade stainless steel with a non-slip rubber handle, it tackles cheese, citrus zest, garlic, ginger, and chocolate with precision. Its dishwasher-safe design and included brush simplify cleanup. What Makes It Stand Out: Its exceptional multi-functionality stands out—unlike dedicated cheese graters, it handles delicate zesting and hard ingredients equally well. The ergonomic, blockage-resistant blade and wall-hangable design (via a handle hole) enhance practicality for small kitchens. Value for Money: Priced affordably under $15, it outperforms single-use graters. While lacking coarse options, its durability and included protective cover justify the cost for those needing finesse over volume, especially compared to pricier multi-blade systems. Strengths and Weaknesses: Strengths: Effortless fine grating, ultra-portable, easy dishwasher-safe cleanup, comfortable grip. Weaknesses: Unsuitable for large cheese blocks or coarse shredding, limited to fine textures, smaller capacity than rotary models. Bottom Line: An ideal budget-friendly tool for zesting and fine grating tasks; skip if you regularly shred large cheese quantities, but perfect for pasta garnishes or citrus accents.
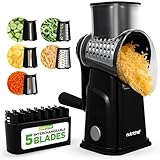
2. Zulay Kitchen Rotary Cheese Grater 5 Blade Cheese Shredder - Manual Hand Crank Cheese Grater With Reinforced Suction & 5 Interchangeable Drums - Easy to Use, Vegetable Chopper Round Mandoline Slicer

Overview: A robust manual rotary grater featuring five interchangeable stainless-steel drums for slicing, shredding, and julienning. Its suction base and included food pusher prioritize safety and stability during operation, handling cheese, vegetables, nuts, and chocolate with efficiency. What Makes It Stand Out: The five-blade versatility is unmatched—covering fine to coarse shredding, wavy slicing, and julienne cuts. The wide hopper, powerful suction base, and transparent anti-clog barrel significantly enhance usability and safety over basic models. Value for Money: Justifying its mid-range price, it replaces multiple gadgets (mandoline, standalone grater). While pricier than 3-blade competitors, the extra drums and superior build offer long-term savings for frequent entertainers or large families. Strengths and Weaknesses: Strengths: Exceptional versatility, 18x faster grating, secure suction, easy dishwasher-safe cleanup, left/right-handed friendly. Weaknesses: Bulky storage, assembly required for blade changes, suction less effective on textured surfaces. Bottom Line: A top-tier investment for serious home chefs seeking speed, safety, and diverse prep options; highly recommended despite its footprint for those prioritizing kitchen efficiency.
3. Ourokhome Rotary Cheese Grater Hand Crank, Kitchen Shredder Speed Mandolin Slicer Nuts Grinder with Handle and Drum Blades for Cheese, Vegetable, Walnuts, Chocolate, Potato, Carrot, 3 Blades, White

Overview: This streamlined 3-blade rotary grater emphasizes simplicity and space efficiency. Designed for effortless cheese and vegetable preparation, it features an ergonomic handle, non-slip base, and built-in safety to prevent blade contact during use. What Makes It Stand Out: Its standout feature is space optimization—replacing three separate tools (slicer, coarse/fine shredder) in one compact unit. The focus on safety (no direct blade handling) and gift-ready presentation (white finish, included accessories) broadens its appeal. Value for Money: Priced competitively, it delivers excellent value by consolidating functions. Though it lacks the blade variety of premium models, its reliability for core tasks (cheese, carrots, nuts) makes it a smart buy for minimalist kitchens or gift-giving. Strengths and Weaknesses: Strengths: Space-saving 3-in-1 design, intuitive safe operation, quiet manual use, ideal gifting potential. Weaknesses: Only three blades (less versatile than 5-blade models), suction base weaker than competitors, limited for very hard cheeses. Bottom Line: A practical, safety-focused choice for everyday grating needs; best for casual cooks or as a thoughtful gift, though enthusiasts may desire more blade options.
4. EDEFISY Cheese Grater Hand Crank Rotary Vegetables Shredder with Handle, 3-in-1 Graters with Interchangeable Blades and Non-slip Base Multifunctional Slicer for Kitchen

Overview: A sturdy 3-blade rotary grater emphasizing speed and stability. Its reinforced suction base and BPA-free construction handle cheese, vegetables, and nuts efficiently, promising 18x faster results than manual graters with smooth, crank-operated action. What Makes It Stand Out: The exceptional suction base provides unmatched stability on smooth surfaces, preventing slips during use. Combined with the 18x speed claim and fully detachable, dishwasher-safe components, it prioritizes safety and hassle-free cleanup. Value for Money: Offers strong value with durable 430 stainless steel blades and BPA-free plastic at a moderate price. It undercuts 5-blade models while matching core performance, making it a cost-effective upgrade from handheld graters for frequent users. Strengths and Weaknesses: Strengths: Rock-solid suction base, quick 3-blade swaps, easy dishwasher-safe cleaning, compact storage. Weaknesses: Only three blades (no julienne), suction ineffective on uneven counters, plastic body feels less premium than metal competitors. Bottom Line: Highly recommended for safety-conscious users needing reliable, fast grating; a balanced pick between affordability and performance, though blade variety is limited.
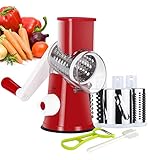
5. Cambom Rotary Cheese Grater Hand Crank Cheese Shredder for Fresh Cheese, Vegetable, Nuts,Non-slip Suction Base, Free Cleaning Brush Three Blades, Black

Overview: A no-frills rotary grater featuring three essential blades (coarse, fine, slice) and an aggressive suction base. Designed for fresh cheese, vegetables, nuts, and chocolate, it emphasizes speed (“30 seconds per pound”) and straightforward operation without electricity. What Makes It Stand Out: Its standout trait is the powerful suction base, securely gripping marble or glass surfaces to eliminate slippage. The focus on moderately firm cheeses (like Mozzarella or Cheddar) and included cleaning brush enhance practicality for daily use. Value for Money: Positioned as an entry-level rotary option, it delivers core functionality at an accessible price. While less versatile than 5-blade models, its robust 430 stainless steel blades and suction performance offer solid ROI for budget-focused buyers. Strengths and Weaknesses: Strengths: Exceptional suction grip, fast grating for firm cheeses, compact storage, BPA-free safety. Weaknesses: Limited to three blades, less effective on very hard cheeses (e.g., aged Parmesan), suction fails on textured surfaces. Bottom Line: A dependable, budget-friendly rotary grater for secure, quick prep; ideal for beginners or those prioritizing stability over versatility, though serious chefs may want more blade choices.
6. Cuisinart Curve Handle Hand Grater,Black/Silver

Overview: The Cuisinart Curve Handle Hand Grater is a no-frills, manual grater designed for basic kitchen tasks. Its simple construction focuses on essential functionality for grating cheese, vegetables, or citrus zest without mechanical complexity.
What Makes It Stand Out: The ergonomic soft-grip handle and flat-bottomed design prevent rolling during use, enhancing safety and stability. Heat-resistant nylon heads (up to 400°F) and nonstick-cookware compatibility offer versatility, while dishwasher-safe parts simplify cleanup.
Value for Money: Priced affordably, it’s ideal for infrequent users or those avoiding electric gadgets. Though less versatile than rotary models, it outperforms cheaper roll-prone graters in stability and durability, justifying its modest cost for straightforward tasks.
Strengths and Weaknesses: Strengths: Secure countertop placement, comfortable grip, gentle on nonstick pans, easy maintenance. Weaknesses: Limited to one grating style per tool (sold separately for multi-functionality), slower for large batches, no container for collected shreds.
Bottom Line: A reliable, budget-friendly option for occasional grating needs, prioritizing safety and simplicity over speed or versatility. Best for users seeking a dependable basic grater without bells and whistles.
7. Hand Crank Cheese Grater, BPA-Free,Rotary Slicer with 3 Replaceable Blades, Non slip Suction Base,Round Mandoline Slicer & Food Chopper for Kitchen

Overview: This 3-in-1 rotary grater combines speed and safety for cheese, vegetables, and more. Its hand-crank mechanism and suction base aim to streamline prep work while minimizing effort and mess.
What Makes It Stand Out: The fast 3-blade system (coarse, fine, slice) processes 1 lb of cheese in under 30 seconds. The strong suction base prevents slipping, and BPA-free materials with rust-resistant blades ensure safety across diverse foods like chocolate or nuts.
Value for Money: Competitively priced for its multi-functionality, it replaces several gadgets. While pricier than basic graters, its speed, durability, and dishwasher-safe design offer long-term savings for frequent cooks compared to single-use tools.
Strengths and Weaknesses: Strengths: Exceptional speed, rock-solid stability, versatile for multiple foods, effortless cleanup. Weaknesses: Suction base requires perfectly smooth surfaces, blades may dull faster with hard cheeses, storage of loose blades can be cumbersome.
Bottom Line: An excellent investment for busy kitchens, delivering restaurant-style efficiency safely and quickly. Highly recommended for those prioritizing speed and versatility in meal prep.
8. UHIYEE Patented Rotary Parmesan Cheese Grater, Hand Crank Cheese Shredder with Fine & Coarse Drums, Restaurant Quality, White, Stainless Steel & ABS, Dishwasher Safe

Overview: The UHIYEE rotary grater targets cheese enthusiasts with its focus on Parmesan and hard cheeses, promising professional results in home kitchens through thoughtful engineering.
What Makes It Stand Out: Inspired by Olive Garden’s grater, it features effortless cranking and two precision drums (fine/coarse) for tailored textures—from fluffy Parmesan to chunky Mozzarella. Its BPA-free build and removable drums emphasize durability and ease of use.
Value for Money: Priced mid-range, it excels for cheese-centric households. While lacking vegetable versatility, its specialized performance justifies the cost over generic graters, especially given its restaurant-grade reliability and included drum variety.
Strengths and Weaknesses: Strengths: Superior cheese grating with minimal effort, consistent texture control, sturdy construction, simple disassembly for cleaning. Weaknesses: Limited to cheese/nuts/chocolate (not ideal for veggies), suction base weaker than competitors, no storage container.
Bottom Line: A top choice for cheese lovers seeking authentic, effortless shredding. Prioritize this if Parmesan perfection matters more than multi-ingredient flexibility.
9. NutriChef 5 in 1 Cheese Grater & Shredder | 5 Different Blades for Thin, Thick, Julienne Strips, Wavy, & Straight Strips | Includes Hand Crank, Strong Suction Base & Storage Container | Black
Overview: The NutriChef 5-in-1 grater maximizes versatility with five blades, a suction base, and integrated storage, aiming to be a comprehensive solution for diverse kitchen prep tasks.
What Makes It Stand Out: Its five interchangeable blades (thin, thick, wavy, julienne, straight) enable precise cuts for cheeses, veggies, or fruits. The ergonomic handle reduces strain, while the strong suction base and included storage container keep counters clean and organized.
Value for Money: Slightly higher priced but justified by its unmatched blade variety and space-saving design. It eliminates the need for multiple gadgets, offering better long-term value than single-function graters despite a steeper initial outlay.
Strengths and Weaknesses: Strengths: Exceptional versatility with 5 blades, stable suction base, comfortable grip, storage container minimizes mess. Weaknesses: Blade storage isn’t integrated (risk of misplacement), container size may be small for large batches, assembly slightly fiddly.
Bottom Line: The ultimate all-in-one grater for serious home cooks. If you demand precision slicing/shredding for varied ingredients, this justifies its price with unmatched utility.
10. Ourokhome Rotary Cheese Grater Hand Crank, Kitchen Shredder Speed Mandolin Slicer Nut Grinder with Handle and Drum Blades for Cheese, Vegetable, Walnut, Chocolate, Potato, Carrot, 3 Blades, Red
Overview: This vibrant rotary grater emphasizes safety and broad functionality, targeting users who want a single tool for cheese, vegetables, nuts, and more without electricity.
What Makes It Stand Out: Featuring three blades for slicing, coarse, and fine shredding, it highlights built-in blade safety (no direct contact) and handles diverse foods like broccoli or walnuts. Its gift-ready appeal and space-saving “3-in-1” design cater to modern kitchens.
Value for Money: Mid-priced with strong utility. Its wide food compatibility and safety features offer good value, though blade quality may not match premium brands. Ideal for gifting or beginners seeking an affordable multi-tasker.
Strengths and Weaknesses: Strengths: Safe operation, versatile for unexpected items (e.g., cauliflower rice), compact, excellent gift potential. Weaknesses: Suction base less reliable on textured counters, blades may clog with wet foods, plastic feels less durable than metal competitors.
Bottom Line: A practical, safe choice for casual users or as a thoughtful gift. Best for those needing a cheerful, no-fuss grater for everyday tasks rather than heavy-duty use.
Understanding Hand Grater Types for Beginners
Choosing the right style is the single biggest factor in your beginner grating success. Each type has distinct strengths and ideal uses, and picking one that matches your common tasks prevents frustration.
Box Graters: The Versatile Workhorse
Box graters offer multiple grating surfaces in one compact unit, usually including coarse, fine, and often a zesting or slicing side. This versatility is ideal for beginners tackling various tasks like shredding cheese for tacos, grating potatoes for hash browns, or zesting citrus. Their stable base sits firmly on countertops, reducing slippage. However, they can be bulky to store, and cleaning the interior crevices requires attention. Look for models with easy-access flaps or removable parts if storage is tight.
Flat Plane Graters: Simple and Space-Saving
These single-surface graters lie flat against your palm or a bowl. They excel at fine zesting (citrus, nutmeg) and small-batch tasks like grating garlic or a small amount of hard cheese directly into a dish. Their slim profile makes them incredibly easy to store in drawers. The main drawback for beginners is the learning curve for maintaining consistent pressure and avoiding knuckle contact; they require a specific hand position. Opt for models with a comfortable, non-slip handle or base for better control.
Rotary Graters: Effortless and Safe
Rotary graters feature a drum that spins as you crank a handle. Food is inserted into a chute, and the grating action happens safely inside the drum. This design virtually eliminates the risk of knuckle scrapes, making it exceptionally beginner-friendly and great for those with limited hand strength or dexterity. They’re fantastic for hard cheeses, nuts, and chocolate. Downsides include slower speed for larger quantities and potential difficulty cleaning the internal drum mechanism thoroughly.
Microplane-Style Graters: Precision Zesting and Fine Shreds
Characterized by incredibly sharp, laser-cut blades on a slender frame, these excel at ultra-fine zesting, grating hard spices (nutmeg, cinnamon), garlic, ginger, and creating light, fluffy cheese shreds. The results are restaurant-quality, but the blades are extremely sharp. Beginners must exercise extreme caution with hand placement and cleaning. They are generally not suitable for large, hard items like frozen butter or dense root vegetables, which can damage the delicate blades.
Material Matters: Durability and Performance
The material of the grating surface and the overall construction significantly impact longevity, ease of cleaning, and the quality of your shreds.
Stainless Steel: The Gold Standard
High-quality stainless steel is the most common and recommended material for grating surfaces. It’s incredibly durable, resistant to rust and corrosion, maintains sharpness well, and produces clean, consistent shreds without imparting metallic flavors. Look for 18/10 or 18/8 grade stainless steel for the best balance of performance and value. Avoid very thin, flimsy stainless that bends easily.
Ceramic Blades: Sharp but Fragile
Some graters, particularly microplane-style or rotary models, feature ceramic blades. They stay exceptionally sharp for a long time and resist staining from acidic foods like citrus. However, ceramic is brittle and can chip or shatter if dropped or subjected to hard impacts. They are generally not recommended for beginners due to this fragility and higher cost.
Coated Blades: A Short-Term Solution?
Non-stick coatings (like Teflon) are sometimes applied to grating surfaces to reduce clogging, especially with moist cheeses. While effective initially, these coatings can scratch and wear off over time, potentially exposing the underlying metal and negating the benefit. They are generally less durable than high-quality bare stainless steel for long-term use.
Safety First: Features That Protect Beginners
Safety is paramount, especially when starting out. The right features can prevent painful accidents and build confidence.
Essential Finger Guards and Pushers
A well-designed finger guard or food pusher is non-negotiable for beginners. This plastic or metal piece slides over the food, keeping your knuckles a safe distance from the sharp blades. Ensure it fits securely, is comfortable to hold, and effectively covers the grating surface as the food diminishes. Some box graters have integrated pushers, while others require a separate piece.
Secure Grip and Non-Slip Bases
A grater that skids across the counter is a major hazard. Look for models with substantial weight, rubberized feet, or textured, non-slip bases that anchor firmly during use. Handles (on flat plane or rotary graters) should be ergonomically shaped and provide a comfortable, secure grip, even when your hands are slightly damp from washing produce.
Blade Design and Coverage
Consider how exposed the blades are. Some flat plane graters have minimal coverage around the edges, increasing risk. Box graters with deep chutes or rotary models with enclosed drums offer inherently safer operation by minimizing direct access to the sharp surfaces. The sharper the blade (like microplanes), the more critical safe handling features become.
Size, Storage, and Practicality for Your Kitchen
Your available space and typical cooking volume dictate the ideal size and storage solution.
Matching Capacity to Your Needs
Beginners often overestimate how much grating they’ll do initially. A compact box grater or a single flat plane grater might suffice for small households or occasional use. If you frequently cook for families or love dishes requiring large amounts of shredded ingredients (like lasagna or potato pancakes), a larger box grater or dedicated rotary model makes more sense. Avoid oversized tools that dominate your drawer if you’ll rarely use their full capacity.
Streamlined Storage Solutions
Consider your drawer depth and cabinet space. Slim flat plane graters slide easily into cutlery trays. Compact box graters with smooth sides fit better than bulky ones with protruding parts. Some models feature hanging holes or nestable designs. Rotary graters often have the largest footprint. Prioritize tools that can be stored without sharp edges exposed or requiring complex disassembly.
Weight and Handling Comfort
A grater that’s too light might feel flimsy and vibrate excessively; one that’s too heavy can be tiring to hold steady, especially for extended grating. Test the weight if possible (or read reviews mentioning it). The balance should feel comfortable in your hand, allowing controlled pressure without strain. Ergonomic handles on non-box styles significantly enhance comfort during use.
Mastering Basic Grating Techniques
Understanding simple techniques makes a huge difference in results and safety, regardless of the grater type.
The Claw Grip: Your Knuckle’s Best Friend
This fundamental technique is crucial for safety on flat plane or box graters. Curl the fingertips of your guiding hand inward, using the knuckles to push the food against the grater. Your fingernails should be safely tucked away, and only the very top knuckle makes contact near the blade edge. Practice this grip gently before applying full pressure.
Applying Consistent, Moderate Pressure
Heavy-handed grating leads to clogging, uneven shreds, and increased risk of slipping. Use steady, moderate downward pressure. Let the sharpness of the blade do the work. If the food isn’t moving, check if it’s too cold (hard cheese needs slight warming) or if the grater needs cleaning. For rotary models, a smooth, consistent crank is key.
Managing Moisture and Clogging
Moist foods (like fresh mozzarella or certain cheeses) clog graters easily. Pat foods dry with a paper towel before grating. Chill hard cheeses slightly for cleaner shreds. If clogging occurs, stop immediately. Clear the blades carefully with a small brush (often included) or under running water – never use your fingers. Some foods benefit from grating in short bursts.
Cleaning and Maintenance for Longevity
Proper care ensures your grater performs well and lasts for years, preventing rust and bacterial growth.
Immediate Post-Use Rinse is Critical
Residue, especially dairy or starchy foods (potatoes), dries quickly and becomes incredibly difficult to clean. Rinse the grater thoroughly under warm running water immediately after use, using a sponge or soft brush to dislodge particles. Pay special attention to the underside of the grating surface where shreds collect.
Safe Brushing Techniques
Always brush away from the sharp blades. Use a dedicated grater brush (often small with stiff nylon bristles) or a soft dishwashing brush. Never scrub aggressively parallel to the blades, as this can damage them or dull the edge. For box graters, focus on cleaning inside the chute and around the mounting points.
Dishwasher Dilemma: Proceed with Caution
While many graters are labeled dishwasher-safe, hand washing is strongly recommended, especially for beginners. Dishwasher detergents and high heat can accelerate dulling of blades over time and potentially damage non-slip feet or plastic components. If you must dishwasher, place it securely in the top rack to minimize jostling and avoid harsh detergents. Always inspect for residue after the cycle.
Selecting Based on Your Most Common Ingredients
Your go-to recipes should heavily influence your choice, as different graters excel with specific foods.
Grating Hard Cheeses: Parmesan, Pecorino, Aged Cheddar
Hard cheeses require sharp, durable blades. Box graters (fine side), flat plane graters, and microplane-style graters produce the best fluffy, light shreds. Ensure the cheese is very cold (almost frozen) for optimal results. Rotary graters also work well but may be slower for small amounts. Avoid dull graters or those with large holes meant for softer cheeses.
Zesting Citrus and Spices: Lemon, Lime, Orange, Nutmeg
Fine, precise zesting demands the sharpest blades. Microplane-style graters are the undisputed champions here, creating delicate, aromatic zest without bitter pith. High-quality flat plane graters with fine holes are a good secondary option. Box graters often have a dedicated zesting side, but the results are usually coarser. Avoid any grater where the holes are too large.
Shredding Vegetables: Carrots, Zucchini, Cabbage
For larger volumes of moist vegetables, a box grater (coarse or medium side) is efficient. Ensure the grater is very stable. Flat plane graters work for smaller quantities. Be mindful of moisture – pat veggies dry slightly if very wet. Avoid microplane-style graters for large veggie tasks, as they clog easily and the delicate blades can be damaged by fibrous materials.
Budgeting Wisely for Beginner Success
Investing smartly prevents buyer’s remorse and ensures you get a tool you’ll actually use.
Value vs. Cost: Beyond the Price Tag
The cheapest grater often leads to the most frustration – dull blades, poor construction, and safety hazards. Conversely, the most expensive isn’t necessarily the “best” for your beginner needs. Focus on core features: sharp stainless steel blades, essential safety elements (guard/pusher, non-slip base), and a style matching your cooking. A mid-range, well-reviewed basic box grater often offers the best beginner value.
Warning Signs of Poor Quality
Avoid graters with flimsy, thin metal that bends easily under light pressure. Check that blades feel sharp (carefully!) and are securely attached – loose blades are dangerous and ineffective. Steer clear of excessive plastic construction on the grating surface itself; it dulls quickly. Poorly fitting finger guards that wobble or don’t cover adequately are a red flag.
When a Simple Tool Suffices
You likely don’t need an 8-in-1 mega grater right away. Starting with one reliable tool – perhaps a compact 4-sided box grater or a good flat plane zester – lets you master the basics without overwhelm. As your cooking evolves and you identify specific needs (e.g., “I make a lot of potato latkes”), you can then consider adding a specialized tool. Build your collection intentionally.
Building Confidence Through Practice
Like any skill, grating improves with mindful repetition. Start simple.
Start Small and Simple
Begin with easy, forgiving ingredients like cold, hard block cheese (Parmesan) or a firm lemon for zesting. These are less likely to clog and provide immediate, satisfying results. Avoid tackling challenging items like frozen butter or soft mozzarella on your first few tries.
Focus on Safety and Rhythm
Prioritize using the claw grip and a secure base over speed. Find a comfortable, sustainable rhythm – short, controlled strokes are better than long, forceful ones. Pay attention to how the food moves and the sound it makes; this helps you adjust pressure instinctively.
Embrace the Learning Curve
Expect a few knuckle grazes or clogs – it happens to everyone! Analyze what went wrong (was the cheese too warm? Did you lose your grip?). Each minor mishap teaches you how to handle the tool better. Celebrate the small wins, like your first clog-free zesting session.
Frequently Asked Questions
Frequently Asked Questions
Can I use a hand grater for frozen foods like butter?
Yes, but with caution. Very hard frozen items can damage some graters, especially microplane-style blades. Use the coarse side of a sturdy box grater, work quickly before the butter softens too much, and apply firm, even pressure. Ensure your grip is very secure.
Why does my grater clog so easily, especially with cheese?
Moisture is the primary culprit. Pat hard cheeses dry with a paper towel before grating. Ensure the cheese is very cold (chill it for 15-20 minutes). Grate in shorter bursts and clear the underside frequently with a brush. Dull blades also contribute significantly to clogging.
How do I avoid grating my knuckles?
Master the “claw grip”: curl your fingertips inward, using the top knuckles to push the food. Always use the provided finger guard or food pusher, especially as the food piece gets small. Ensure your grater has a non-slip base so it doesn’t move unexpectedly.
Is it safe to put my hand grater in the dishwasher?
While many are labeled dishwasher-safe, hand washing is strongly recommended for longevity. Dishwasher detergents and heat can dull blades over time and potentially damage plastic parts or non-slip feet. If you must dishwasher, place it securely in the top rack.
What’s the best grater for zesting citrus without the bitter white pith?
Microplane-style graters are ideal for fine, pith-free zest due to their ultra-sharp, shallow blades. Use gentle pressure and only zest the colored part of the peel, avoiding the white pith underneath. A high-quality flat plane grater with fine holes is a good alternative.
Can I grate garlic or ginger effectively with a hand grater?
Yes, a microplane-style or fine-hole flat plane grater works well for small amounts of garlic or ginger, creating a smooth paste. Use extreme caution due to the sharp blades and small size of the food. A dedicated small rotary grater can also be very effective and safer.
Why do my cheese shreds clump together after grating?
This is natural, especially with moist cheeses. Toss the shreds immediately with a tiny amount of cornstarch or flour (if the recipe allows), or spread them out on a plate for a few minutes to dry slightly before storing. Very cold cheese shreds less clump-prone.
How often should I replace my hand grater?
With proper care (hand washing, thorough drying), a quality stainless steel grater can last many years. Replace it if the blades become significantly dull (food smears instead of shreds cleanly), bent, rusted, or if safety features like the non-slip base are damaged.
Are rotary graters better than box graters for beginners?
Rotary graters are often safer for beginners due to the enclosed mechanism and crank handle, eliminating knuckle risk. However, box graters are generally faster for larger quantities and offer more grating surfaces. The “better” choice depends on your priority: maximum safety (rotary) vs. speed/versatility (box).
What’s the easiest way to clean cheese out from under the grating surface?
Rinse immediately under warm running water while gently brushing the underside away from the blades with a small, stiff-bristled brush (often included). For stubborn residue, soak briefly in warm, soapy water before brushing. Never use metal scouring pads.