There’s something deeply satisfying about crafting your own spirits at home—the alchemy of turning simple ingredients into complex, nuanced liquor that rivals commercial offerings. But behind every great home-distilled whiskey or gin lies not just skill and patience, but a carefully curated collection of specialty equipment that transforms your kitchen or garage into a micro-distillery.
Whether you’re dreaming of small-batch bourbon with rich caramel notes or a crisp, botanical-forward gin, the right tools make the difference between amateur hooch and artisanal excellence. This comprehensive guide walks you through the essential specialty cooking equipment for home distilling, focusing on the features, materials, and considerations that matter most—without pushing specific brands or products. Let’s dive into the fascinating world of home distillation gear.
Top 10 Specialty Cooking Equipment
Detailed Product Reviews
1. The Food Substitutions Bible: 8,000 Substitutions for Ingredients, Equipment and Techniques

Overview: This comprehensive reference guide is an indispensable kitchen companion for both home cooks and culinary professionals. Containing 8,000 substitutions spanning ingredients, equipment, and techniques, this book addresses virtually any cooking challenge. Whether you’ve run out of a crucial spice, lack specialized equipment, or need to adapt recipes for dietary restrictions, this bible provides practical solutions. The well-organized format makes it easy to quickly find alternatives without disrupting your cooking flow.
What Makes It Stand Out: Unlike typical substitution guides that focus solely on ingredients, this volume uniquely covers equipment and technique alternatives, making it exceptionally comprehensive. The breadth of entries includes professional-grade solutions and emergency hacks that can save a dinner party. The book’s systematic approach helps users understand not just what to substitute, but why certain alternatives work, building fundamental cooking knowledge.
Value for Money: At $32.04, this reference book offers substantial value. Consider the cost of making emergency grocery runs or abandoning recipes mid-preparation—this book pays for itself after just a few uses. Compared to culinary textbooks or digital subscriptions, it’s a one-time investment that serves you indefinitely. For serious cooks, it’s an affordable insurance policy against kitchen mishaps.
Strengths and Weaknesses: Strengths include unparalleled comprehensiveness, money-saving potential, eco-friendly approach to using pantry staples, and professional-level guidance. The physical format is durable for kitchen use. Weaknesses involve potential overwhelm for absolute beginners, occasional substitutions that may slightly alter intended flavors, and its substantial size requiring dedicated storage space.
Bottom Line: An essential reference that belongs in every serious cook’s library. The depth and practicality justify the price, making it a wise investment for anyone who cooks regularly.
2. The Home Bartender: The Third Edition: 200+ Cocktails Made with Four Ingredients or Less

Overview: This streamlined cocktail manual demystifies mixology for home enthusiasts by focusing on simplicity. With over 200 recipes requiring four ingredients or fewer, it eliminates the intimidation factor and expense typically associated with home bartending. The third edition builds on proven success, offering classic and contemporary drinks that are accessible without sacrificing quality. Perfect for casual entertaining or winding down after work.
What Makes It Stand Out: The strict four-ingredient limit is a game-changer, dramatically reducing shopping lists and storage needs while accelerating drink preparation. This constraint paradoxically expands creativity, teaching fundamental flavor balancing. The book excels at identifying essential spirits and mixers, preventing costly one-off purchases. Its layout prioritizes speed, with quick-reference sections for impromptu gatherings.
Value for Money: At just $9.82, this represents exceptional affordability. Comparable cocktail courses cost hundreds of dollars, while a single night out can exceed this price. The book’s longevity and reusable nature make it practically free per use. For entertainment value alone, it outperforms most bar guides in its price range.
Strengths and Weaknesses: Strengths include beginner-friendly approach, budget-conscious recipes, rapid preparation times, and diverse drink categories. The third edition’s refinements show responsive author development. Weaknesses are minimal: advanced bartenders may find recipes too simplistic, and some complex classic cocktails are necessarily omitted. The focus on simplicity might limit exploration of layered techniques.
Bottom Line: The ultimate starter guide for home bartending that delivers professional-quality drinks without complexity. An unbeatable value and essential for anyone building their home bar.
3. Craft Coffee: A Manual: Brewing a Better Cup at Home

Overview: This specialized manual elevates home coffee from routine to ritual. Focused exclusively on manual brewing methods like pour-over, French press, and AeroPress, it provides the technical knowledge needed to extract exceptional flavor. The book covers bean selection, grind size, water chemistry, and equipment calibration with scientific precision. It’s designed for coffee enthusiasts ready to invest time in mastering their morning cup.
What Makes It Stand Out: Unlike general coffee books, this manual treats brewing as a craft requiring technique and understanding. The deep dive into extraction principles, temperature control, and timing variables transforms readers from passive consumers to active artisans. Its methodical troubleshooting sections diagnose common brewing failures, while side-by-side comparisons of equipment help justify purchasing decisions.
Value for Money: Priced at $15.06, this manual offers tremendous return on investment. For daily coffee shop patrons, the cost equals roughly three purchased beverages. The knowledge gained can save hundreds annually while producing superior results. Compared to barista courses costing $200+, it’s an accessible alternative that doesn’t compromise on technical depth.
Strengths and Weaknesses: Strengths include rigorous technical detail, equipment recommendations for various budgets, and systematic improvement frameworks. The writing balances accessibility with expertise. Weaknesses include requiring additional equipment purchases, steep learning curve for casual drinkers, and time-intensive methods unsuitable for rushed mornings. Some may find the precision overwhelming.
Bottom Line: An indispensable resource for coffee aficionados seeking cafe-quality results at home. The modest price unlocks years of exceptional coffee and financial savings.
4. Tangoowal Culinary Specialty Tools Set,Professional Chef Cooking Plating Kit, 7 Pieces, Stainless Steel

Overview: This seven-piece stainless steel plating kit brings professional kitchen precision to home cooks and culinary students. The set includes an offset spatula, decorating spoons, a plating spoon with solid bowl, long straight tweezers, and three precision tweezers (straight, offset, and curved tip) with machined finger grips and grooved tips. Dishwasher-safe and ergonomically designed, these tools enable restaurant-quality plate presentation.
What Makes It Stand Out: The comprehensive variety addresses every plating need—from saucing with specialized spoons to micro-adjusting components with precision tweezers. The inclusion of three distinct tweezer styles demonstrates thoughtful design for different tasks. Machined finger grips provide control during intricate work, while the 12-inch straight tweezers offer safety for deep containers. This isn’t a compromise set; it’s a professional-grade collection at consumer pricing.
Value for Money: At $22.99 for seven professional tools, the value is exceptional. Individual purchasing would cost $60-$100. The stainless steel construction ensures longevity, while dishwasher-safe convenience adds practical value. For culinary students, it eliminates piecemeal buying. The durability translates to years of reliable service, making the per-use cost negligible.
Strengths and Weaknesses: Strengths include complete functionality, professional-grade materials, ergonomic design, easy maintenance, and perfect gift packaging. The tools perform as well as restaurant versions costing triple. Weaknesses involve a learning curve for novice users, potential underutilization by casual cooks, and storage requirements. Some may find the precision unnecessary for everyday meals.
Bottom Line: An outstanding value proposition for anyone serious about culinary presentation. This kit delivers professional capabilities at a fraction of the cost, making it a smart investment for aspiring chefs.
5. NU-View Concession & Food Equipment & Multi-Purpose Cleaner, Removes Cooking Oil, Grease, Sugar, Starch & Protein Residues, 18 OZ
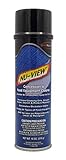
Overview: This specialized 18-ounce foam cleaner tackles the toughest food equipment messes with a powerful, non-toxic formula. Designed for concession stands and commercial kitchens, it effectively removes cooking oil, grease, sugar, starch, protein residues, and baked-on carbon from popcorn poppers, steamers, hot dog boilers, and slicing machines. The clinging foam action works on vertical surfaces, while its safety on stainless steel, aluminum, plastics, and chrome makes it surprisingly versatile.
What Makes It Stand Out: The foam’s vertical cling technology sets it apart from runny liquid cleaners, allowing extended contact time for stubborn residues without constant reapplication. Its non-toxic formulation balances professional-strength cleaning with user safety—a rare combination. The Made-in-USA quality ensures reliable performance, while its multi-surface compatibility eliminates the need for multiple specialized cleaners.
Value for Money: At $11.77 ($0.66 per ounce), this professional-grade cleaner is priced competitively with consumer products while delivering superior performance. For concession operators, it prevents equipment damage and maintains health standards. Home users gain commercial cleaning power without bulk purchasing. A single can lasts through multiple deep-cleaning sessions, making it cost-effective for periodic maintenance.
Strengths and Weaknesses: Strengths include exceptional cling action, broad residue removal, surface safety, non-toxic formula, and professional origins. It excels on baked-on carbon where others fail. Weaknesses include foam potentially being messier than sprays, the concession-focused marketing possibly deterring home users, and 18 ounces running quickly in commercial settings. The aerosol format may concern environmentally-conscious buyers.
Bottom Line: A powerful, versatile cleaner that brings professional kitchen standards to any food preparation environment. The innovative foam action and safety profile justify the price for both commercial and serious home users.
6. Smokehouse Handbook: Comprehensive Techniques & Specialty Recipes for Smoking Meat, Fish & Vegetables

Overview: The Smokehouse Handbook is a definitive guide for anyone looking to master the art of smoking foods. This comprehensive manual covers everything from basic techniques to advanced recipes for meat, fish, and vegetables, making it an essential resource for both beginners and seasoned pitmasters.
What Makes It Stand Out: Unlike generic cookbooks, this handbook specializes exclusively in smoking, offering detailed techniques for different proteins and produce. The inclusion of specialty recipes suggests unique flavor combinations and methods that go beyond standard barbecue fare. Its comprehensive approach ensures readers understand the science behind smoking, not just follow recipes.
Value for Money: At $24.95, this specialized cookbook sits in the mid-range for culinary guides. Considering the depth of knowledge on a single cooking method, it offers solid value compared to broader cookbooks that only touch on smoking. It’s an investment in skill development rather than just recipe collection.
Strengths and Weaknesses: Strengths include thorough coverage of multiple food categories, technique-focused instruction, and specialized knowledge. The primary weakness is the lack of listed features, which may indicate fewer photos or diagrams. It’s also a niche subject, limiting its appeal to general home cooks.
Bottom Line: Perfect for smoking enthusiasts wanting to expand their repertoire beyond basic brisket. The focused content justifies the price for anyone serious about mastering smoke-cooking.
7. Uno Casa - XL Pie Irons Cast Iron Sandwich Maker - Mountain Japanese Sandwich Maker with Recipe Book - Durable Campfire Cooking Equipment for Toasted Pies, and More

Overview: This XL cast iron pie iron from Uno Casa transforms campfire cooking into a versatile culinary experience. Designed for outdoor enthusiasts, it creates toasted pies, sandwiches, and even Japanese-style sandwiches over open flames, making it a multi-functional camping essential.
What Makes It Stand Out: The double-sized square head sets it apart from standard pie irons, while removable handles (13.8" and 21.6") offer portability and easy cleaning. The pre-seasoned, rust-proof cast iron provides non-stick performance without chemicals. The included recipe e-book and grill grid lining for flavor enhancement show thoughtful design for serious camp cooks.
Value for Money: At $32.50, this is competitively priced for heavy-duty cast iron cookware with accessories. Comparable single-size irons cost $20-25, making the XL size, dual handles, and recipe book excellent value for regular campers.
Strengths and Weaknesses: Strengths include durability, versatility, portability, and pre-seasoned convenience. The ergonomic hook closure keeps food secure. Weaknesses include cast iron’s weight (though manageable) and maintenance requirements. The large size may be overkill for solo campers.
Bottom Line: An outstanding value for families and groups who camp frequently. The XL capacity and thoughtful features make it worth every penny for creating memorable outdoor meals.
8. All-Clad Specialty Stainless Steel Universal Steamer for Cooking 3 Quart Food Steamer, Steamer Basket Silver
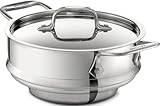
Overview: All-Clad’s 3-quart universal steamer insert delivers professional-grade steaming capability for home kitchens. Engineered to fit All-Clad’s 8-inch sauce pans and casseroles, this heavy-gauge stainless steel steamer brings restaurant-quality construction to everyday cooking.
What Makes It Stand Out: The precision engineering ensures a secure fit on specific All-Clad cookware, eliminating wobbling and ensuring efficient steam circulation. Heavy-gauge stainless steel construction with riveted handles provides durability that matches All-Clad’s legendary sauce pans. The included lid creates a sealed environment for optimal nutrient retention.
Value for Money: At $89.95, this is a premium-priced accessory that delivers proportional value for All-Clad owners. While expensive compared to universal steamers ($30-50), the perfect integration, lifetime warranty, and matching quality justify the investment for those already committed to the All-Clad ecosystem.
Strengths and Weaknesses: Strengths include exceptional build quality, precise fit, dishwasher safety, and brand-backed warranty. The main weakness is limited compatibility—it only fits non-flared 8-inch All-Clad pans (3-4 quart). The “Made in China” label may disappoint given All-Clad’s American heritage.
Bottom Line: Essential for All-Clad enthusiasts seeking seamless integration. Skip if you own mixed cookware brands—opt for a cheaper universal model instead.
9. The Joy Of Coffee: The Essential Guide to Buying, Brewing, and Enjoying - Revised and Updated – The Complete Source for Beans and Home Espresso Equipment

Overview: This revised edition serves as a comprehensive coffee compendium for enthusiasts at all levels. Covering bean selection, brewing methods, and home espresso equipment, it positions itself as the definitive resource for elevating your coffee experience from commodity to craft.
What Makes It Stand Out: The book’s holistic approach addresses the entire coffee journey—from sourcing beans to mastering extraction. The revised edition ensures current information on modern equipment and third-wave coffee trends. Its focus on both manual brewing and espresso caters to diverse preferences, making it more comprehensive than single-method guides.
Value for Money: At $12.37, this represents exceptional value for a specialized reference book. Comparable coffee guides typically cost $20-30, making this an affordable entry point for beginners or a worthwhile update for owners of previous editions.
Strengths and Weaknesses: Strengths include comprehensive coverage, updated content, and accessible price point. The main weakness is the lack of listed features, potentially indicating fewer visual aids or tasting notes. As a printed book, it may become dated as equipment evolves.
Bottom Line: An unbeatable value for anyone serious about coffee quality. Purchase without hesitation—it’s cheaper than two bags of specialty beans but will improve every cup you brew.
10. Taste of Home What Can I Cook in My Instant Pot, Air Fryer, Waffle Iron…?: Get Geared Up, Great Cooking Starts Here (Taste of Home Quick & Easy)

Overview: Taste of Home addresses the modern cook’s gadget overload with this practical guide spanning multiple appliances. Targeting owners of Instant Pots, air fryers, waffle irons, and more, it provides quick, accessible recipes that maximize these popular kitchen tools without overwhelming complexity.
What Makes It Stand Out: The multi-appliance focus solves a common problem: underutilized specialty cookware. By covering several devices in one volume, it offers better value than single-appliance cookbooks. The “Quick & Easy” branding ensures recipes fit busy lifestyles, while Taste of Home’s tested approach guarantees reliable results.
Value for Money: At $15.43, this moderately-priced cookbook offers excellent value for owners of multiple appliances. Individual appliance cookbooks often cost $15-20 each, making this compilation economical for gadget enthusiasts seeking inspiration across their collection.
Strengths and Weaknesses: Strengths include practical multi-device coverage, trusted brand reputation, and accessible recipes. Weaknesses include necessarily shallow depth for each appliance and reliance on owning several devices. The broad scope may not satisfy those seeking mastery of a single tool.
Bottom Line: Perfect for home cooks with gadget-filled kitchens who need inspiration. Skip if you only own one appliance—get a dedicated guide instead. For multi-device owners, it’s a no-brainer.
Understanding the Fundamentals of Home Distilling Apparatus
The Distillation Process: A Brief Overview
Distillation is essentially controlled evaporation and condensation. You heat a fermented liquid (the “wash” or “mash”) to separate alcohol from water and other compounds based on their different boiling points. Quality equipment gives you precise control over this separation, allowing you to capture the desirable “hearts” while discarding the harsh “heads” and “tails.” Your apparatus must handle vapor management, heat control, and efficient cooling—all while maintaining safety under pressure and temperature fluctuations.
Legal Landscape: What You Need to Know First
Before investing in equipment, understand that home distillation of spirits for consumption remains illegal in many countries, including the United States, without proper federal and state permits. However, owning distillation equipment for water purification, essential oil extraction, or fuel alcohol production is typically legal. Always research your local regulations thoroughly. This guide focuses on equipment characteristics for educational purposes, assuming you’re operating within legal boundaries or in jurisdictions where hobby distilling is permitted.
Core Distillation Units: Pot Stills vs. Reflux Stills
Pot Stills: Traditional Artistry and Flavor Preservation
Pot stills are the classic choice for spirit styles where character and congener development are desirable—think whiskey, rum, and brandy. These simple, onion-shaped vessels allow more flavorful compounds to carry over into the final product. When evaluating pot stills, look for wide, low-pressure vapor paths that minimize reflux and preserve those precious flavor molecules. The lyne arm angle and swan neck design significantly influence spirit character, with downward-sloping arms creating more reflux and lighter spirits.
Reflux Stills: Precision and Purity for Neutrality
Reflux stills are engineered for high-proof, neutral spirits like vodka and gin base spirits. They use packed columns and reflux condensers to create multiple distillation stages in a single run. Key features to examine include column height (taller = more theoretical plates), packing material options (stainless steel scrubbers, copper mesh, or structured packing), and reflux ratio control mechanisms. The ability to adjust reflux gives you command over purity levels—a critical feature for neutral spirit production.
Material Science: Copper vs. Stainless Steel Construction
The Catalytic Properties of Copper
Copper isn’t traditional by accident—it reacts with sulfur compounds in vapor, removing unpleasant rotten-egg notes and catalyzing beneficial flavor reactions. When assessing copper equipment, examine the gauge thickness (16-20 oz copper is standard for durability), joint quality (silver soldered or TIG welded), and accessibility for cleaning. Raw copper develops a protective patina, but avoid overly polished interiors that might reduce catalytic surface area. Remember, copper requires periodic acid washing to maintain efficiency.
Stainless Steel: Modern Durability and Maintenance
Stainless steel offers superior strength, easier cleaning, and no risk of verdigris contamination. For grain-in distilling or acidic washes, it’s often the practical choice. Look for 304-grade stainless steel (food-safe and corrosion-resistant) with sanitary tri-clamp connections for easy disassembly. The downside? Stainless doesn’t remove sulfur compounds naturally. Compensate by incorporating copper components—packing, scrubbers, or a dedicated copper section in the vapor path—to get the best of both materials.
Boiler Capacity and Batch Sizing Strategies
Small Batch Systems for Beginners
One to five-gallon boilers are perfect for learning the craft without committing massive ingredient costs. These systems heat quickly, require less storage space, and allow for frequent experimentation. When selecting small-batch equipment, prioritize units with precise temperature control and efficient condensers—the smaller vapor volume means less margin for error. Look for boilers with wide openings for easy cleaning and ingredient addition.
Scaling Up: Medium and Large Batch Considerations
Five to fifteen-gallon systems represent the sweet spot for serious hobbyists, balancing production volume with manageable equipment size. For these larger batches, examine boiler wall thickness (prevents scorching), drain valve placement (bottom-center is ideal), and heating element wattage (5500W elements heat 10 gallons efficiently). Large systems require more robust cooling solutions—plan for adequate water supply or recirculating systems. The weight of a full boiler becomes a factor; ensure your bench or stand can support 100+ pounds safely.
Heat Sources: Electric Elements vs. Direct Fire
Electric Heating: Precision and Indoor Safety
Electric heating elements offer unmatched temperature control and eliminate open flames—crucial for indoor setups. When evaluating electric systems, check the element’s wattage density (low-density elements scorch less), material (stainless steel or Incoloy for longevity), and whether they’re removable for cleaning. UL-listed elements with proper grounding are non-negotiable for safety. Consider units with multiple element switches for stepped heating control, allowing you to manage heat input during different distillation phases.
Direct Fire: Traditional Methods and Modern Adaptations
Propane burners provide rapid heating and portability for outdoor distilling. If you choose direct fire, look for boilers with thick, sandwich-clad bottoms (stainless exterior, copper interior) to distribute heat evenly and prevent hot spots. Wind guards, adjustable flame control, and stable stands are essential features. Never use direct fire indoors without professional ventilation and fire suppression systems—the carbon monoxide and explosion risks are severe.
Temperature Control Systems
Analog vs. Digital Thermostats
Analog thermostats (capillary tube types) are reliable and don’t require electricity, but they lack precision. Digital thermostats offer 1-degree accuracy and programmable setpoints—crucial for making consistent cuts. When assessing digital controllers, verify the probe placement (should be in vapor path, not liquid), display readability, and temperature range (should cover at least 0-250°F). Some advanced units include timers and data logging for recipe replication.
PID Controllers: The Gold Standard
Proportional-Integral-Derivative controllers represent the pinnacle of temperature management, automatically adjusting power to maintain setpoints. For distilling, look for manual mode capability (essential for making heads/hearts/tails cuts) and auto-tuning functions. The best controllers include solid-state relays for silent operation and long life. Ensure the controller’s amperage rating exceeds your heating element’s draw—40-amp controllers handle most 5500W elements safely.
Condenser Technology and Cooling Management
Liebig Condensers: Simple and Reliable
The Liebig condenser—a straight tube within a cooling jacket—is the workhorse of home distilling. When evaluating Liebig designs, consider the tube length (24-36 inches is typical for 5-gallon batches), jacket water flow design (counter-flow is most efficient), and connection types (garden hose fittings are convenient). The inner tube diameter affects vapor speed—too narrow creates backpressure; too wide reduces condensation efficiency. Look for condensers with slight downward angles to prevent liquid pooling.
Shotgun and Reflux Condensers: Efficiency Upgrades
Shotgun condensers use multiple smaller tubes within the cooling jacket, dramatically increasing surface area for high-volume applications. Reflux condensers mount atop columns to control reflux ratios. For shotgun units, inspect tube count and spacing (more tubes = more cooling but harder to clean). Reflux condensers should have adjustable cooling water flow and easy access for packing changes. These designs shine in reflux stills where managing vapor temperature at different column heights is critical.
Fermentation Equipment Essentials
Vessel Selection: Glass, Plastic, or Stainless Steel
Your fermenter sets the stage for everything that follows. Glass carboys are inert and easy to inspect but heavy and fragile. Food-grade HDPE plastic buckets are affordable and light but scratch easily, harboring bacteria. Stainless steel conical fermenters are the premium choice—durable, temperature-controllable, and yeast can be harvested from the bottom valve. When choosing, evaluate airlock compatibility, sample port accessibility, and whether the design allows for closed transfers to minimize oxidation.
Conical Fermenters: Advanced Features Worth Considering
Conical fermenters with 60-degree cone angles allow complete yeast sedimentation. Look for models with rotating racking arms (lets you pull clear liquid above the yeast cake), thermowells for temperature probes, and pressure-rated designs that can handle spunding valves for natural carbonation. The ability to dump trub and harvest yeast saves money on future batches. Ensure the bottom valve is butterfly-style for sanitary operation and easy cleaning.
Mash Tuns and Grain Handling
Cooler Conversions vs. Purpose-Built Systems
Igloo cooler mash tuns are popular DIY options—excellent temperature stability at low cost. However, purpose-built stainless mash tuns offer integrated heating elements and sparging capabilities. When assessing cooler conversions, check the false bottom seal quality and spigot material (stainless, not plastic). For dedicated mash tuns, look for tangential inlet ports that create natural whirlpools, helping separate grain from wort. RIMS (Recirculating Infusion Mash System) or HERMS (Heat Exchanged Recirculating Mash System) capabilities are worth the investment for all-grain distilling.
False Bottoms and Filtration Solutions
A quality false bottom prevents grain from scorching on the boiler element while allowing efficient wort extraction. For pot stills, look for perforated designs with 3/32" holes on 5/32" centers—small enough to contain grain but large enough for good flow. In column stills, consider using a copper scrubber “filter” above the element to catch fine particles. Some advanced systems use removable grain baskets that lift out entirely, simplifying cleanup dramatically.
Precision Measurement and Monitoring Tools
Hydrometers, Alcoholmeters, and Refractometers
A triple-scale hydrometer measures specific gravity before and after fermentation to calculate alcohol content. Alcoholmeters (spirit hydrometers) measure proof in the final distillate—essential for making cuts. When selecting these tools, ensure they come with calibration certificates and storage tubes. Digital refractometers offer instant gravity readings with just a few drops, invaluable for checking fermentation progress without wasting product. Look for models with automatic temperature compensation (ATC) for accuracy.
Temperature Probes and Placement Strategy
Accurate temperature readings are non-negotiable. Fixed probes should be positioned in the vapor path, not submerged in liquid, to monitor boiling point accurately. For flexibility, consider systems with multiple thermowell ports—one at the boiler, one at the column top, and one at the condenser inlet. K-type thermocouples offer the best accuracy-to-cost ratio for distilling temperatures. Wireless probe systems let you monitor runs from your phone, but always have redundant analog gauges as backup—electronics can fail mid-run.
Non-Negotiable Safety Equipment
Pressure Relief Valves and Vacuum Breaks
Even with open systems, pressure can build from blockages or cooling failures. A properly sized pressure relief valve (typically set at 5 PSI for pot stills) is your last line of defense against explosion. Vacuum breaks prevent dangerous negative pressure when condensers cool too quickly. When evaluating boilers, confirm these are included and ASME-rated. Test them regularly—sticky valves are worse than none at all. The relief valve should vent to a safe area, never toward the operator.
Flame Arrestors and Ventilation Systems
If using direct fire, a flame arrestor on the vapor outlet prevents flashback into the boiler. For electric systems, proper ventilation prevents alcohol vapor accumulation. Calculate your space’s air changes per hour—alcohol vapor is heavier than air and pools at floor level. Install explosion-proof fans rated for Class 1, Division 2 environments if distilling indoors. Carbon monoxide detectors are mandatory for any combustion-based heating, and a portable fire extinguisher (Class B for flammable liquids) should be within arm’s reach.
Cleaning, Sanitization, and Maintenance
Specialized Tools for Still Hygiene
Dedicated bottle brushes with long, flexible handles reach deep into columns and condensers. Look for sets with varying diameters to match different tube sizes. Caustic-based still cleaners dissolve organic buildup without scrubbing—critical for copper, which scratches easily. For stainless systems, PBW (Powdered Brewery Wash) is effective and safe. Always have a set of gaskets and O-rings on hand; these wear out and can cause dangerous vapor leaks during runs.
Chemical vs. Steam Sanitization Methods
Chemical sanitizers like Star San provide quick, no-rinse sanitation but must be thoroughly rinsed from copper to prevent corrosion. Steam sanitization—running a water-only distillation cycle—sterilizes without chemicals but requires time and energy. Some advanced systems include dedicated steam injection ports. For maximum effectiveness, alternate methods: steam for routine cleaning, chemicals for deep cleans after messy runs. Never mix acid and caustic cleaners—neutralize thoroughly between treatments.
Storage and Aging Infrastructure
Barrel Alternatives and Oak Solutions
Full-sized barrels are impractical for most home distillers. Instead, consider oak sticks, spirals, or chips that fit inside glass or stainless vessels. When evaluating oak products, examine toast levels (light, medium, heavy) and wood origin (American, French, Hungarian). Each imparts different flavor profiles. For rapid aging, look into ultrasonic aging devices or small barrel alternatives like 1-3 gallon oak casks—just remember smaller barrels mean faster extraction and higher angel’s share evaporation.
Vessels for Finished Spirit Storage
Storing high-proof spirits requires airtight, alcohol-safe containers. Glass carboys with silicone seals work well for long-term storage. For bulk aging, food-grade HDPE drums are affordable but can impart slight flavors over time. Stainless steel kegs with modified spears offer professional-grade storage with the ability to push spirit out with inert gas, minimizing oxygen exposure. Always verify gasket materials are ethanol-compatible—some rubbers degrade and contaminate your product.
Budget Planning and Investment Strategy
Entry-Level vs. Professional-Grade Equipment
Entry-level kits ($200-$500) typically feature thin materials, basic temperature monitoring, and minimal safety features. They’re fine for learning but expect to upgrade. Mid-range systems ($500-$1500) offer thicker copper/stainless, PID controllers, and proper safety valves—this is where most serious hobbyists land. Professional-grade equipment ($1500+) includes tri-clamp connections, modular designs, and ASME-certified boilers. When budgeting, allocate 30% for the still, 30% for fermentation gear, 20% for measurement tools, and 20% for safety/cleaning equipment.
Hidden Costs and Long-Term Value
The sticker price rarely tells the full story. Factor in utility costs—electric heating can add $5-15 per run in electricity. Water usage for cooling adds up; a recirculating system pays for itself quickly. Consumables like oak, yeast, nutrients, and cleaning chemicals run $20-50 per batch. Don’t forget storage—quality glass or stainless vessels aren’t cheap. Equipment that disassembles easily saves countless hours of cleaning time, representing significant long-term value. Modular systems that grow with your skills offer better ROI than replacing entire setups.
Space Requirements and Setup Optimization
Indoor Distilling Stations: Ventilation and Safety
Indoor setups demand serious planning. You’ll need a dedicated 240V circuit for electric systems, explosion-proof ventilation, and a fire-resistant floor. Minimum room size should be 100 square feet with 8-foot ceilings to prevent vapor accumulation. Position your still near a water source and drain—condenser water management gets messy. Consider a vent hood with 300+ CFM rating positioned low to capture heavy alcohol vapors. Keep flammable materials 10 feet away from the still, and never distill in living spaces.
Outdoor Solutions and Weather Considerations
Outdoor distilling eliminates ventilation concerns but introduces new challenges. Your setup needs weather protection—alcohol vapor and rain are a dangerous mix. Portable canopies work, but ensure they’re flame-retardant and well-ventilated. Propane heating becomes more practical outdoors, but wind guards are essential. Temperature fluctuations affect fermentation and distillation efficiency; plan for seasonal adjustments. Secure all equipment against wind—a toppled still spewing hot alcohol is catastrophic. Consider a lockable shed or cabinet to prevent unauthorized access.
Frequently Asked Questions
1. Can I legally distill alcohol at home for personal consumption?
In the United States, federal law requires a distilled spirits permit for any non-fuel alcohol production, regardless of quantity or intent. Some countries allow hobby distilling with restrictions. Always verify federal, state, and local regulations before purchasing equipment. Many enthusiasts legally own stills for water purification or fuel alcohol while learning the craft.
2. What’s the minimum equipment investment to start distilling safely?
Plan for at least $400-$600 for a basic, safe setup: a quality 5-gallon stainless boiler with electric element, simple condenser, accurate thermometer, hydrometers, and essential safety valves. Cutting corners on safety equipment is never advisable. You can add advanced features like PID controllers and conical fermenters as your skills develop.
3. How do I choose between a pot still and reflux still?
Match the still type to your spirit goals. Pot stills preserve flavors and are ideal for whiskey, rum, and brandy. Reflux stills produce high-proof neutral spirits perfect for vodka or gin. Many hobbyists start with a hybrid pot still that can accommodate a small column, offering flexibility as you explore different styles.
4. Is copper really necessary, or can I use all-stainless equipment?
While you can produce alcohol in all-stainless systems, copper plays a crucial role in removing sulfur compounds that cause off-flavors. If you choose stainless, incorporate copper mesh or scrubbers in the vapor path. For grain-in distilling, stainless is more practical, but a copper column section or packing is highly recommended for flavor development.
5. How much space do I realistically need for a home distilling setup?
A functional indoor station requires at least a 10x10 foot area with 8-foot ceilings, explosion-proof ventilation, and a concrete or tile floor. Outdoor setups need less space but require weather protection and secure storage. Always maintain 3 feet of clearance around the still for safe operation and emergency access.
6. What’s the difference between a 1500W and 5500W heating element?
1500W elements (standard 120V outlet) heat slowly but work for small batches up to 5 gallons, offering simplicity for beginners. 5500W elements (require 240V) heat 10-15 gallon batches efficiently and provide better temperature control. Higher wattage isn’t always better—too much heat can cause foaming and puking (liquid carryover) in the column.
7. How often should I clean my still, and what’s the best method?
Clean after every run to prevent flavor carryover and bacterial growth. For routine cleaning, run a water distillation cycle (steam cleaning) for 30 minutes. Every 5-10 runs, use a caustic still cleaner for copper or PBW for stainless, followed by thorough rinsing. Never let mash dry inside the still—it becomes nearly impossible to remove.
8. Can I use my homebrew beer equipment for distilling?
Some crossover exists: fermenters, hydrometers, and cleaning supplies transfer well. However, never repurpose plastic fermenters that held sour or funky beers—their scratches can harbor bacteria that survive distillation and create off-flavors. Mash tuns work similarly, but distilling requires more precise temperature control and different safety considerations.
9. What safety features are absolutely non-negotiable?
Pressure relief valves, proper ventilation, and secure electrical connections are mandatory. A vacuum break prevents implosion during rapid cooling. For direct fire, flame arrestors are essential. Always have a fire extinguisher rated for flammable liquids nearby. Never distill unattended, and keep a written log of each run for troubleshooting and safety tracking.
10. How long does it take to actually produce drinkable spirits from start to finish?
From mash to aged spirit, expect 2-4 weeks: 3-7 days for fermentation, 1 day for distillation, and 1-3 weeks for aging (longer for oak character). Neutral spirits can be drinkable immediately after proper cuts and dilution. Whiskey benefits from at least 2-4 weeks on oak, while rum often improves with months of aging. The learning curve is the real variable—your first few batches will likely be experimental rather than exceptional.