There’s something undeniably magical about transforming fresh cream into golden, fragrant butter using equipment that feels like it belongs in a rustic farmhouse kitchen. In an age where convenience often trumps craftsmanship, artisanal butter churning has emerged as a meditative practice that connects us to centuries of culinary tradition. The rhythmic motion of a wooden dasher, the gentle slosh of cream against glass, and the anticipation of that moment when butter finally separates from buttermilk—these experiences offer a tactile satisfaction that modern appliances simply cannot replicate.
Whether you’re a homestead enthusiast, a culinary historian, or simply someone who appreciates the superior flavor of freshly churned butter, selecting the right vintage-style equipment is crucial to your success. This comprehensive guide will walk you through everything you need to know about choosing specialty cooking equipment for artisanal butter churning, focusing on the features, materials, and design elements that separate exceptional tools from mere decorative pieces.
Top 10 Specialty Cooking Equipment
Detailed Product Reviews
1. The Food Substitutions Bible: 8,000 Substitutions for Ingredients, Equipment and Techniques

Overview: The Food Substitutions Bible positions itself as the ultimate kitchen reference guide, offering an exhaustive compilation of 8,000 alternatives for ingredients, equipment, and techniques. This hardcover resource targets home cooks who’ve ever started a recipe only to discover they’re missing a crucial component. Beyond simple ingredient swaps, it addresses equipment limitations and technique modifications, making it a comprehensive problem-solving tool for culinary adaptations.
What Makes It Stand Out: The staggering 8,000-entry database sets this apart from pocket-sized substitution charts or the occasional tip in standard cookbooks. Its three-pronged approach—ingredients, equipment, AND techniques—creates a uniquely holistic resource. Whether you need a buttermilk substitute, lack a stand mixer, or want to grill instead of pan-sear, this book provides vetted alternatives. The breadth suggests deep culinary research rather than crowd-sourced guesses.
Value for Money: At $32.04, this sits in premium cookbook territory. However, its reference value extends for years, potentially saving numerous emergency grocery runs. Compared to subscription-based cooking apps or specialty diet guides, it’s a one-time investment. For avid cooks, the cost-per-use becomes negligible over time.
Strengths and Weaknesses: Pros: Exceptionally comprehensive; reduces food waste by using what you have; invaluable for dietary restrictions (gluten-free, vegan, low-sodium); builds cooking confidence; well-organized for quick lookup. Cons: Physical book occupies valuable kitchen space; some substitutions inevitably compromise flavor authenticity; may overwhelm beginners; requires updating as food trends evolve; no user reviews or community input.
Bottom Line: A worthwhile investment for passionate home cooks who improvise regularly. Casual cooks should consider whether they’ll use it enough to justify the price and storage.
2. The Home Bartender: The Third Edition: 200+ Cocktails Made with Four Ingredients or Less

Overview: The Home Bartender’s third edition delivers over 200 cocktail recipes unified by one compelling constraint: maximum four ingredients per drink. This paperback targets home enthusiasts who want to craft impressive cocktails without investing in dozens of obscure bottles or mastering complex techniques. The book’s philosophy centers on accessibility, demonstrating that thoughtful combinations of common spirits, mixers, and fresh ingredients can yield sophisticated results. It’s designed for quick reference during gatherings rather than academic study.
What Makes It Stand Out: The self-imposed four-ingredient limit transforms potential limitation into creative strength. This constraint keeps costs down, reduces prep time, and eliminates decision fatigue. Unlike encyclopedic bartending guides that overwhelm with technique, this focuses on achievable excellence. The third edition indicates sustained popularity and likely incorporates reader favorites and refinements. The recipe variety spans classics to modern creations, all filtered through the simplicity lens.
Value for Money: At $9.82, this represents exceptional value—less than the cost of two craft cocktails at a bar, yet providing hundreds of recipes. Compared to $25+ professional bartending manuals or monthly subscription boxes, it’s a minimal investment with maximal return. For apartment dwellers or budget-conscious entertainers, it enables quality cocktails without financial commitment.
Strengths and Weaknesses: Pros: Unbeatable price point; beginner-friendly; reduces ingredient waste; encourages creative mixing; perfect for casual entertaining; compact and giftable. Cons: Limited depth for serious mixologists; may over-rely on simple syrup/citrus; lacks advanced techniques; not ideal for those seeking craft cocktail mastery; binding quality unknown.
Bottom Line: A must-have for cocktail newcomers and casual hosts. Seasoned bartenders should look elsewhere, but for most home users, it’s the perfect balance of simplicity and variety.
3. Craft Coffee: A Manual: Brewing a Better Cup at Home

Overview: Craft Coffee: A Manual serves as a technical guide for coffee enthusiasts determined to master home brewing fundamentals. This book moves beyond basic instructions to explore the science of extraction, water chemistry, grind particle distribution, and temperature stability. It’s written for those who view coffee preparation as a craft to be honed rather than a caffeine delivery system. The manual format suggests methodical coverage of equipment from French presses to pour-over cones, focusing on repeatable results.
What Makes It Stand Out: Unlike recipe-driven coffee books, this emphasizes universal principles that apply regardless of your brewer. It likely treats coffee making as a series of variables to be controlled and optimized, empowering readers to diagnose their own mistakes. The depth probably includes detailed discussions of bean origin characteristics, roast levels, and how to adjust techniques accordingly. This analytical approach creates self-sufficient brewers who can adapt to new equipment or beans.
Value for Money: At $15.06, this occupies the sweet spot between free internet forums and $40 professional barista certifications. Considering most enthusiasts spend $15+ on a single bag of specialty beans, improving your extraction technique offers compounding returns. It can postpone expensive equipment upgrades by maximizing your current setup’s potential. The knowledge remains relevant as trends evolve.
Strengths and Weaknesses: Pros: Comprehensive technical foundation; equipment-agnostic principles; likely includes troubleshooting flowcharts; develops palate and technique simultaneously; cost-effective education; encourages experimentation. Cons: Potentially intimidating for casual coffee drinkers; requires dedicated study time; may need companion resources for visual learners; equipment specifics could become outdated; not suited for those wanting quick tips.
Bottom Line: An essential investment for anyone serious about coffee quality. If you’re content with automatic drip, pass. But if you’re pursuing café-quality results at home, this manual pays for itself in saved beans and improved mornings.
4. Tangoowal Culinary Specialty Tools Set,Professional Chef Cooking Plating Kit, 7 Pieces, Stainless Steel

Overview: The Tangoowal seven-piece plating kit equips cooks with professional tools for restaurant-quality food presentation. This stainless steel set includes an 11.5-inch offset spatula for smooth spreads, two decorating spoons (7.76-inch and 8-inch solid bowl) for precise sauce work, and three specialized tweezers (straight, offset, and curved tip at 6.3-inch) plus 12-inch long straight tweezers for delicate placement. Each tool features machined finger grips and grooved tips for control during intricate plating sessions.
What Makes It Stand Out: The tweezer variety is exceptional—three different tip configurations handle everything from herb placement to removing fish bones. The machined grips show attention to professional comfort during extended use. Unlike generic tool sets, this includes both an offset spatula (for cakes and proteins) and decorating spoons specifically designed for saucier work. The dishwasher-safe designation is crucial for busy kitchens. It’s a curated collection rather than a random assortment.
Value for Money: At $22.99, this undercuts professional brands significantly. Individual high-quality culinary tweezers often retail for $12-18, making this set a bargain. While it may not match the heirloom durability of Matfer or JB Prince tools, it delivers 90% of the functionality at a fraction of the cost. For culinary students or home cooks exploring modernist plating, it’s an accessible entry point.
Strengths and Weaknesses: Pros: Comprehensive seven-piece coverage; ergonomic machined grips; multiple tweezer angles for diverse tasks; dishwasher safe simplifies cleanup; excellent gift presentation; enables precise sauce artistry; stainless steel construction resists corrosion. Cons: Steel grade and thickness unspecified; long-term durability uncertain under professional kitchen abuse; overkill for cooks who don’t prioritize presentation; requires dedicated storage; effective use demands practice and technique; may arrive needing polishing.
Bottom Line: A smart purchase for culinary students, food bloggers, or home chefs passionate about visual presentation. Casual cooks will find it unnecessary, but for those pursuing Instagram-worthy plates or professional skills, it offers tremendous bang for the buck.
5. NU-View Concession & Food Equipment & Multi-Purpose Cleaner, Removes Cooking Oil, Grease, Sugar, Starch & Protein Residues, 18 OZ
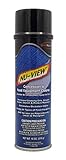
Overview: NU-View Concession Cleaner is a purpose-built degreasing foam formulated for the unique challenges of food service equipment. This 18-ounce aerosol tackles cooking oils, grease, sugar, starch, protein residues, and baked-on carbon that accumulate on popcorn poppers, steamers, hot dog boilers, and nacho warmers. Its non-toxic chemistry and material-safe formula (stainless steel, aluminum, plastics, chrome, plexiglass) make it suitable for mixed-material appliances where harsh chemicals would cause damage.
What Makes It Stand Out: The foam’s vertical cling technology is the killer feature—unlike liquid sprays that immediately run off, this stays put on hood filters, kettle interiors, and machine sides, allowing active ingredients to dissolve grime without constant reapplication. The non-toxic formulation is critical in food environments where residue concerns are paramount. Its specialized targeting of sugar and starch residues (common in concession settings) distinguishes it from generic degreasers focused only on oil.
Value for Money: At $11.77 ($0.66/ounce), it commands a premium over $3 all-purpose cleaners but delivers specialized performance. For concession operators, preventing equipment failure from carbon buildup saves hundreds in repairs. The multi-surface compatibility eliminates buying separate cleaners for stainless, plastic, and aluminum components, consolidating costs. Home users with serious equipment will find it cost-effective; casual cooks won’t.
Strengths and Weaknesses: Pros: Superior vertical surface adhesion; genuinely non-toxic and food-safe; effective on sugar/starch residues; safe across diverse materials; reduces manual scrubbing; made in USA; targeted formula saves time. Cons: Aerosol propellant environmental impact; requires ventilation despite non-toxic claim; may need repeat applications for heavy carbon; specialized nature limits household versatility; higher cost-per-ounce than generic options; trigger mechanism durability uncertain.
Bottom Line: Indispensable for concession businesses and serious home preservers/fryer owners. Standard home kitchens likely don’t need this level of specialization—stick with simpler degreasers unless you’re cleaning commercial-style equipment regularly.
6. Smokehouse Handbook: Comprehensive Techniques & Specialty Recipes for Smoking Meat, Fish & Vegetables

Overview: This authoritative guidebook serves as a masterclass in the art of smoking foods, delivering detailed techniques and specialty recipes for meat, fish, and vegetables. Designed for both novices and experienced pitmasters, the Smokehouse Handbook demystifies the smoking process with step-by-step instructions and scientific explanations behind flavor development and food safety.
What Makes It Stand Out: Unlike basic grilling cookbooks, this handbook covers the full spectrum of smoking methods across multiple food categories. It includes wood selection guides, temperature control strategies, brining techniques, and specialty recipes that elevate beyond standard barbecue fare. The comprehensive approach addresses cold smoking, hot smoking, and even vegetarian options rarely covered elsewhere.
Value for Money: At $24.95, this specialized cookbook offers exceptional value compared to hands-on smoking classes that cost hundreds. The knowledge density justifies the price, providing years of reference material in one volume. Digital resources may be cheaper but lack the organized, curated expertise this handbook delivers.
Strengths and Weaknesses: Strengths include exhaustive technique coverage, cross-food-category versatility, and reliable recipes from smoking experts. The structured progression helps build skills systematically. Weaknesses involve its niche appeal—casual grillers may find it too specialized. The book format means no video demonstrations, which some learners prefer. Beginners might feel overwhelmed by the technical depth initially.
Bottom Line: An essential reference for serious smoking enthusiasts. The Smokehouse Handbook earns its place on any outdoor cook’s shelf, offering knowledge that pays dividends in flavor. For committed learners, it’s a worthwhile investment that transforms smoking from mystery to mastery.
7. Uno Casa - XL Pie Irons Cast Iron Sandwich Maker - Mountain Japanese Sandwich Maker with Recipe Book - Durable Campfire Cooking Equipment for Toasted Pies, and More

Overview: This XL cast iron pie iron revolutionizes campfire cooking with its oversized design and versatile functionality. The Uno Casa sandwich maker transforms basic ingredients into toasted pies, Japanese sandwiches, and more. Built for outdoor durability, it includes removable handles and a recipe e-book to inspire campsite culinary creativity.
What Makes It Stand Out: The double-sized square head sets this apart from standard round pie irons, fitting more food while the grill grid interior enhances flavor through better heat distribution. Removable handles (13.8" and 21.6" options) solve storage and cleaning challenges that plague traditional one-piece designs. The secure hook closure prevents ingredient spillage during cooking.
Value for Money: At $32.50, this pie iron costs slightly more than basic models but delivers superior versatility and durability. Cast iron cookware lasts generations when maintained, making this a one-time purchase. The included recipe book and ergonomic features justify the modest premium over cheaper aluminum alternatives that wear out quickly.
Strengths and Weaknesses: Strengths include exceptional durability, generous cooking capacity, portable design with removable handles, and pre-seasoned non-stick surface. The multi-use capability replaces several camping tools. Weaknesses: cast iron weight may challenge backpackers, requires careful drying to prevent rust, and pre-seasoning needs periodic maintenance. The learning curve for heat management can frustrate first-time users.
Bottom Line: A rugged, versatile upgrade for campfire cooking enthusiasts. While weight-conscious hikers should look elsewhere, car campers will appreciate the durability and capacity. The Uno Casa pie iron delivers restaurant-quality toasted pies outdoors, making it a worthy addition to any camping kit.
8. All-Clad Specialty Stainless Steel Universal Steamer for Cooking 3 Quart Food Steamer, Steamer Basket Silver
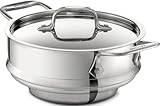
Overview: This premium 3-quart steamer insert exemplifies All-Clad’s commitment to professional-grade kitchen tools. Designed to fit 8-inch diameter saucepans and casseroles, the universal steamer delivers precise, even steaming that preserves nutrients and flavor. Constructed from heavy-gauge stainless steel with riveted handles, it integrates seamlessly with existing All-Clad cookware.
What Makes It Stand Out: The universal fit design specifically accommodates All-Clad’s 3 and 4-quart saucepans with non-flared edges, ensuring stability during use. Heavy-gauge stainless steel construction provides superior heat conductivity compared to cheaper alternatives. The included lid creates an efficient closed system, while riveted handles guarantee secure grip even when fully loaded.
Value for Money: At $89.95, this steamer commands a premium price that reflects All-Clad’s legendary durability and lifetime warranty. While significantly more expensive than basic steamers, it offers perfect compatibility with All-Clad pans, eliminating wobbling and uneven cooking. For owners of All-Clad cookware, it’s a precision tool that maintains brand consistency.
Strengths and Weaknesses: Strengths include exceptional build quality, precise fit for All-Clad pans, dishwasher-safe convenience, and lifetime warranty backing. The heavy-gauge steel ensures even heat distribution. Weaknesses: the high cost is hard to justify for non-All-Clad owners, limited compatibility with flared-edge pans, and “Made in China” may disappoint those expecting American manufacturing.
Bottom Line: An essential accessory for All-Clad devotees who demand seamless integration. The universal steamer delivers professional results and lifetime durability. However, budget-conscious cooks or those without compatible All-Clad pans should consider more affordable universal options that offer similar functionality at a fraction of the cost.
9. The Joy Of Coffee: The Essential Guide to Buying, Brewing, and Enjoying - Revised and Updated – The Complete Source for Beans and Home Espresso Equipment

Overview: This definitive coffee guidebook provides comprehensive education on coffee selection, brewing methods, and equipment for home baristas. The revised edition updates bean sourcing information and covers modern espresso equipment. Written by experts, it transforms coffee from daily habit into craft, offering systematic guidance for improving home brewing quality.
What Makes It Stand Out: The book’s exhaustive coverage spans from coffee bean botany to advanced espresso machine maintenance, creating a complete reference. It includes detailed equipment reviews, grinding techniques, and troubleshooting guides rarely found in single volumes. The updated edition addresses third-wave coffee trends and modern brewing devices, keeping content relevant.
Value for Money: At $12.37, this guide offers remarkable value—costing less than two bags of specialty coffee beans. The depth of knowledge rivals expensive barista courses, providing permanent reference material. Online resources offer free information but lack this book’s organized, vetted expertise and comprehensive scope.
Strengths and Weaknesses: Strengths include authoritative content, systematic structure, equipment buying guidance, and affordable price point. The troubleshooting sections help diagnose common brewing problems effectively. Weaknesses: even revised editions can become dated given coffee’s rapid evolution, and book format lacks visual demonstrations. Some equipment recommendations may not reflect the newest market releases.
Bottom Line: An indispensable reference for coffee enthusiasts seeking to elevate their home brewing. The Joy of Coffee delivers exceptional knowledge density at a budget price. While serious baristas may eventually outgrow it, beginners and intermediates will find years of valuable guidance. For the price, it’s an easy recommendation.
10. Taste of Home What Can I Cook in My Instant Pot, Air Fryer, Waffle Iron…?: Get Geared Up, Great Cooking Starts Here (Taste of Home Quick & Easy)

Overview: This practical cookbook tackles the challenge of maximizing small kitchen appliances, offering targeted recipes for Instant Pots, air fryers, waffle irons, and more. Part of Taste of Home’s Quick & Easy series, it helps home cooks justify their gadget investments with approachable recipes that deliver results without culinary school technique.
What Makes It Stand Out: The multi-appliance focus eliminates the need for separate cookbooks, providing crossover recipes and appliance-specific techniques in one volume. Taste of Home’s signature approachable style ensures recipes work for busy families, with clear instructions and common ingredients. The “What Can I Cook” framing directly addresses the uncertainty many gadget owners face.
Value for Money: At $15.43, this budget-friendly cookbook delivers substantial utility for owners of multiple appliances. Individual appliance cookbooks often cost $20+ each, making this compilation an economical choice. The quick & easy focus saves time and reduces expensive recipe failures that waste ingredients.
Strengths and Weaknesses: Strengths include broad appliance coverage, budget-conscious recipes, reliable Taste of Home testing, and beginner-friendly instructions. The variety prevents appliance boredom. Weaknesses: depth suffers given the breadth—each appliance gets superficial coverage rather than mastery-level technique. Recipe creativity may feel generic to experienced cooks, and the paperback format wears quickly with kitchen use.
Bottom Line: A solid starter guide for gadget-heavy kitchens. This book excels at building confidence in appliance cooking but won’t satisfy advanced users seeking technique depth. For the price and convenience, it’s perfect for busy families wanting quick wins. Consider it a practical reference rather than a comprehensive culinary education.
The Resurgence of Artisanal Butter Making
The farm-to-table movement has sparked renewed interest in traditional food preparation methods, and butter churning sits at the intersection of practicality and nostalgia. Home cooks are discovering that controlling every variable—from cream source to salt content—produces butter with complexity and freshness that mass-produced versions cannot match. Vintage-style churns tap into this desire for authenticity while providing the functional reliability modern users demand.
Understanding Vintage-Style Butter Churn Types
Before investing in equipment, understanding the fundamental designs that have stood the test of time will help you make an informed decision that aligns with your churning style and kitchen aesthetic.
Dash Churns: The Classic Country Choice
The iconic upright churn with a long wooden dasher and lid represents the most recognizable vintage style. These vertical churns rely on rhythmic up-and-down plunging motion to agitate cream until butter forms. The design simplicity means fewer mechanical parts to maintain, and the tall, slender profile makes them striking display pieces when not in use. Look for models with ergonomic handle grips and smooth, well-finished dasher paddles that won’t scratch interior surfaces.
Barrel Churns: Efficiency Meets Nostalgia
Mounted on a wooden stand or metal frame, barrel churns rotate horizontally using a hand crank or paddle wheel mechanism. The rolling motion creates continuous agitation, often reducing churning time compared to dash models. Their substantial presence commands attention in any kitchen, and the barrel construction typically allows for larger batch sizes. Evaluate the turning mechanism carefully—smooth gear operation and comfortable crank handles distinguish quality pieces from decorative replicas.
Paddle Churns: The Middle Ground
These versatile churns feature a paddle or blade assembly that rotates within a stationary container, either manually or with minimal electric assistance. The design offers excellent visibility of the churning process and typically requires less physical effort than dash churns while maintaining that hands-on connection to the craft. Paddle churns often accommodate modern kitchen constraints better than their bulkier counterparts.
Crock Churns: Earthenware Elegance
Glazed ceramic or stoneware crocks with wooden dashers represent some of the oldest churning traditions. The earthenware material provides natural temperature insulation, keeping cream at optimal churning temperature longer. Their rustic, earthy appearance appeals to collectors and practical cooks alike. When evaluating crock churns, examine the glaze quality for food safety and check that the wooden dasher fits precisely without wobbling excessively.
Manual vs. Electric Mechanisms: Finding Your Rhythm
The choice between purely manual operation and electric-assisted mechanisms defines your butter-making experience. Manual churns connect you directly to the process, allowing you to feel the cream’s transformation through changing resistance in the handle. This kinetic feedback helps experienced churners recognize when butter is about to form.
Electric vintage-style churns maintain the aesthetic appeal while incorporating small motors that drive the paddle or barrel rotation. These hybrids typically offer adjustable speed settings and automatic shutoff features, making them practical for those with physical limitations or time constraints. The key is finding models where the motor housing integrates seamlessly with the vintage design rather than appearing as an afterthought.
Material Matters: Wood, Glass, Ceramic, and Metal
The construction material significantly impacts both performance and authenticity. Traditional hardwoods like maple or beech resist absorbing flavors and withstand decades of use when properly maintained. Look for food-safe finishes and tight grain patterns that won’t harbor bacteria.
Glass churns, particularly those with vintage-inspired metal frameworks, offer the advantage of full visibility. You can monitor the entire process without lifting lids, which helps maintain consistent temperature. Thickness matters—heavy, tempered glass provides better thermal stability and durability.
Stainless steel interiors with vintage-styled exteriors combine modern hygiene standards with classic aesthetics. These are ideal for commercial kitchens or serious home producers who prioritize easy sanitization. Ceramic and stoneware options provide authentic weight and temperature retention but require more careful handling to prevent chipping.
Capacity Considerations: Matching Churn Size to Your Needs
Vintage-style churns range from petite one-pint models perfect for occasional use to substantial three-gallon versions suited for regular production. A two-quart capacity represents the sweet spot for most home users, yielding approximately one pound of butter per batch while remaining manageable to operate and store.
Consider your cream source when selecting capacity. If you’re purchasing cream from local dairies, smaller batches allow for more frequent flavor experiments. Those with home dairy animals may prefer larger churns to process milk efficiently. Remember that churns work best when filled to approximately one-third capacity—too little cream won’t agitate properly, while overfilling prevents adequate aeration.
Authentic Vintage vs. Vintage-Style Reproductions
Genuine antique churns carry historical charm and patina but present several challenges for practical use. Lead-based glazes, cracked wood that harbors bacteria, and non-standardized parts make many antiques better suited for decoration. Vintage-style reproductions, crafted by modern artisans, replicate the aesthetic while incorporating food-safe materials, replaceable gaskets, and improved mechanical designs.
When evaluating reproductions, examine how faithfully they’ve captured historical details—are the proportions correct? Do the metal bands show appropriate riveting? Are wooden components turned or carved using traditional methods? The best reproductions honor their inspiration while discreetly incorporating modern improvements.
Key Features to Evaluate Before Buying
Beyond basic type and material, several specific features separate exceptional churns from mediocre imitations. These details determine long-term satisfaction and ease of use.
Ergonomics and Handle Design
The handle is your primary point of contact, so its design deserves careful scrutiny. Look for smooth, sanded surfaces without splinters or rough spots. Contoured grips that fit comfortably in your palm reduce fatigue during extended churning sessions. For barrel churns, crank handles should rotate smoothly in your grip without requiring awkward wrist angles.
Stability and Base Construction
A churn that wobbles or walks across the counter creates frustration and potential safety hazards. Quality churns feature weighted bases, non-slip feet, or sturdy wooden stands that anchor the unit securely during operation. Test the stability by simulating churning motion—the base should remain firmly planted without rocking.
Lid and Seal Quality
Proper lid design prevents cream splatter and maintains consistent temperature. Wooden lids should fit snugly with minimal gaps, while glass or ceramic lids need reliable gaskets. Some premium models include locking mechanisms that secure the lid during vigorous churning. The seal material must be food-grade and replaceable, as gaskets inevitably wear over time.
Viewing Windows and Progress Monitoring
Even in vintage-style designs, small viewing windows or transparent sections allow you to monitor progress without interrupting the process. For opaque churns, consider models with easily removable lids that you can quickly lift to check consistency. Some barrel churns include timing marks on the exterior, referencing historical practices where churners tracked progress by counting rotations.
The Aesthetic Appeal: Integrating Vintage Style Into Modern Kitchens
A butter churn need not be relegated to storage between uses. The most beautiful vintage-style churns function as sculptural elements in kitchen decor. Consider how the churn’s finish, color, and proportions complement your existing aesthetic. Weathered wood tones pair beautifully with farmhouse kitchens, while crisp white ceramic suits more refined spaces.
Many modern reproductions offer customizable elements—choose from different wood stains, ceramic glazes, or metal finishes to match your kitchen palette. The churn’s silhouette should enhance rather than clutter your countertop, so measure your available space before falling in love with a particular model.
Essential Accessories for Your Butter Churning Journey
The churn itself represents just the beginning. Quality wooden butter paddles, also known as scotch hands, are indispensable for working butter and removing residual buttermilk. Look for paddles with smooth, rounded edges and comfortable grips. Butter molds with vintage-inspired designs add decorative flair to finished products, pressing intricate patterns into butter blocks.
A reliable dairy thermometer ensures you churn at the optimal 55-60°F temperature range. Butter cloths or fine-mesh strainers help separate buttermilk efficiently. Consider investing in a butter keeper or bell crock for storage—these traditional vessels keep butter fresh and spreadable at room temperature while adding another vintage element to your kitchen.
Maintenance and Care: Preserving Your Investment
Proper maintenance ensures your vintage-style churn remains functional and beautiful for decades. Wooden components require periodic oiling with food-grade mineral oil to prevent drying and cracking. Never submerge wooden churns in water; instead, wipe clean with damp cloths and mild soap, then dry immediately.
Glass and ceramic churns can withstand more thorough cleaning but still require gentle handling. Avoid abrasive scrubbers that scratch surfaces, as micro-scratches can harbor bacteria. Stainless steel interiors benefit from occasional polishing to maintain their non-reactive properties.
After each use, disassemble any removable parts and allow them to dry completely before storage. This prevents mold growth and wood warping. Store your churn in a climate-controlled environment away from direct sunlight, which can fade finishes and dry out wooden components.
Budget Considerations: What to Expect at Different Price Points
Entry-level vintage-style churns starting around $75-$150 typically feature smaller capacities and simpler mechanisms. These are excellent for beginners wanting to test the practice without significant investment. Mid-range options from $150-$350 offer better materials, improved ergonomics, and more authentic detailing.
Premium churns commanding $350-$600+ represent heirloom-quality pieces crafted by artisan manufacturers. These feature museum-quality woodwork, custom ceramic glazes, precision-engineered mechanisms, and comprehensive warranties. While the initial investment seems substantial, the cost per use decreases dramatically over decades of service.
Consider the total cost of ownership, including accessories and maintenance supplies. A slightly more expensive churn with replaceable parts and robust construction often proves more economical than replacing cheaper models every few years.
Space Requirements and Storage Solutions
While vintage-style churns make beautiful displays, they require dedicated space. Dash churns need vertical clearance for the full dasher stroke, typically requiring an additional 12-18 inches above the churn height. Barrel churns demand more counter footprint but can often be stored on sturdy shelving when not in use.
Measure your churning area carefully, accounting for elbow room and the ability to stand comfortably during operation. Some barrel churns feature detachable cranks that reduce storage height. Wall-mounted racks designed for drying pots can double as decorative churn storage, keeping your equipment accessible while showcasing its beauty.
Safety Features to Look For
Even traditional designs can incorporate modern safety considerations. Smooth, sanded edges prevent splinters and cuts. Food-grade finishes eliminate chemical leaching concerns. For electric models, look for UL certification and automatic shutoff mechanisms that prevent motor burnout if cream becomes too thick.
Stable bases prevent tipping, particularly important in households with children or pets. Some churns include locking lids that prevent accidental opening during operation. If you choose a genuine antique, have it professionally evaluated for lead glazes and structural integrity before food use.
Troubleshooting Common Churning Challenges
Even with perfect equipment, butter making presents learning curves. If butter refuses to form after 30-40 minutes of churning, your cream is likely too cold—let it warm slightly and try again. Conversely, if butter forms almost immediately but feels greasy, the cream was too warm.
Excessive foaming often indicates over-churning or cream that hasn’t aged properly. Quality vintage-style churns minimize these issues through superior agitation design, but understanding the underlying principles helps you adjust technique regardless of equipment.
If your churn develops off-odors, thoroughly clean and sun-dry wooden components—UV light naturally sanitizes wood. Persistent odors may require light sanding and re-oiling. Mechanical sticking in barrel churns usually indicates the need for food-grade lubricant on moving parts.
The Step-by-Step Churning Process with Vintage Equipment
Mastering your vintage-style churn requires understanding the full process. Begin with cream at 55-60°F, pouring it into your scrupulously clean churn. Churn at a steady, moderate pace—approximately one stroke per second for dash churns, or 40-50 rpm for barrel models.
After 15-20 minutes, you’ll notice the sound changing as whipped cream forms. Continue churning until you see small butter granules and the liquid becomes thin and watery—this is buttermilk. Drain it off, then add ice-cold water to rinse the butter, churning briefly to work out remaining buttermilk.
Transfer the butter to your wooden paddles, working it against a cold surface to remove all liquid. Add salt if desired, press into molds, and wrap tightly. The entire process typically takes 30-45 minutes with quality equipment, yielding butter with texture and flavor that justifies every moment of effort.
Frequently Asked Questions
How long does it typically take to churn butter in a vintage-style churn?
With properly tempered cream at 55-60°F, most manual vintage-style churns produce butter in 25-40 minutes of steady agitation. Barrel churns often work faster than dash churns due to continuous motion. Electric-assisted models may reduce this to 15-20 minutes. The key is maintaining consistent rhythm rather than speed—over-churning can produce greasy butter.
Can I use store-bought cream in a vintage butter churn, or does it need to be raw?
Both work beautifully, though they require slightly different approaches. Pasteurized heavy cream from the grocery store churns perfectly; just avoid ultra-pasteurized varieties as their high-heat processing alters protein structures. Raw cream from local dairies offers more complex flavors but must be aged 12-24 hours to develop proper acidity. Both options produce superior butter to commercial products.
What’s the best way to clean wooden butter churn components without damaging them?
Never submerge wooden parts in water or run them through a dishwasher. Instead, wipe surfaces with a cloth dampened with warm water and mild dish soap, then immediately dry with a clean towel. For stubborn residue, use a soft-bristled brush. After cleaning and complete drying, apply a thin coat of food-grade mineral oil to prevent cracking. Allow the oil to absorb overnight before using the churn again.
How do I know if a vintage-style churn is truly food-safe or just decorative?
Examine all finishes and materials for explicit “food-safe” labeling. Quality reproductions use FDA-approved glazes on ceramics and food-grade mineral oil finishes on wood. Avoid churns with visible lead solder on metal components or unknown varnish coatings. Reputable manufacturers provide material specifications. When in doubt, contact the maker directly—legitimate companies readily share safety certifications.
What’s the ideal temperature for churning butter, and how do I maintain it?
The sweet spot is 55-60°F (13-16°C). Too cold and butter won’t form; too warm and you’ll get greasy, low-yield butter. Chill your churn in the refrigerator beforehand, and start with cream at the proper temperature. If your kitchen is warm, place the churn in a basin of cool water during churning. Vintage ceramic churns excel at temperature maintenance due to their thermal mass.
Can children safely participate in butter churning with vintage-style equipment?
Absolutely—it’s an excellent family activity. Choose churns with smooth, splinter-free surfaces and stable bases that won’t tip. Barrel churns with easy-turning cranks are often more child-friendly than dash churns requiring more strength. Supervise young children closely, especially around moving parts. Start with small batches so they can see results quickly, maintaining their interest and preventing fatigue.
How much cream should I put in my churn for best results?
Fill your churn to approximately one-third capacity for optimal agitation. A two-quart churn performs best with 2-3 cups of cream, yielding about one pound of butter. Underfilling prevents proper aeration, while overfilling restricts movement and extends churning time. Mark your churn’s interior with a water line at the ideal fill level for easy reference.
Why is my butter taking much longer to form than expected?
The most common culprit is temperature—cream that’s too cold (below 50°F) churns slowly. Let it warm slightly and continue. Another factor is cream freshness; very fresh cream churns slower than cream aged 12-24 hours. Finally, check your churning speed—overly vigorous agitation can incorporate too much air, actually slowing butter formation. Slow, steady motion works best.
What’s the difference between butter paddles and regular wooden spoons for working butter?
Butter paddles (scotch hands) feature broad, flat surfaces with thin edges specifically designed for pressing and shaping butter while squeezing out buttermilk. Their shape allows you to work efficiently against a cold surface without the butter sticking. Regular spoons lack the surface area and proper angles, making the process tedious and less effective. The small investment in proper paddles dramatically improves results.
How often should I replace gaskets, seals, or other wear parts on my vintage-style churn?
With regular use, inspect gaskets and seals every six months for cracking, stiffness, or deformation. Most food-grade rubber or silicone seals last 1-2 years with proper cleaning. Wooden components can last decades but may need light sanding and re-oiling annually. Keep a small kit of replacement parts from the manufacturer—quality churn makers stock these specifically because they understand their equipment is built for long-term use.