There’s something almost magical about pulling a perfectly crusty, golden-brown artisan loaf from your own oven. The crackle of the crust, the cloud of steam escaping, that intoxicating aroma filling your kitchen—it’s a sensory experience that transforms ordinary weekends into memorable occasions. While professional bakeries rely on expensive steam-injected ovens, home bakers have discovered a brilliantly simple tool that delivers equally impressive results: the cast iron Dutch oven. And for those serious about their bread game, models equipped with lid lifters represent the pinnacle of convenience and safety.
These heavy-duty vessels create the ideal micro-environment for bread baking, trapping steam released from the dough itself to produce that coveted crispy crust and airy crumb. The lid lifter feature, often overlooked by casual cooks, becomes a game-changer when you’re handling blistering-hot cookware at 450°F or higher. No more fumbling with oven mitts or risking burns from escaping steam—just smooth, controlled access to your developing masterpiece. Whether you’re a sourdough obsessive or just beginning your no-knead journey, understanding what makes a Dutch oven exceptional for bread baking will elevate your results from good to bakery-quality.
Top 10 Cast Iron Dutch Ovens with Lid Lifters
Detailed Product Reviews
1. Lodge Camp Dutch Oven Lid Lifter. Black 9 mm bar Stock For Lifting & Carrying Dutch Ovens. (Black Finish), Model Number: A5
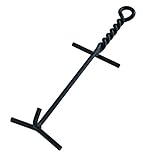
Overview: The Lodge Camp Dutch Oven Lid Lifter is the official accessory from America’s most trusted cast iron manufacturer. Designed specifically for Lodge’s line of camp Dutch ovens, this tool features a robust T-bar design that engages securely with slotted lids. Measuring approximately 15 inches with 9mm bar stock construction, it provides adequate distance from heat sources while maintaining the strength needed to lift heavy, coal-laden lids safely.
What Makes It Stand Out: The T-bar configuration offers superior control compared to simple hook designs, allowing you to lift, rotate, and maneuver lids with confidence. The 9mm thick bar stock provides exceptional durability without excessive weight, while the integrated hanging loop enables convenient storage. The heat-diffusing spiral handle is engineered to reduce heat transfer, keeping the grip cooler during extended cooking sessions. As a Lodge product, it’s guaranteed to fit all Lodge Dutch ovens perfectly.
Value for Money: At $18.19, this lifter sits in the mid-range price bracket. While cheaper alternatives exist, the Lodge name represents decades of proven cast iron expertise and quality assurance. For Lodge Dutch oven owners, this specialized tool ensures perfect compatibility and reliable performance that generic alternatives can’t guarantee. The investment pays dividends in safety and longevity.
Strengths and Weaknesses: Strengths include perfect Lodge compatibility, robust 9mm construction, effective heat-resistant handle, and brand reliability. Weaknesses are its premium price point and T-bar design that may not work as well with non-Lodge ovens. The specialized nature means less versatility across different brands.
Bottom Line: This is the ideal choice for dedicated Lodge enthusiasts who prioritize perfect fit and proven quality over bargain pricing. For your primary camp Dutch oven, the Lodge Lid Lifter is worth the modest premium.
2. 16.5" Cast Iron Black Finish Dutch Oven Lid Lifter with Spiral Bail Handle for Lifting and Carrying Dutch Oven Lid

Overview: This 16.5-inch Cast Iron Lid Lifter offers a budget-friendly solution for outdoor cooks seeking basic functionality without brand-name markup. The extended length provides excellent clearance from hot fires and sizzling coals, while the cast iron construction promises durability. The spiral bail handle aims to minimize heat transfer, making it more comfortable during prolonged use around the campfire.
What Makes It Stand Out: The primary appeal is the sub-$10 price point, making it the most affordable option in this category. The full cast iron construction provides heft and durability that steel alternatives lack, while the 16.5-inch length exceeds standard offerings. This tool is marketed as universally compatible, suitable for kitchen, backyard, and wilderness applications. The black finish offers basic corrosion resistance for outdoor storage.
Value for Money: At $9.99, this lifter delivers exceptional value for occasional campers or those new to Dutch oven cooking. The cast iron build should theoretically last decades with minimal care. However, the unknown manufacturer raises questions about quality control and consistency. For the price, it’s a low-risk entry point, though seasoned outdoorsmen might prefer proven brands.
Strengths and Weaknesses: Strengths include unbeatable price, generous length, durable cast iron material, and versatile application. Weaknesses involve uncertain brand reliability, potentially inconsistent manufacturing standards, and a basic design that may not fit all lid slots perfectly. The cast iron construction also makes it heavier than steel alternatives.
Bottom Line: Perfect for budget-conscious buyers or beginners testing the Dutch oven waters. While it lacks brand prestige, the value proposition is compelling for those prioritizing function over labels.
3. Camp Cast Iron Dutch Oven Lid Lifter and Folding Finish Camp Dutch Oven Lid Stand can be used as Trivet, Lifter and Skillet Holder

Overview: This combination package includes both a lid lifter and a folding lid stand, addressing two common Dutch oven needs in one purchase. The 15-inch lifter features cast iron construction with a spiral handle, while the steel stand folds flat for transport. The stand’s dual-purpose design allows it to function as both a trivet and an inverted griddle surface, maximizing utility in camp kitchens where space and gear weight matter.
What Makes It Stand Out: The bundled approach delivers immediate versatility that standalone lifters can’t match. The folding stand transforms your lid into a secondary cooking surface and provides a clean resting place for hot lids. Both pieces feature black coated finishes for weather resistance. The stand’s compact folded dimensions (7 7/8" square) make it backpack-friendly for serious wilderness cooks who count every ounce and cubic inch.
Value for Money: At $21.99, this is the priciest option, but you’re getting two specialized tools. Purchased separately, similar accessories would cost $25-30. The stand’s multi-functionality adds significant value, essentially giving you a portable griddle and trivet. For dedicated camp chefs, the convenience justifies the premium. Casual users might find the bundle unnecessary.
Strengths and Weaknesses: Strengths include comprehensive solution, portable folding design, stand versatility, and cost savings versus separate purchases. Weaknesses are the shorter 15-inch lifter providing less reach, potential stand stability issues with heavy lids, and the highest overall price point. The steel stand may not be as durable as cast iron.
Bottom Line: This bundle excels for committed outdoor cooks who need both accessories. The convenience and versatility outweigh the cost premium, making it the smartest comprehensive choice for serious camp kitchens.
4. Stansport Dutch Oven Lid Lifter (16000), Black

Overview: The Stansport Dutch Oven Lid Lifter offers a straightforward, no-frills approach to handling hot Dutch oven lids. Constructed from durable steel, this tool focuses on essential functionality without decorative elements or proprietary designs. Its simple hook configuration works with most slotted lids, making it a versatile addition to any camp cooking kit. The 16.5-inch length provides adequate safety distance from heat sources.
What Makes It Stand Out: Stansport’s reputation for reliable outdoor gear at reasonable prices defines this product. The minimalist design prioritizes function over form, appealing to traditionalists who prefer simple, time-tested tools. The steel construction offers a good balance of strength and weight, lighter than cast iron alternatives. Its universal compatibility with “most slotted lids” makes it a safe choice for mixed-brand Dutch oven collections.
Value for Money: At $11.99, this lifter hits the sweet spot between bargain generics and premium brands. You’re paying for Stansport’s quality assurance without the Lodge premium. The steel build should last many seasons with basic care. For campers owning multiple Dutch oven brands, the universal design provides better value than brand-specific tools.
Strengths and Weaknesses: Strengths include brand reliability, universal compatibility, lightweight steel construction, and honest pricing. Weaknesses are the basic handle design (no spiral heat diffusion mentioned), simple hook geometry offering less control than T-bar designs, and potentially thinner steel than heavy-duty alternatives. The lack of a hanging loop is a minor inconvenience.
Bottom Line: A solid mid-range choice for practical campers who value brand trust and universal compatibility. It strikes an excellent balance between cost, quality, and versatility for general outdoor cooking needs.
5. 16.7" Cast Iron Black Finish Dutch Oven Lid Lifter with Spiral Bail Handle for Lifting and Carrying Dutch Oven Lid(V Shape)

Overview: This 16.7-inch lid lifter distinguishes itself with a V-shaped hook design that may offer enhanced grip on certain lid configurations. Similar to other budget cast iron options, it provides extended reach and durable construction at an attractive price point. The spiral bail handle aims to minimize heat transfer, while the black finish offers basic protection against the elements for outdoor storage and use.
What Makes It Stand Out: The V-shape hook represents a subtle design variation that could provide more secure engagement with some Dutch oven lids compared to standard J-hooks. At $11.99, it competes directly with other generic cast iron lifters while offering this unique geometry. The near-identical specifications to other budget options suggest similar manufacturing, but the V-shape may appeal to users seeking alternatives to traditional designs.
Value for Money: Positioned between the cheapest generic and brand-name options, this lifter offers cast iron durability at a steel price point. The V-shape adds potential value without cost increase. However, like other no-name cast iron tools, quality consistency remains a question mark. For the price, it’s a reasonable gamble on a potentially improved design.
Strengths and Weaknesses: Strengths include affordable cast iron construction, V-shape design innovation, adequate length, and heat-resistant handle. Weaknesses involve unknown brand reputation, questionable quality control, and limited reviews verifying the V-shape advantage. The cast iron weight may fatigue users during long cooking sessions.
Bottom Line: Worth considering if you’re drawn to the V-shape design or want cast iron at a budget price. For most users, established alternatives offer more predictable performance, but this remains a solid value option for adventurous buyers.
6. Folding Finish Camp Dutch Oven Lid Stand and Camp Cast Iron Dutch Oven Lid Lifter

Overview: This practical two-piece set provides essential campfire cooking accessories in one compact package. The folding steel lid stand measures 7 7/8 inches square and collapses to just 2 3/4 inches high for effortless transport and storage. Paired with a 15-inch cast iron lid lifter featuring a spiral bail handle, this combination addresses two fundamental challenges of Dutch oven cooking: where to place hot lids and how to handle them safely over open flames.
What Makes It Stand Out: The dual-functionality of the lid stand sets this apart from basic trivets. When inverted, it transforms your Dutch oven lid into a functional griddle, maximizing cooking surface area at your campsite. The stand’s heat-resistant coating withstands high temperatures while protecting surfaces beneath. The cast iron lifter’s spiral bail handle naturally stays cooler than solid metal and provides excellent grip control when maneuvering heavy cast iron lids. The folding design is particularly valuable for campers with limited packing space.
Value for Money: At $20.59, this set offers solid value compared to purchasing components separately. Similar cast iron lifters alone typically cost $12-15, while quality folding stands retail for $10-18. You’re essentially getting the stand for just a few extra dollars. The durable materials ensure years of service, making this a cost-effective investment for occasional to regular campers who prioritize portability without sacrificing functionality.
Strengths and Weaknesses: Strengths include compact folding design, versatile lid stand that doubles as griddle support, durable cast iron lifter construction, and excellent heat resistance. The spiral handle provides superior grip and heat dissipation. Weaknesses are the relatively small stand size that may not accommodate oversized lids, and the basic feature set lacking additional accessories like gloves or tongs. The stand’s steel construction, while sturdy, isn’t as traditional as cast iron for some purists.
Bottom Line: This set delivers exactly what most campfire cooks need without unnecessary frills. It’s an ideal choice for campers seeking a portable, durable solution for lid management. While minimalists might prefer just a lifter, the added versatility of the folding stand justifies the modest price increase. Perfect for those who value space-saving design and proven functionality.
7. IPROUDER 5-in-1 Dutch Oven Camping Accessories Kit - Campfire Cooking Equipment with Heat-Resistant Gloves, 16" Scissors Tongs, Lid Lifter, Lid Stand & Trivet | BBQ Tools, Outdoor Camping Cookware

Overview: This comprehensive kit eliminates the guesswork from campfire cooking preparation by bundling five essential tools into one convenient package. The set includes a 16.5-inch lid lifter, 10.6-inch lid stand, 13-inch heat-resistant gloves, 16-inch scissor tongs, and a trivet. Designed for versatility, each component serves multiple functions, making it an all-in-one solution for Dutch oven enthusiasts who want to arrive at camp fully equipped without sourcing items separately.
What Makes It Stand Out: The 4-in-1 lid stand’s versatility is impressive, functioning as a trivet, lifter, stand, or griddle base. The included heat-resistant gloves feature high-density aramid fabric with silicone coating, offering protection up to the forearms—far more comprehensive than standard gloves. The scissor tongs provide a sturdy alternative to traditional tongs for handling hot coals or food. The spiral-handled lifter’s long T-bar design ensures stable, secure lid manipulation from a safe distance.
Value for Money: Priced at $25.39, this kit represents exceptional value. Purchasing comparable items individually would easily exceed $40-50. The gloves alone would cost $15-20, while quality tongs and lifters add another $20-30. For campers building their kit from scratch, this bundle saves both money and shopping time. The convenience factor of having matched, purpose-designed tools further enhances its worth, particularly for beginners unsure what to buy.
Strengths and Weaknesses: Strengths include comprehensive tool selection, high-quality heat-resistant gloves, versatile lid stand, and excellent overall value. The aramid fabric gloves with silicone grip outperform basic leather alternatives. Weaknesses include potentially uneven quality across components, bulkier packing than minimal sets, and the steel construction may not appeal to cast iron purists. The included stand, while versatile, might not support very large Dutch ovens as stably as dedicated, heavier stands.
Bottom Line: This is the perfect starter kit for new Dutch oven campers or those looking to upgrade multiple worn-out tools simultaneously. It provides professional-level protection and functionality at a budget-friendly price point. While seasoned campers might prefer premium individual pieces, the convenience and comprehensive nature make it hard to beat for most outdoor cooking enthusiasts.
8. Stanbroil 15" Dutch Oven Lid Lifter with Spiral Bail Handle, Cast Iron Dutch Oven Lid Lifter for Outdoor/Campfire Cooking Accessories, Black Finish

Overview: This single-purpose tool focuses on doing one job exceptionally well: safely lifting and rotating hot Dutch oven lids. The 15-inch length provides adequate distance from heat sources while maintaining control over heavy cast iron cookware. Constructed from durable cast iron with a black finish, it features the traditional spiral bail handle design that has proven effective for generations of campfire cooks. Compatible with all Lodge Dutch Ovens, it serves as a reliable, no-frills solution for managing lids during outdoor cooking sessions.
What Makes It Stand Out: Simplicity is this tool’s greatest strength. Unlike multi-piece kits, there’s nothing to break, lose, or complicate your packing list. The spiral bail handle naturally dissipates heat while providing a comfortable, secure grip even with gloved hands. Its cast iron construction matches the durability of your Dutch oven itself, developing a seasoned patina over time. The tool’s straightforward design means zero learning curve—anyone can immediately use it effectively. At just 15 inches, it strikes the right balance between reach and packability.
Value for Money: At $13.99, this is the most budget-friendly option for acquiring a quality lid lifter. It’s perfect for campers who already own a lid stand, gloves, and other accessories but need to replace a broken lifter or upgrade from improvised tools like pliers. Compared to multi-tool kits costing $20-30, this represents significant savings if you don’t need additional components. The cast iron construction ensures this lifter will outlast cheaper steel alternatives, making it a wise long-term investment.
Strengths and Weaknesses: Strengths include affordable price, durable cast iron build, proven spiral handle design, and universal Lodge compatibility. It’s lightweight and takes up minimal space. Weaknesses are its single-function nature—no stand, gloves, or other accessories included. The 15-inch length, while adequate, is shorter than some premium lifters, potentially bringing you closer to heat than ideal for very large fires. It lacks the T-bar design some users prefer for maximum stability.
Bottom Line: If you need only a lid lifter and nothing else, this is your best value option. It’s a durable, traditional tool that performs its sole function reliably. Ideal for experienced campers with established kits or budget-conscious buyers who prioritize essentials over comprehensive sets. Don’t expect frills, but do expect years of dependable service from this straightforward cast iron lifter.
9. Overmont Camp Dutch Oven Pre Seasoned Cast Iron Lid Also a Skillet Casserole Pot with Lid Lifter for Camping Cooking BBQ Baking 6QT(Pot+Lid)
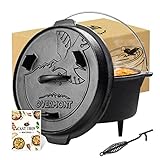
Overview: This isn’t just an accessory—it’s a complete 6-quart cast iron Dutch oven system designed for serious campfire cooking. The package includes a pre-seasoned pot with integral legs, a flanged lid that doubles as a 10-inch skillet, and a matching lid lifter. Both pot and lid feature three legs for stable positioning over coals, while the lid’s flat design with raised edge contains coals for top-down baking. The integrated system approach ensures all components work together seamlessly, eliminating compatibility concerns.
What Makes It Stand Out: The lid’s dual nature as a skillet is a game-changer for campsite cooking versatility, effectively giving you two pieces of cookware in one. Pre-seasoning means you can cook immediately without the initial preparation ritual. The eagle logo design adds a touch of personality while the durable handle allows hanging over open flames. Overmont emphasizes environmental benefits, noting cast iron’s energy efficiency through superior heat retention and distribution—particularly valuable for novice campers achieving consistent results. The included lifter is specifically designed for this oven’s weight and dimensions.
Value for Money: At $59.99, this represents mid-range pricing for a quality 6QT cast iron Dutch oven alone, making the included lifter essentially free. Comparable Lodge models retail for $60-80 without accessories. For campers needing both the oven and tools, this eliminates separate purchases. The lifetime durability—when properly cared for—means this could be the last Dutch oven you buy, amortizing the cost over decades. The 6-quart capacity serves 4-6 people, making it practical for family camping.
Strengths and Weaknesses: Strengths include complete integrated system, versatile lid/skillet combo, pre-seasoned convenience, excellent heat retention, and lifetime durability. The legs on both pot and lid provide unmatched stability over coals. Weaknesses are considerable weight (typical for cast iron), higher upfront cost than accessory-only sets, and the 6QT size may be oversized for solo campers. The included lifter, while functional, is basic compared to specialized ergonomic models.
Bottom Line: This is the ideal choice for campers ready to invest in a permanent, high-quality Dutch oven system rather than piecemeal accessories. The skillet-lid versatility and pre-seasoned convenience justify the price premium over bare-bones alternatives. Perfect for families or groups who camp regularly and want professional-grade cooking capabilities. If you already own a Dutch oven, skip this; if you’re starting fresh, this is your best integrated option.
10. RAAKARRS Dutch Oven Lid Lifter & Folding Lid Stand Set – Heavy-Duty Steel with Silicone Grips – Lift, Rotate, Support Cast Iron Lids – Great for Campfire, Outdoor Picnic, BBQ, and Cooking

Overview: This upgraded two-piece set enhances the traditional lid lifter and stand combination with modern comfort features. The approximately 17-inch lid lifter provides extended reach with a 4.2-inch T-bar for maximum stability when handling heavy lids. The folding stand measures roughly 11 x 11 x 3 inches, offering generous support for various Dutch oven sizes. Both components feature heavy-duty steel construction with black coating, and the set includes bonus silicone handle grips for additional heat protection during baking or stovetop use.
What Makes It Stand Out: The extended 17-inch length on the lifter keeps you notably further from heat sources than standard 15-inch models—a significant safety advantage. The included silicone grips are a thoughtful addition rarely found in basic sets, providing extra protection when grabbing hot handles or lid lifters. The T-bar design offers superior leverage and control compared to simple hook-style lifters. The stand’s larger footprint provides more stable support for oversized lids when using them as griddles, reducing tipping risk on uneven ground.
Value for Money: At $21.99, this set positions itself as a mid-range option between basic $15-18 sets and premium $30+ alternatives. The silicone grips add value that would cost $5-8 separately. The longer lifter and larger stand justify the slight premium over entry-level options. For campers prioritizing safety and comfort, the extra reach and grips provide tangible benefits worth the additional cost. The steel construction, while not traditional cast iron, reduces weight without sacrificing durability.
Strengths and Weaknesses: Strengths include extended 17-inch reach for safety, stable T-bar lifter design, larger stand footprint, bonus silicone grips, and sturdy steel construction. The folding design maintains portability despite larger dimensions. Weaknesses include steel rather than cast iron lifter (may not develop seasoning), slightly higher price than minimalist sets, and the stand’s larger size still packs down efficiently but takes more space than ultra-compact models. The black coating may wear over time with heavy use.
Bottom Line: This set strikes an excellent balance between safety, functionality, and value. The longer lifter and silicone grips address common campfire cooking pain points without breaking the bank. Ideal for safety-conscious campers or those with larger Dutch ovens who need extra stability. While purists might prefer all-cast-iron construction, the practical benefits of this upgraded steel set make it a smart choice for most outdoor cooking scenarios.
Why Cast Iron Reigns Supreme for Artisan Bread
Cast iron Dutch ovens have become the gold standard for home bread baking for reasons that go far beyond tradition. The material’s unique physical properties create conditions that mimic professional baking environments, giving your loaves the best possible start in life. Unlike lightweight metal pans or ceramic bakeware, cast iron brings serious thermal mass to the equation, meaning it holds onto heat with remarkable tenacity. This stability is crucial when you introduce cold dough to a hot environment, preventing the temperature from dropping precipitously and ensuring your bread springs upward rapidly during those critical first minutes.
The Steam Environment Magic
The secret to artisan bread’s crackling crust lies in steam. When dough enters a hot oven, surface moisture delays crust formation, allowing the loaf to expand fully before the exterior sets. Professional ovens inject steam precisely for this purpose. Your Dutch oven replicates this by trapping moisture evaporating from the dough itself under its heavy lid. This self-contained steam bath creates a humid environment for the first 20-30 minutes of baking, after which removing the lid allows the crust to dry and caramelize into that deep, rich color and shatteringly crisp texture. Lid lifters become invaluable here, letting you vent steam and remove the lid without tilting it and dripping condensation onto your carefully scored dough.
Thermal Mass and Heat Retention Science
Thermal mass refers to a material’s ability to absorb and store heat energy. Cast iron’s density gives it exceptional thermal mass, which translates to consistent, even heating throughout the baking process. When you preheat your Dutch oven, that heat energy doesn’t just sit on the surface—it saturates the entire vessel. The moment you add your dough, this stored energy radiates from all directions, not just the bottom. This surround-heat effect cooks the bread evenly, eliminating pale spots or undercooked centers. The weight that makes these pots challenging to handle is precisely what makes them perform so brilliantly.
Decoding Lid Lifters: Your Safety Essential
Lid lifters might seem like a minor convenience feature until you’ve experienced the adrenaline spike of removing a 500-degree lid with standard oven mitts. These integrated mechanisms provide mechanical advantage and keep your hands clear of scalding steam, transforming a potentially hazardous maneuver into a controlled, confident action. They come in various designs, from simple wire bails to sophisticated hinge systems, but all serve the same critical function: safe steam management.
Mechanical vs. Integrated Lid Lifter Designs
Mechanical lid lifters typically consist of a sturdy wire bail attached to the lid’s handle, allowing you to lift straight up without gripping the hot surface. Integrated designs build the lifting mechanism directly into the handle assembly, often using heat-resistant materials or creating enough clearance that standard oven mitts can grip safely. Some advanced systems even allow one-handed operation, letting you steady the pot with one hand while removing the lid with the other. When evaluating designs, consider how the lifter balances the lid’s weight and whether it provides enough clearance to prevent steam burns on your wrists and forearms.
Burn Prevention and Steam Management
Steam burns are particularly nasty because steam carries more heat energy than dry air at the same temperature. A lid lifter’s primary safety benefit is creating distance between you and the concentrated steam that rushes out when you crack the seal. The best designs allow you to lift the lid vertically without tilting it, preventing condensed water from dripping onto your loaf or oven element. Some bakers prefer lifters that let them rotate the lid slightly first, venting steam gradually before full removal. This controlled release reduces the risk of steam rushing out in a single, dangerous burst.
Critical Features for Bread-Baking Excellence
Selecting the right Dutch oven for bread requires evaluating several interconnected features that affect performance, safety, and longevity. While all cast iron Dutch ovens share basic characteristics, subtle differences in design can significantly impact your bread-baking success. Understanding these nuances helps you make an informed decision based on your baking style, physical capabilities, and kitchen setup.
Capacity: Right-Sizing for Your Boules
For most home bakers, a 5 to 6-quart capacity hits the sweet spot. This size comfortably accommodates a 1 to 1.5-pound boule or batard with enough headspace for proper oven spring—the dramatic rise that occurs in the first minutes of baking. Too small, and your dough will touch the lid, creating a flat top and uneven crust. Too large, and you’ll lose steam concentration, resulting in a paler, less crispy crust. Consider your typical loaf size: sourdough enthusiasts often prefer 6-quart models for those ambitious, high-hydration loaves, while casual bakers might find 5 quarts perfectly adequate for no-knead recipes.
Geometry Wars: Round vs. Oval
Round Dutch ovens dominate bread baking discussions for good reason—they match the shape of classic boules perfectly, promoting even expansion in all directions. The circular footprint allows heat to penetrate uniformly from the sides, creating consistent crust development. Oval shapes excel for batards and ciabatta-style loaves, giving you length without excessive width. However, oval pots can create slightly uneven heat distribution at the narrow ends. If you exclusively bake round loaves, stick with circular geometry. If you enjoy variety and occasionally bake longer shapes, an oval pot offers versatility, though you might need to rotate the loaf halfway through for even browning.
Enameled vs. Raw Cast Iron Surfaces
This debate stirs passionate opinions in baking circles. Bare cast iron, when properly seasoned, becomes virtually non-stick and can withstand any temperature your home oven can produce. It develops a dark patina over time that actually improves performance. Enameled cast iron eliminates seasoning concerns and prevents iron from reacting with acidic doughs, though most bread doughs aren’t acidic enough to cause issues. The real consideration is temperature tolerance: some enamel finishes can discolor or degrade above 500°F, while bare iron laughs at extreme heat. For bread baking, where temperatures often exceed 475°F, ensure any enameled pot is rated for high-heat use. Bare iron’s main drawback is maintenance—you must keep it seasoned and dry to prevent rust.
Lid Seal Integrity and Steam Trapping
Not all lids are created equal. The best bread-baking Dutch ovens feature heavy, tight-fitting lids with either a smooth, ground rim or a self-basting texture. Smooth rims create a tighter seal, trapping more steam, but can be prone to chipping if handled roughly. Self-basting lids, with their concentric rings or spikes, are designed to return moisture to braises and stews, but work beautifully for bread too. The key is weight—a substantial lid resists being lifted by internal steam pressure and maintains consistent contact with the pot’s rim. Test the seal by placing the lid on the pot; it should sit firmly without wobbling and require a slight tug to remove, even when cold.
Handle Systems: Heat, Height, and Handling
Handle design impacts both safety and functionality. Loop handles on the pot itself should be large enough to accommodate gloved hands and positioned high enough to stay cooler during oven use. Some premium designs use stainless steel or other materials that remain cooler than cast iron. The lid handle must be heat-resistant or tall enough to grip safely with oven mitts. Lid lifters integrated into the handle assembly should feel sturdy and operate smoothly without flexing or bending. Consider how the entire system works together—can you confidently move a 500-degree, 15-pound vessel from oven to cooling rack without feeling unstable?
Weight-to-Performance Ratio
There’s no escaping the heft of quality cast iron. A 6-quart Dutch oven typically weighs between 12 and 18 pounds, and that weight increases with food. While this mass delivers superior performance, it can be challenging for some users to maneuver. Lighter options exist but often sacrifice thermal mass, leading to temperature fluctuations that affect bread quality. Look for designs that distribute weight evenly and provide secure grip points. Some bakers keep their Dutch oven on a sturdy baking sheet, using it as a tray to slide the entire assembly in and out of the oven, minimizing lifting distance and risk.
Pre-Baking Preparation Protocols
Success with Dutch oven bread baking begins long before you shape your dough. Proper preparation of your cookware ensures consistent results and extends the life of your investment. These protocols become second nature with practice, but understanding the “why” behind each step helps you adapt to different recipes and conditions.
Seasoning Strategies for Bare Iron
Even pre-seasoned Dutch ovens benefit from additional seasoning when dedicated to bread baking. The process is simple: coat the interior lightly with a high-smoke-point oil like flaxseed or grapeseed, wipe away excess until it looks nearly dry, then bake upside-down in a 450°F oven for an hour. This polymerizes the oil into a hard, non-stick surface. For bread baking, focus on the interior and lid underside—where dough contacts the surface. Avoid over-seasoning; multiple thin coats work better than one heavy application. A well-seasoned pot releases bread effortlessly and develops a beautiful, dark patina that improves with each bake.
Preheating Protocols for Best Results
Preheating is non-negotiable for artisan bread. Place your empty Dutch oven (lid on) in a cold oven, then set your desired temperature—typically 450-500°F for lean doughs, slightly lower for enriched breads. Heating gradually prevents thermal shock and ensures the entire vessel, including the lid, reaches temperature simultaneously. Most recipes call for a 30-45 minute preheat, but thicker-walled pots may benefit from a full hour. Adding a baking stone beneath the Dutch oven can help maintain temperature stability, especially in ovens that cycle frequently. Always use oven mitts rated for high temperatures; standard mitts may not provide adequate protection at 500°F.
Mastering Advanced Baking Techniques
Once you’ve mastered basic no-knead bread, these advanced techniques help you tackle challenging recipes and achieve professional-level results. The Dutch oven’s versatility shines when you understand how to manipulate steam, temperature, and timing to control crust development and crumb structure.
Steam Generation Without Scalding
While the Dutch oven traps natural steam, some recipes benefit from additional moisture. Rather than risking burns by pouring water into a hot pot, try these safer methods: place a few ice cubes on a small piece of parchment paper beside your dough, or mist the dough surface lightly with water before covering. Some bakers place a small, preheated lava rock in a corner of the pot, adding a tablespoon of water to it after loading the bread. The rock’s heat instantly vaporizes the water without dramatic splashing. Lid lifters prove invaluable here, allowing you to add steam quickly and close the pot before heat escapes.
Temperature Curve Management
Professional bakers manipulate oven temperature throughout the bake, and you can too. Start at a high temperature—475-500°F—for the first 20 minutes with the lid on, maximizing oven spring. Then reduce heat to 450°F when you remove the lid, allowing the crust to develop color without burning. For very dark, rustic crusts, some recipes call for dropping to 425°F for the final 10 minutes. Use an instant-read thermometer to monitor your oven’s actual temperature; many home ovens run hot or cold by 25-50 degrees. The Dutch oven’s thermal mass buffers these fluctuations, but knowing your oven’s personality helps you adjust accordingly.
Scoring and Transferring Dough Safely
Scoring—cutting the dough surface before baking—controls expansion and creates beautiful patterns. Use a sharp razor blade or lame, working quickly to prevent the dough from sticking to your blade. Transferring shaped dough to the screaming-hot Dutch oven intimidates many bakers. The parchment paper sling method works brilliantly: place your shaped dough on a square of parchment, lift by the corners, and lower it into the pot. The paper burns slightly but won’t affect flavor. Some bakers prefer to invert the dough onto the hot lid, then place the pot over it—a technique that works well with low-profile loaves but requires confidence and a lid lifter for safe handling.
Maintenance for Multi-Generational Durability
A quality cast iron Dutch oven can last centuries with proper care. Bread baking is relatively gentle on cookware compared to acidic braises or high-heat searing, but specific maintenance practices keep your pot in prime condition and ensure consistent baking performance for decades.
Post-Bake Cleaning Approaches
After your bread emerges, resist the urge to clean immediately. Let the pot cool gradually—never plunge hot cast iron into water, as thermal shock can cause cracking. Once warm but handleable, wipe out any flour or cornmeal residue with a dry paper towel. For stubborn bits, add coarse salt and scrub with a damp cloth—the salt acts as an abrasive without damaging seasoning. Avoid soap on bare iron unless absolutely necessary; it strips seasoning. Enameled surfaces tolerate mild soap but never need harsh scrubbing. Always dry thoroughly, then heat briefly on the stovetop to evaporate any lingering moisture.
Rust Prevention and Storage
The enemy of cast iron is moisture. After cleaning and drying, apply a micro-thin coat of oil to bare iron surfaces before storing. Store with the lid slightly ajar or place a folded paper towel inside to absorb humidity. Never nest cast iron pieces directly inside each other without protection—this traps moisture and causes rust rings. If you live in a humid climate, consider storing your Dutch oven in the oven itself (when not in use) where residual heat keeps it dry. Check periodically for any orange spots, addressing rust immediately with fine steel wool and re-seasoning.
When to Re-Season
Even well-maintained bare cast iron eventually needs re-seasoning. Signs include dull, patchy areas where the glossy black finish has worn thin, or food starting to stick despite proper oiling. A light re-seasoning involves applying a thin oil coat and baking as described earlier. For more serious restoration, scrub the entire surface with steel wool to remove old seasoning, then build up 3-4 fresh layers. Bread baking is forgiving—you don’t need a perfect non-stick surface like you would for eggs, but good seasoning prevents dough from sticking and makes cleanup effortless.
Pitfalls That Ruin Loaves and Cookware
Even experienced bakers encounter problems when technique or equipment fails. Understanding these common mistakes helps you troubleshoot issues before they become disasters. Many problems stem from rushing or overlooking basic principles of thermal dynamics and material science.
Thermal Shock Prevention
Cast iron is tough but not invincible. Thermal shock—rapid temperature change—can cause catastrophic cracking. Always preheat your Dutch oven gradually in a cold oven. Never add cold dough to a room-temperature pot expecting it to work the same way. Conversely, don’t place a hot pot on a cold granite countertop or in a drafty location. Use trivets or wooden cutting boards as landing zones. If you need to cool your pot quickly (for successive bakes), let it cool naturally for at least 15 minutes before placing it in a slightly warm oven to finish cooling. Patience protects your investment.
Overheating Empty Cookware
While cast iron tolerates high heat, repeatedly heating empty enameled Dutch ovens above their rated temperature can damage the finish. Most quality enameled pieces handle 500°F, but sustained higher temperatures may cause discoloration or micro-cracking in the enamel. Bare iron has no such limit, but extremely high temperatures (above 550°F) can warp the metal over time, especially thinner-walled models. Use an oven thermometer to verify you’re not exceeding safe limits. If your recipe calls for 550°F and your pot is rated for 500°F, reduce temperature slightly and extend baking time instead of risking damage.
Using Damaged or Cracked Lids
A lid with chips, cracks, or a compromised seal defeats the entire steam-trapping purpose. Even small chips along the rim create escape routes for steam, resulting in pale, soft crusts. Inspect your lid regularly, especially if you’ve dropped it. Hairline cracks may not be visible but will whistle or fail to maintain condensation. A damaged lid isn’t necessarily trash—bare iron lids can often be re-seasoned and used for other cooking, but they won’t deliver bakery-quality bread results. Replace lids that no longer fit snugly; the investment pays for itself in consistent, beautiful loaves.
Frequently Asked Questions
What size Dutch oven is best for bread baking?
A 5.5 to 6-quart capacity works perfectly for most home bakers, accommodating 1 to 1.5-pound loaves with adequate headspace for oven spring. Smaller 4-quart models suit single-person households but restrict loaf size, while 7-quart pots may dilute steam concentration unless you’re baking exceptionally large boules.
Can I use enameled cast iron for bread baking?
Absolutely, provided the enamel is rated for high-heat use (typically 500°F or higher). Enameled surfaces eliminate seasoning concerns and resist acidic doughs, though most bread doughs aren’t acidic enough to affect bare iron. The key is verifying temperature tolerance, as some lower-cost enameled pieces may discolor or degrade at bread-baking temperatures.
Are lid lifters really necessary for safe bread baking?
While not strictly mandatory, lid lifters dramatically reduce burn risk and make steam management far more controlled. They allow you to remove hot lids without tilting them (preventing condensation from dripping on your loaf) and keep your hands clear of concentrated steam bursts. For anyone baking bread more than occasionally, they’re a worthwhile safety feature.
How do I prevent my bread from sticking to the Dutch oven?
Proper seasoning is crucial for bare iron—build up a solid polymerized oil layer through repeated thin coatings. Always use parchment paper as a sling when transferring dough. A light dusting of cornmeal or semolina on the parchment adds extra insurance. Ensure your dough isn’t excessively wet; high-hydration recipes need more skill to handle cleanly.
Can I bake bread in a Dutch oven with a plastic knob?
Standard phenolic knobs typically tolerate temperatures only to 390-400°F, insufficient for most bread recipes. Either replace the knob with a stainless steel version (many manufacturers sell replacements) or use a lid lifter system that keeps the knob away from direct heat. Some bakers simply unscrew and remove the knob, using pliers to lift the lid instead.
Why does my Dutch oven bread come out pale and soft?
Insufficient steam is the culprit. Check your lid’s seal—chips, cracks, or poor fit let steam escape. Ensure you’re preheating long enough for the lid to reach temperature. Avoid opening the oven door during the covered baking phase, as this drops temperature and releases steam. Some ovens benefit from adding a few ice cubes beside the dough for extra moisture.
How do I clean flour residue from my Dutch oven after baking?
Let the pot cool completely, then use a dry paper towel to wipe out loose flour. For baked-on residue, add coarse kosher salt and scrub with a damp cloth—the salt acts as a gentle abrasive. Avoid soap on bare iron unless necessary, as it strips seasoning. Enameled surfaces can handle mild dish soap and a soft sponge for stubborn spots.
Is it safe to preheat an empty Dutch oven?
Yes, this is standard practice for bread baking. Place the cold Dutch oven (with lid) in a cold oven, then set your temperature. This gradual heating prevents thermal shock. Never preheat on the stovetop empty, as direct flame can cause hot spots and potential warping. The oven’s ambient heat surrounds the pot evenly, ensuring uniform temperature distribution.
What’s the difference between round and oval Dutch ovens for bread?
Round pots match classic boule shapes, promoting even expansion and crust development from all sides. Oval versions accommodate longer loaves like batards or ciabatta but may produce slightly uneven browning at the narrow ends. For versatile baking, round is the default choice; choose oval only if you regularly bake elongated shapes and accept the need for occasional loaf rotation.
How often should I re-season my bare cast iron Dutch oven?
With regular bread baking, a light re-seasoning every 3-4 months maintains optimal performance. Signs you need re-seasoning include dull, patchy areas, food sticking despite proper oiling, or a metallic smell when heating. Bread baking is gentle on seasoning compared to searing acidic foods, so aggressive scrubbing or soap use typically triggers re-seasoning needs more than baking itself.