There’s nothing quite like the disappointment of reaching into your backpack after a long hike only to find your trail mix swimming in olive oil from a crushed container, or discovering that your “airtight” lunchbox has transformed your dry goods into a soggy mess. Camping food storage is an art form that balances space efficiency, durability, and food safety—and getting it wrong can turn a promising outdoor adventure into a frustrating exercise in waste management. Stackable containers have emerged as the gold standard for savvy campers who understand that every cubic inch of pack space matters, but not all stackable systems are created equal, especially when you’re working with a sub-$80 budget.
The beauty of modern stackable designs lies in their ability to create vertical organization that maximizes capacity while minimizing footprint, but the real magic happens when you understand how to evaluate materials, seal mechanisms, and modular configurations before spending a dime. This guide dives deep into the engineering principles and practical considerations that separate genuinely useful camping containers from the kitchen castoffs that will fail you at the worst possible moment. Whether you’re planning a solo weekend getaway or feeding a family of four for a week in the backcountry, these insights will help you build a cohesive food storage system that keeps your provisions secure, organized, and accessible without breaking the bank.
Top 10 Food Storage & Containers for Camping
Detailed Product Reviews
1. Ainmvnos 8 Collapsible Food Storage Containers, Silicone Collapsible Food Storage Containers, Collapsible Food Storage Silicone, Rv Collapsible Bowls, Collapsible Storage Containers for Food Camping

Overview: The Ainmvnos 8-piece collapsible food storage container set delivers comprehensive versatility for mobile lifestyles. With four graduated capacities ranging from 12 oz to 40.6 oz, this collection addresses diverse storage needs from snacks to full meals. Designed specifically for RV enthusiasts and campers, the containers collapse to save over 60% storage space when not in use.
What Makes It Stand Out: This set’s primary distinction lies in its quantity-to-variety ratio—eight containers spanning four practical sizes provides unmatched flexibility. The food-grade silicone construction withstands extreme temperatures from -4°F to 428°F, enabling direct microwave reheating (excluding lids) and freezer storage. The integrated fixed-lid design prevents separation and loss, a crucial feature for travel applications.
Value for Money: At $27.99 ($3.50 per container), this set positions itself as a mid-range option. Compared to purchasing individual containers or disposable alternatives, the investment pays for itself within months of regular use. Similar-quality silicone containers retail for $5-7 individually, making this bulk offering economically attractive for families or frequent travelers.
Strengths and Weaknesses: Strengths include exceptional size variety, robust temperature tolerance, and true space-saving design. The eight-container quantity ensures you’ll rarely run out of clean options. Weaknesses involve the microwave restriction on lids and potential wear at fold points with heavy use. The silicone may absorb odors if not cleaned promptly, and the lack of an air vent means careful lid placement during heating.
Bottom Line: For RV owners, camping families, or meal-prep enthusiasts seeking maximum versatility, this eight-container set delivers outstanding functionality. The graduated sizing system eliminates guesswork, while the collapsible design solves storage constraints. Despite minor limitations, the comprehensive nature makes it an excellent value.
2. Epinke 8 Collapsible Food Storage Containers With Lids, Rv Collapsible Bowls, Silicone Food Storage Containers, Camping Food Containers, Collapsible Containers for Food, Camping, Travel

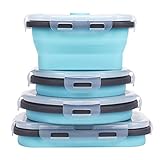
Overview: Epinke’s 8-piece collapsible container set mirrors its competitors in capacity but introduces shape diversity with both round and rectangular options. The blue silicone containers range from 12 oz to 40.6 oz across four sizes, targeting the same RV and camping demographic. The collapsible mechanism reduces each piece to one-third its expanded height.
What Makes It Stand Out: The dual-shape configuration sets this apart—round bowls excel for soups and cereals while rectangles optimize refrigerator space efficiency. This thoughtful design acknowledges that different foods demand different geometries. The “high-quality silicone” marketing emphasizes durability, while the consistent blue color scheme provides visual cohesion for organized storage.
Value for Money: Priced at $28.99 ($3.62 per unit), this set commands a slight premium over similar 8-piece offerings. The shape versatility justifies the marginal upcharge, particularly for users who value rectangular containers for meal prep and round ones for casual dining. When amortized over years of reusable service, the cost-per-use becomes negligible.
Strengths and Weaknesses: Advantages include the pragmatic shape assortment, robust temperature range, and substantial space savings. The eight-container count prevents scarcity during busy weeks. Drawbacks mirror category-standard issues: lids cannot be microwaved, repeated collapsing may stress silicone at seams, and the lack of vent valves requires cautious microwave use to prevent pressure buildup.
Bottom Line: Epinke’s set suits organized travelers who appreciate geometric options. The shape variety addresses real-world storage inefficiencies that single-shape sets ignore. While functionally similar to competitors, the round-rectangle combination provides tangible organizational benefits worth the modest price increase.
3. KUON Collapsible Silicone Food Storage Containers with Airtight Lids, Set of 4 Stacking Container, Microwave and Freezer and Dishwasher Safe, with Vent Valve, BPA Free (350ml and 500ml)
Overview: KUON’s 4-piece set takes a streamlined approach, offering two sizes (350ml and 500ml) in both square and round configurations. The BPA-free silicone construction features an integrated vent valve—a critical safety element often overlooked in collapsible designs. This set targets urban professionals and small households rather than large camping groups.
What Makes It Stand Out: The snap-buckle closure system combined with an air vent valve creates genuinely airtight storage while enabling safe microwave reheating. This dual-function lid addresses the primary weakness of most silicone containers: either they’re airtight OR microwave-safe, rarely both. The explicit temperature tolerance (-4°F to 428°F) and clear heating instructions demonstrate thoughtful engineering.
Value for Money: At $14.99 for four containers ($3.75 each), KUON positions itself in the sweet spot between budget and premium. The vent valve feature typically appears in $6+ individual containers, making this set a strong value proposition. For office workers or couples, the quantity proves ideal without excess.
Strengths and Weaknesses: Major strengths include the vent valve system, snap-buckle security, and space-saving collapsibility. The BPA-free certification provides health confidence. Limitations involve the restricted size range—lacking larger options for family portions—and the four-container count may prove insufficient for meal-prep enthusiasts. Silicone thickness appears standard, not heavy-duty.
Bottom Line: KUON excels for professionals seeking reliable meal transport with microwave convenience. The vent valve transforms this from a simple container to a genuinely functional lunch system. While not ideal for large families, it’s perfect for individuals or couples prioritizing food safety and heating ease over maximum capacity.
4. Collapsible Food Storage Containers with Airtight Lid & Air Vent, 16.9 oz, Kitchen Stacking Silicone Collapsible Meal Prep Container Set for Leftover, Microwave Freezer Dishwasher Safe, Blue, Set of 4

Overview: This 4-pack of identical 16.9 oz (500ml) containers emphasizes uniformity and sealing performance. Each blue silicone container features four snap buckles and a silicone seal ring, creating an airtight environment for leftovers and meal prep. The vent valve mandates proper technique during microwave use, prioritizing safety over convenience.
What Makes It Stand Out: The consistent sizing enables perfect stacking and modular storage, appealing to organization enthusiasts. The quadruple-snap closure system with integrated seal ring provides superior leak protection compared to simpler press-on lids. The manufacturer includes a specific customer tip about avoiding downward pressure when sealing—a rare acknowledgment of user experience pitfalls.
Value for Money: At $15.99 for four ($4.00 per container), this set carries a slight premium but delivers enhanced sealing technology. Comparable airtight containers without collapsibility cost $8-12 each, making this competitively priced. The uniform capacity simplifies portion control and cabinet organization, justifying the cost for systematic users.
Strengths and Weaknesses: Benefits include exceptional leak protection, clear safety instructions, and true 50% space reduction. The vent valve prevents microwave mishaps. Downsides involve the single-size limitation—less versatile than mixed-capacity sets—and the higher per-unit cost. The warning about potential collapse during sealing indicates a learning curve.
Bottom Line: Ideal for meal preppers and leftover organizers who value consistency. The airtight seal rivals rigid containers while offering collapsibility benefits. If you prioritize leakproof performance and standardized storage over size variety, this set justifies its modest premium through superior engineering and thoughtful design.
5. Silicone Food Storage Containers, Camping Bowl with Lids Collapsible, Freezer & Dishwasher Safe, Reusable 30 Oz Lunch Box for Camping Travel Fruit

Overview: This single 30oz silicone container breaks convention with a magnetic lid system designed to solve the chronic sealing problems plaguing collapsible containers. Featuring a whimsical red panda print, it targets families and individuals wanting a reliable, leakproof solution for lunches and snacks. The collapsible design reduces height from 2.95" to 1.57".
What Makes It Stand Out: The magnetic closure represents genuine innovation—creating a secure, alignment-correct seal that opens one-handed. This addresses the primary frustration with silicone containers: lids that warp or fit inconsistently. The fixed-lid connection prevents loss, while the cute design makes it appealing for children’s lunches. The 30oz capacity hits a versatile sweet spot between snack and meal size.
Value for Money: At $5.99 for a single container, this offers low-risk entry into collapsible storage. While costlier per-unit than bulk sets, it allows testing the concept without $25+ commitment. For parents seeking one reliable lunchbox or campers needing a dedicated soup container, the price aligns with premium disposable alternatives that lack reusability.
Strengths and Weaknesses: Strengths include the innovative magnetic seal, attractive design, one-handed operation, and clear usage guidelines. The manufacturer honestly discloses liquid limitations—cannot withstand violent shaking. Weaknesses involve the solitary container limitation and potential magnet degradation over time. The single-size option lacks versatility for comprehensive food storage needs.
Bottom Line: Perfect as a specialized lunch container or introduction to collapsible storage. The magnetic seal solves real problems, making this worthwhile despite being a single piece. Purchase this for its unique lid technology, then expand to multi-piece sets if satisfied. It’s a smart, low-investment solution for specific leakproof transport needs.
6. Aosnare Pet Food Storage Bag for Travel - Transparent Leak-Proof Dog Food Container with Roll-Top Closure, Keeps Kibble Fresh for Camping Trip, Dog Boarding, Weekend Getaways (14 Cups)

Overview: The Aosnare Pet Food Storage Bag addresses the challenge of keeping kibble fresh during travel. This 14-cup container uses a roll-top Velcro closure to create an airtight, waterproof seal. Measuring 6.3 x 5.51 x 13.39 inches, it balances portability with capacity for weekend trips, camping, or boarding. The transparent design allows quick food level checks, while the integrated handle simplifies carrying.
What Makes It Stand Out: Unlike rigid containers, the flexible roll-top design conforms to packed bags and car spaces. The tear-resistant, waterproof material withstands outdoor use while remaining lightweight. Wipe-clean maintenance eliminates washing hassles during travel. The transparent construction proves particularly practical, removing guesswork about remaining kibble.
Value for Money: At $9.99, this specialized bag offers strong value compared to generic bags or bulky hard containers. It serves a specific niche that multi-purpose options miss. While regular zip bags are cheaper, they lack the durability, airtight seal, and convenience that justify this modest investment for traveling pet owners.
Strengths and Weaknesses: Strengths include excellent leak-proof sealing, durable waterproof construction, compact portability, and effortless cleaning. The 14-cup capacity suits small to medium dogs for several days. Weaknesses include limited capacity for large breeds or extended trips, potential roll-top wear over time, and lack of rigid crush protection. The Velcro seal may degrade with heavy use.
Bottom Line: This bag excels for short to medium trips with small or medium pets. Its thoughtful design solves real travel problems, making it worthwhile for active pet parents prioritizing convenience. For occasional travelers, it’s an affordable upgrade over improvised solutions.
7. 2 Pcs Collapsible Bowls with Lids, Foldable Meal Prep Containers Reusable, Silicone Food Storage Containers, Camper Must Haves Rv Camping Accessories for Travel Trailers, Microwave and Freezer Safe

Overview: This two-pack of collapsible silicone bowls provides versatile, space-efficient food storage for campers and meal preppers. Each bowl includes an airtight lid and withstands freezer-to-microwave transitions. Made from food-grade, BPA-free silicone, they collapse flat for easy packing in backpacks or RV cabinets. The set serves multiple functions: mixing, storing, and serving, reducing gear clutter.
What Makes It Stand Out: Temperature versatility distinguishes these from typical camping containers. The non-toxic silicone resists odors, stains, and cracking while ensuring food safety. Airtight lids prevent leaks during transport, and the collapsible design saves substantial space. This dual-container system eliminates needing separate mixing and storage dishes.
Value for Money: At $9.59 for two lidded bowls, this set offers exceptional value. Individual collapsible containers often cost $6-8 each, making this pair budget-friendly. For occasional campers or meal prep beginners, it’s a low-risk investment providing immediate utility without expensive set commitments.
Strengths and Weaknesses: Strengths include impressive temperature resilience, food-safe materials, dishwasher convenience, and smooth collapsing mechanism. They store effortlessly when not needed. Weaknesses include unspecified capacities, potential stability issues if not fully expanded, and limited quantity—two bowls may not suffice for families. The lids lack locking clips for extra security.
Bottom Line: These bowls excel as entry-level gear for solo travelers, couples, or minimalists. They deliver essential functionality at an unbeatable price point. While serious campers may need more units, RV owners with storage constraints will find these indispensable accessories that justify their minimal cabinet space.
8. GSI Outdoors Infinity Storage Set I 3 Piece Food Storage for Camping and Backpacking

Overview: The GSI Outdoors Infinity Storage Set delivers three lightweight, nestable containers for organized backpackers and campers. The 12, 16, and 24-ounce sizes with leak-proof lids enable portion control and meal planning. Made from recycled polypropylene, each container features measurement markings in ounces and milliliters, facilitating precise food prep. The nested design saves pack space when empty.
What Makes It Stand Out: The recycled material construction appeals to eco-conscious adventurers without sacrificing performance. The genuinely leak-proof lids prevent backpack spills—a critical feature many lightweight containers lack. Measurement graduations transform these into functional cooking tools for dehydrated meals. The graduated sizing system eliminates guesswork in portioning.
Value for Money: At $14.88 for three specialized containers, pricing reflects GSI’s durable outdoor gear reputation. Generic containers cost less but rarely match the leak-proof reliability and thoughtful design. For weight-conscious backpackers, the set’s functionality justifies the modest premium over basic alternatives.
Strengths and Weaknesses: Strengths include true leak-proof performance, eco-friendly materials, practical measurement marks, and efficient nesting. The ultralight design suits minimalist philosophies. Weaknesses include limited capacity for large meals, no handles for deep-pack retrieval, and only three pieces—groups need multiple sets. Recycled plastic may absorb odors more than silicone.
Bottom Line: This set serves solo backpackers and minimalist campers prioritizing organization and reliability. The measurement markings and leak-proof lids elevate it above basic storage. For lightweight, portion-controlled food storage on multi-day hikes, this purpose-built system warrants investment despite capacity limitations.
9. Sudaya 8 Pack Collapsible Food Storage Containers With Lids, Collapsible Storage Containers Sets Silicone Collapsible Bowls For Camping, RV Accessories, Travel Trailer Must (Mixed oz) (8)

Overview: The Sudaya 8-pack provides a complete collapsible container system for RV owners and dedicated campers. Eight silicone containers in four sizes (12, 17, 27, and 40.6 ounces) with lids offer versatile storage options. Food-grade silicone withstands -4°F to 428°F, enabling freezer-to-microwave use. The collapsible design compresses the entire set into minimal storage space—essential for mobile lifestyles.
What Makes It Stand Out: The size variety creates a comprehensive system eliminating one-size-fits-all compromises. Having multiple containers in each size supports meal prep for families or groups. The extreme temperature tolerance surpasses many competitors. This all-in-one approach removes need for supplementary containers, providing true storage independence.
Value for Money: At $35.99 ($4.50 per unit), this set offers compelling value versus individual containers at $7-10 each. For frequent campers or RV owners, the upfront cost pays dividends in organization and convenience. Silicone durability ensures years of use, amortizing the investment.
Strengths and Weaknesses: Strengths include exceptional size variety, robust temperature resistance, complete system coverage, and dramatic space savings. Microwave and freezer compatibility add versatility. Weaknesses include significant upfront cost for casual users, potential overkill for solo travelers, and microwave restrictions on lids. Silicone can retain odors if not cleaned promptly.
Bottom Line: This set suits RV enthusiasts and regular campers needing reliable, space-efficient storage across multiple meals. The size variety justifies investment for families or groups. While excessive for occasional users, frequent travelers benefit from a complete, matching system that performs consistently and stores compactly.
10. GAMMA2 Vittles Vault Travel-Tainer (6 Cups) Portable Food Storage Container, Blue
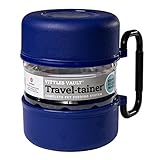
Overview: The GAMMA2 Vittles Vault Travel-Tainer integrates pet food storage and feeding into one compact system. This 6-cup container divides into three sections: central storage and two 3-cup bowls for food and water. Made from BPA-free HDPE plastic with a carry handle, it transforms from storage to serving instantly. Designed for pet travel, it eliminates packing separate containers and bowls for trips, camping, or daycare.
What Makes It Stand Out: The transformative design removes need for separate bowls, reducing bulk and forgetfulness. BPA-free construction ensures food safety, while the secure lid prevents transport spills. The dedicated handle and compact footprint outperform repurposed human containers. As part of GAMMA2’s airtight line, it preserves kibble freshness better than standard plasticware.
Value for Money: At $12.40, this specialized feeder costs less than separate 6-cup container and two bowls. For occasional traveling pet owners, convenience justifies the price. Comparable pet travel solutions often exceed $15-20, making this a value-conscious choice from a reputable brand.
Strengths and Weaknesses: Strengths include clever all-in-one design, genuine food safety, reliable spill prevention, and convenient portability. The system works seamlessly. Weaknesses include modest 6-cup capacity suited for small breeds or short trips, not large dogs or extended travel. The 3-cup bowls may prove inadequate for large or multiple pets. Plastic construction can retain odors and may crack if dropped.
Bottom Line: This Travel-Tainer suits small to medium dog owners taking brief trips. The integrated bowl system solves travel frustrations elegantly and affordably. While capacity limits appeal for large breeds or long journeys, it’s essential for urban pet parents frequenting cafes, offices, or weekend getaways with companions.
Why Stackable Design Matters for Camping
Space Optimization in Your Pack
The fundamental challenge of camping food storage is three-dimensional efficiency. Stackable containers transform chaotic, irregular food packaging into uniform building blocks that exploit vertical space in your pack or bear canister. Unlike traditional round containers that leave dead space between them, square and rectangular stackable designs create a tight tessellation that can increase your food capacity by up to 30% in the same volume. This matters most when you’re working with rigid containers like bear canisters or trying to maximize the utility of a single backpack compartment. Look for containers with slightly tapered walls that allow them to nest within each other when empty but stack securely when full, giving you the best of both worlds.
Preventing Spills and Cross-Contamination
True stackable systems feature interlocking lid designs or recessed bases that prevent containers from sliding off each other during transport. This mechanical stability is crucial when you’re navigating uneven terrain or loading gear into a canoe. More importantly, a well-designed stack creates a sealed ecosystem where a failure in one container doesn’t cascade into others. Containers with flat, stable lids also serve as preparation surfaces in cramped camp kitchens, keeping food off potentially contaminated ground surfaces. The psychological benefit is equally valuable—knowing your coffee grounds won’t infiltrate your pancake mix reduces camp stress significantly.
Key Materials Explained
Plastic Options: Pros and Cons
Polypropylene (PP) and Tritan copolyester dominate the camping container market for good reason. PP offers excellent chemical resistance and can handle boiling water temperatures, making it ideal for dehydrated meals and hot food storage. It’s typically the lightest option and most affordable under budget constraints. Tritan provides glass-like clarity without the weight or fragility, letting you identify contents quickly, but it comes at a slight premium. Avoid standard polyethylene (PE) containers for anything beyond dry goods—they’re prone to retaining odors and can warp with temperature fluctuations. The sweet spot for budget-conscious campers is BPA-free PP with reinforced corners, which provides durability at roughly 30% less cost than premium alternatives.
Silicone: The Flexible Alternative
Food-grade silicone containers collapse to a fraction of their expanded height, offering unprecedented space savings for bulky items like salads or trail snacks. Their flexibility allows them to conform to odd pack shapes, filling gaps that rigid containers can’t. However, silicone’s stretchiness can compromise seal integrity under pressure, and sharp objects can puncture them more easily than hard-sided options. For under $80, consider silicone as a complement to—not replacement for—rigid containers. Use them for cold foods and short-duration trips where pack flexibility matters more than maximum protection. The best designs feature rigid rim reinforcement that maintains shape under load while allowing the body to collapse.
Metal Containers: Durability Considerations
Stainless steel options excel for pre-cooked meals and items requiring robust protection, but they rarely offer true stackability due to manufacturing limitations. Most feature slightly domed lids that prevent stable stacking and add unnecessary height. Titanium exists in this category but immediately blows past budget constraints. If you choose metal, look for containers with flattened lid profiles and silicone gasket seals, but understand you’ll likely sacrifice 2-3 container capacity compared to plastic systems at the same price point. Metal shines for specific applications like storing oily foods that might degrade plastic over time, but it’s a specialist tool rather than a system foundation.
Essential Features to Evaluate
Airtight Seals and Lid Mechanisms
The difference between “splash-proof” and “truly airtight” determines whether your olive oil stays contained or your crackers stay crisp. Four-latch locking lids with silicone gaskets provide the most reliable seal for camping applications, creating positive pressure that compensates for altitude changes and temperature fluctuations. Screw-top designs offer simplicity but require more vertical clearance to open and can be difficult to operate with cold hands. Snap-on lids seem convenient but often fail under compression in a loaded pack. Test seal quality by filling a container with water, sealing it, and applying gentle pressure—any leakage indicates it won’t survive being jostled in your bag.
Nesting vs True Stackability
This distinction is critical: nesting containers fit inside each other when empty but may not stack securely when full. True stackable containers feature recessed lid edges or raised bases that create a mechanical interlock, preventing lateral movement. For camping, prioritize containers that do both—nest for transport to the trailhead, then stack reliably at camp. The best designs include subtle alignment markers or textured contact points that guide proper stacking orientation without adding bulk. Be wary of containers that claim stackability but only offer flat surfaces that slide apart under minimal force.
Weight-to-Volume Ratio
Budget containers often skimp on material thickness to cut costs, resulting in flimsy walls that buckle under stacking loads. Calculate the ratio by dividing empty container weight by its fluid capacity. Aim for under 0.1 oz per fluid ounce for optimal efficiency. A 32 oz container should weigh less than 3.2 oz empty. Heavier containers might feel more durable, but they steal precious weight allowance from food itself. The most efficient designs use ribbed walls or honeycomb patterns that add structural strength without adding mass—look for these features in product photos before purchasing.
Temperature Resistance Range
Your containers must survive everything from boiling water pour-overs to freezing overnight temperatures without cracking or warping. Check specifications for a minimum range of -20°F to 212°F. This covers everything from high-altitude cold snaps to rehydrating meals directly in the container. Containers with limited temperature ranges often fail at lid seals first, as silicone gaskets harden in cold or soften in heat. For budget systems, prioritize heat resistance over extreme cold—most camping failures occur when pouring hot liquids into containers not designed for thermal shock.
Size and Capacity Planning
Meal-Portioning Strategies
The most efficient camping food systems use a mix of container sizes based on meal type rather than buying a uniform set. Breakfast grains and trail snacks require smaller, daily-portion containers (8-12 oz), while dinner bases like rice or pasta store efficiently in larger volumes (32-48 oz). This modular approach lets you grab exactly what you need for a day hike without unpacking your entire food supply. Plan your container sizes around your menu, not arbitrary convenience—this often means buying individual containers in specific sizes rather than pre-packaged multi-size sets that include unnecessary pieces.
Group Size Considerations
Solo campers can optimize with 4-6 small to medium containers that fit inside a single bear canister. Pairs should consider a “hub and spoke” system: one large base container for shared items like cooking oil and spices, with individual meal containers radiating outward. Groups of four or more need to think in terms of “food pods”—complete daily rations in stackable units that distribute weight among multiple packers. Under $80, a group system means sacrificing individual container durability for collective capacity. Focus on getting more mid-sized containers (16-24 oz) rather than a few premium large ones.
Organization and Labeling Systems
Color-Coding Your Camp Kitchen
Visual identification saves time and prevents cross-contamination between raw and cooked foods. Implement a simple color system: blue for breakfast, red for dinner, green for snacks, and clear for ingredients used across meals. This works best when containers have colored lids rather than colored bodies, as lid colors remain visible when stacked. For budget systems, you can retrofit plain containers with colored electrical tape or silicone bands around the rim. Some manufacturers offer interchangeable lids in different colors—this feature alone can justify choosing one generic container over another.
Writable Surfaces and Attachments
Dry-erase surfaces on container lids eliminate the need for separate label makers or tape. Look for matte-finish lids that accept temporary marker and wipe clean with a damp cloth. Alternatively, containers with flat lid surfaces can accommodate adhesive labels that survive several trips. The most versatile designs include small attachment points for hanging tags or silicone bands with writeable tabs. Avoid textured or grooved lid surfaces that make labeling difficult—they’re designed for grip but work against organization.
Cleaning and Maintenance in the Field
Minimal-Wash Designs
The best camping containers minimize cleaning needs through smart design. Wide-mouth openings (at least 4 inches diameter) let you scrape out every last bit of food and reach inside for wiping. Smooth, radius-corner interiors prevent food from lodging in crevices. Some containers feature measurement markings molded into the walls—these are useful but create cleaning challenges. For true field convenience, prioritize containers with completely smooth interiors and minimal internal features. Dark-colored plastics hide stains better than clear ones, maintaining appearance despite limited washing opportunities.
Odor and Stain Resistance
Turmeric, tomato sauce, and curry will stain even the best plastics, but material choice affects how deeply odors penetrate. Tritan resists staining better than PP, while PP is less prone to retaining oily odors. For budget systems, accept that some containers will become dedicated “strong flavor” vessels over time. To test odor resistance, store a small amount of crushed garlic in a sealed container overnight—if you can smell it through the plastic the next morning, it won’t contain odors in your pack. Look for containers marketed as “odor-resistant” or “stain-resistant” rather than assuming all food-grade plastics perform equally.
Safety and Food Preservation
BPA-Free and Food-Grade Certifications
“BPA-free” is a baseline, not a guarantee of safety. Look for additional certifications like FDA food-grade compliance, LFGB (German standard, typically stricter), or NSF International testing. These indicate the material has been tested for chemical leaching across temperature ranges. Be particularly cautious with colorful containers—some manufacturers use cheaper pigments that aren’t food-safe to hit lower price points. Clear or white containers are generally safer bets under budget constraints, as they require fewer additives. If a deal seems too good to be true, check for certification markings molded into the container bottom—legitimate manufacturers embed these permanently.
Bear Safety and Wildlife Considerations
No container under $80 is truly bear-proof, but good design can make your system easier to secure in approved canisters. Rectangular containers maximize volume efficiency in cylindrical bear canisters, filling space that round containers waste. Choose containers with smooth exterior surfaces that won’t snag on canister walls during extraction. For areas requiring hanging techniques, containers with reinforced rim loops or attachment points are invaluable. Some designs feature recessed handles that accept carabiners without adding bulk. Remember, the goal is making your entire food system easy to manage as a single unit—scattered, mismatched containers increase the risk of leaving something accessible to wildlife.
Budget Allocation Strategies
Building a Modular System Under $80
Approach your $80 budget as a system-building exercise rather than a single purchase. Start with 2-3 core containers in the 24-32 oz range that handle your primary meals, allocating about $30-35 here for quality. Spend $20-25 on 3-4 smaller containers (8-16 oz) for snacks and ingredients. Reserve $15-20 for specialty items like a single large container for bulk items or a collapsible silicone piece for flexibility. The remaining $5-10 covers organizational accessories like labels or replacement gaskets. This modular approach lets you upgrade individual pieces over time rather than replacing an entire set when one container fails.
When to Splurge vs Save
Splurge on the containers that will hold liquids or greasy foods—seal failure here ruins entire meals. Save on dry goods containers where perfect airtightness is less critical. Invest in one premium medium-sized container with an exceptional seal for your “can’t lose” items like coffee or spices, then fill out your system with budget-friendly options for crackers, pasta, and other forgiving foods. Container longevity follows the 80/20 rule: 80% of your containers will last years with minimal care, while 20% will see heavy daily use and warrant higher initial investment. Identify your high-use items before spending.
Packing Techniques for Stackable Containers
Vertical Loading Methods
Stack containers in your pack like you’re building a structural wall—largest and heaviest at the bottom, creating a stable base. Place a piece of closed-cell foam or folded tarp between layers to distribute pressure and prevent lid deformation. This is especially critical with budget containers that may have thinner lid structures. Orient all lids facing the same direction for quick access, and align latch mechanisms so they don’t press against each other. In bear canisters, pack containers in a radial pattern around a central core of soft items, maximizing contact points and minimizing movement.
Securing Containers During Transport
Even the best stackable design needs supplemental security. Use a single strap or compression sack to bind your stacked food system into a monolithic unit that won’t shift. Some campers use a dedicated stuff sack that holds their container stack with minimal extra volume. For canoe or kayak trips, place the secured stack inside a dry bag—this adds waterproofing insurance and makes portaging easier. The key is treating your stack as one item rather than multiple loose pieces. Budget containers benefit most from this approach, as they typically lack the heavy-duty locking features of premium options.
Common Mistakes to Avoid
Overpacking and Space Waste
Filling containers to the brim seems efficient but prevents proper sealing and increases spill risk when contents expand with temperature changes. Leave 10-15% headspace in every container, especially at altitude. More critically, don’t buy containers based on home storage logic—those giant 64 oz containers seem versatile but waste space when partially filled. Multiple smaller containers organized by meal provide better flexibility and reduce waste from opened packages. The common mistake is optimizing for total volume rather than usable, accessible volume.
Ignoring Temperature Ratings
That “microwave safe” label doesn’t translate to camping performance. Containers left in a hot car can warp lids, while morning condensation can freeze seals shut. Test your system at home by freezing a sealed container overnight, then submerging it in warm water to simulate thermal cycling. If the lid becomes difficult to remove or the seal deforms, it won’t survive real camping conditions. Budget containers often cut costs by using lower-grade seals that harden in cold—test before you trust them with critical provisions.
Frequently Asked Questions
How many containers do I actually need for a weekend camping trip?
For a solo weekend trip, plan on 4-5 containers: two medium (24 oz) for main meals, one small (12 oz) for snacks, one tiny (4-6 oz) for spices/oil, and one flexible container for leftovers or unexpected items. Pairs should double the medium containers and add one large (32 oz) for shared ingredients. The key is having enough separation to prevent cross-contamination while avoiding redundancy that wastes pack space.
Can I safely pour boiling water directly into plastic camping containers?
Only if they’re specifically rated for temperatures exceeding 212°F. Look for “boiling water safe” or similar markings. Polypropylene (PP) containers typically handle this, but Tritan offers better clarity and stain resistance. Always pre-warm the container with warm tap water first to reduce thermal shock, and leave the lid off for 30 seconds after pouring to prevent pressure buildup. When in doubt, use a metal mug for boiling water and transfer to plastic once cooled slightly.
What’s the best way to clean containers with limited water at camp?
Implement a “scrape, wipe, rinse” protocol. Scrape out all food residue with a spatula or spoon. Wipe the interior with a damp cloth or paper towel—store this “dirty” wipe in its own small container. Use a minimal splash of water (2-3 tablespoons) to swish and rinse, drinking the rinse water if it’s just food particles to leave no trace. Wide-mouth designs make this process dramatically easier. Bring a dedicated small scrub brush that stores inside your largest container when not in use.
How do I prevent my stackable containers from sticking together when nested?
Place a small square of parchment paper or a paper towel between nested containers. The paper absorbs moisture and prevents vacuum formation. Some campers use mesh produce bags as liners. Avoid using oil or soap as a release agent—they’ll become rancid and contaminate food. If containers do stick, run warm water over the outer container for 30 seconds to expand it slightly without heating the inner one. Always dry containers completely before nesting to prevent mold and seal degradation.
Are square or round containers better for stacking in a backpack?
Square or rectangular containers are superior for stacking efficiency, eliminating the dead space between round containers. They also stabilize better against pack walls and resist rolling on uneven surfaces. However, round containers handle internal pressure better and are easier to clean. The hybrid solution is square containers with rounded interior corners—giving you packing efficiency without cleaning nightmares. For budget systems under $80, square designs typically offer more usable capacity per dollar.
How can I test if a container is truly airtight before buying?
Perform the water submersion test: fill the container halfway with water, seal it, then submerge it in a sink or bucket with the lid facing down. Look for any bubbles indicating air (and potential liquid) leakage. For a dry test, seal the empty container, press down on the lid, and listen for air hissing. Quality containers will feel solid with minimal lid flex. Budget options may have slight air exchange but should still prevent liquid escape—decide your tolerance based on what you’re storing.
What’s the lifespan of budget-friendly camping containers?
With proper care, expect 2-3 years of regular use (8-10 trips per year) before seals degrade or latches crack. The failure point is almost always the lid mechanism, not the container body. Extend life by storing containers with lids slightly ajar (a quarter-turn loose) to prevent gasket compression set. Replace individual lids rather than entire sets when possible—many manufacturers sell replacement parts. UV exposure is the silent killer; even “UV-resistant” plastics become brittle after prolonged sun exposure, so store containers in a dark bag when not in use.
Can I use these containers for both hot and cold foods on the same trip?
Yes, but implement a rotation strategy. Use containers for cold foods first (breakfast, snacks), then repurpose them for hot meals later in the day. This prevents thermal cycling a single container repeatedly, which stresses seals. Never put hot food in a container that previously held something pungent like garlic unless you’ve had a chance to thoroughly clean it—heat amplifies odor transfer. Bring one dedicated “hot food” container with superior temperature ratings, and use cheaper containers for cold items to maximize budget efficiency.
How do I deal with altitude changes affecting container seals?
At high altitudes, pressure differential can make lids difficult to open or cause them to bulge. When ascending, “burp” containers by slightly opening and immediately resealing them at your first camp to equalize pressure. Choose containers with pressure-relief valves if camping above 8,000 feet regularly. For descent, pack containers with minimal headspace to prevent collapse. Silicone gaskets adapt better to pressure changes than foam or rubber seals. If you notice persistent seal issues at altitude, store containers inside a sealed trash bag to contain any leaks rather than trusting individual containers.
Is it better to buy a pre-made set or individual containers for a custom system?
Pre-made sets offer convenience and guaranteed compatibility but often include sizes you’ll never use. For budget-conscious campers, buying 3-4 individual containers in specific sizes you need typically provides better value and performance. Sets under $80 usually compromise on seal quality across all pieces to hit price points. Build your system incrementally: start with two versatile medium containers, add pieces as you identify gaps on actual trips. This approach costs the same or less than a set while ensuring every piece earns its place in your pack. The only exception is if you find a set where every single container size matches your exact meal plan—then it’s worth considering for the matched aesthetics and guaranteed stacking compatibility.