There’s something undeniably satisfying about biting into a perfectly pressed panini—crispy, golden grill marks on the outside, warm melty goodness on the inside. While dedicated panini presses are fantastic, they can be bulky, expensive, and single-purpose. Enter the humble square grill pan: your secret weapon for creating restaurant-quality pressed sandwiches right on your stovetop without breaking the bank. For under $55, you can snag a versatile workhorse that not only crafts incredible paninis but also handles everything from seared vegetables to indoor steaks.
But not all grill pans are created equal. The market is flooded with options that promise professional results, yet many fall short where it matters most—heat retention, ridge design, and durability. Whether you’re a sandwich enthusiast looking to elevate your lunch game or a budget-conscious home cook seeking maximum versatility, understanding what separates a mediocre panini pan from an exceptional one is crucial. Let’s dive into the essential features, materials, and techniques that will transform your kitchen into your favorite sandwich shop.
Top 10 Square Grill Pans for Panini Style Sandwiches
Detailed Product Reviews
1. Norpro Italian Panini Sandwich Press And Steak Chicken Grill Cast Iron New 8.5 inch

Overview: The Norpro Italian Panini Press brings traditional trattoria-style cooking to your kitchen with its enamel-coated cast iron construction. Measuring 8.5 inches square, this press simultaneously grills both sides of your sandwich, cutting cooking time in half while delivering authentic grill marks and even heat distribution.
What Makes It Stand Out: Unlike standard grill presses, this unit’s enamel coating eliminates the seasoning maintenance required by raw cast iron while providing a non-reactive surface for acidic ingredients. Its dual-sided design means you can press from the top while your panini cooks below, creating professional results without flipping. The cast iron construction excels at retaining heat, making it equally effective for steaks, chicken breasts, and burgers.
Value for Money: At $22.36, this press sits in the sweet spot for quality cast iron tools. It’s priced competitively against uncoated cast iron alternatives while offering the convenience of enamel protection. Considering its versatility across multiple food types and its potential to replace several single-use gadgets, it represents solid long-term value for serious home cooks.
Strengths and Weaknesses: Strengths include exceptional heat retention, durable enamel coating, versatile sizing, and authentic Italian design. The cast iron construction ensures decades of use when properly cared for. Weaknesses include significant weight that may challenge some users, mandatory hand-washing requirements, and enamel that can chip if dropped. The handle also conducts heat and requires a mitt.
Bottom Line: This press suits traditionalists seeking authentic cast iron performance with modern convenience. For $22.36, you get a professional-grade tool that elevates sandwiches and proteins alike. If you value durability and don’t mind the maintenance, it’s an excellent investment.
2. TableCraft 10751 Cast Iron Square Panini Press, 7.75 x 7.75 x 2.375 in, Heavy-Duty Grill Weight for Even Cooking, Ideal for Sandwiches, Bacon, Burgers, Indoor Grilling, Hand Wash Recommended

Overview: The TableCraft 10751 delivers commercial-kitchen durability in a compact 7.75-inch square cast iron press. This heavy-duty tool applies consistent pressure and heat transfer to create restaurant-quality grill marks on paninis, burgers, bacon, and vegetables without requiring a specialized appliance.
What Makes It Stand Out: Its ergonomic cast iron handle provides superior control compared to wire-handled competitors, staying secure during aggressive pressing. The precisely engineered dimensions fit most skillets and griddles, making it more versatile than dedicated sandwich makers. The raw cast iron develops a natural non-stick patina over time, enhancing performance with each use while ensuring even heat distribution across the entire cooking surface.
Value for Money: Priced at $19.06, this is the most affordable heavy-duty cast iron press in its class. It undercuts enamel-coated alternatives while offering superior durability and heat retention compared to aluminum options. For home cooks wanting professional results without investing in electric appliances, this represents exceptional value.
Strengths and Weaknesses: Strengths include robust construction, excellent heat retention, versatile sizing, and a handle design that won’t loosen. The press excels at flattening sandwiches and speeding up bacon cooking. Weaknesses include required seasoning maintenance, a handle that gets extremely hot during use, and significant weight. It also lacks the non-stick convenience of coated alternatives and demands thorough drying to prevent rust.
Bottom Line: For $19.06, you get a lifetime tool that outperforms most electric alternatives. Ideal for serious cooks who appreciate cast iron’s heat retention and don’t mind basic maintenance. It’s the best budget option for achieving restaurant-quality results.
3. Norpro Mini Cast Iron Panini Pan with Press, 5.9 IN, As Shown
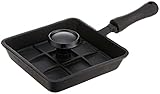
Overview: The Norpro Mini Cast Iron Panini set combines a 6-inch pre-seasoned skillet with a matching press, creating a self-contained sandwich-making system. This compact duo handles everything from paninis to steaks, delivering cast iron’s signature heat retention in a space-efficient package perfect for single servings.
What Makes It Stand Out: Its pre-seasoned, ready-to-use design eliminates the initial seasoning barrier that deters many cast iron newcomers. The integrated system ensures perfect component pairing, while raised ridges on both pieces create professional grill marks and drain excess fat. The included recipes and instructions add value for beginners, and its compact size enables both indoor stovetop and outdoor campfire use.
Value for Money: At $24.85, this is the priciest manual option, but you’re getting two coordinated cast iron pieces. The pre-seasoning convenience and included accessories justify the premium over single presses. For solo dwellers or those with limited storage, the space-saving design offers unique value that larger alternatives cannot match.
Strengths and Weaknesses: Strengths include immediate readiness, compact footprint, versatile indoor/outdoor capability, and perfect component matching. The set excels at single portions and stores easily. Weaknesses include limited capacity—unsuitable for families—and the highest price point among manual options. Like all cast iron, it remains heavy relative to size and requires diligent hand-washing and drying.
Bottom Line: This mini set serves singles and small-space dwellers perfectly. While $24.85 seems steep, the pre-seasoned convenience and dual-piece system justify the cost. Choose this if you prioritize compact storage and immediate usability over batch cooking capacity.
4. SOUJOY Sandwich Maker, Non-stick Grill Panini Maker Pan with Handle, Stovetop Toasted Aluminum Flip Pan Indoor Outdoor Camping Home Kitchen Breakfast

Overview: The SOUJOY Sandwich Maker revolutionizes stovetop grilling with its lightweight aluminum flip-pan design. This innovative tool sandwiches your food between two non-stick coated plates that heat simultaneously, creating evenly cooked paninis, waffles, and steaks without requiring a separate press or weighted tool.
What Makes It Stand Out: The double-sided heating mechanism cooks both sides simultaneously while the locking handle flips the entire unit for easy turning. A built-in hook enables compact vertical storage, solving the bulky storage problem plaguing traditional presses. At a fraction of cast iron’s weight, it’s ideal for camping and outdoor cooking while delivering faster heat-up times on gas or electric ceramic stoves.
Value for Money: Priced at $20.99, this aluminum press offers modern convenience between budget cast iron and premium electric options. It eliminates the need for separate pans and presses while providing non-stick ease. For occasional users or outdoor enthusiasts, it delivers versatility that justifies the modest investment.
Strengths and Weaknesses: Strengths include lightweight portability, rapid heating, easy cleanup, integrated design, and secure locking mechanism. The non-stick surface requires no seasoning. Weaknesses include incompatibility with induction cooktops, lower durability compared to cast iron, and potential non-stick coating degradation over time. Aluminum construction may not achieve the same sear as cast iron.
Bottom Line: This $20.99 flip pan excels for campers, apartment dwellers, and convenience-focused cooks. While it won’t replace cast iron for searing purists, its versatility and easy storage make it a smart choice for casual sandwich makers who value portability and quick cleanup.
5. Chefman Panini Press Grill and Gourmet Sandwich Maker Non-Stick Coated Plates, Opens 180 Degrees to Fit Any Type or Size of Food, Stainless Steel Surface and Removable Drip Tray, 4 Slice, Black
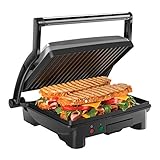
Overview: The Chefman Panini Press transforms countertop cooking with its electric 1000-watt heating system and versatile 180-degree opening design. This 4-slice capacity appliance handles everything from pressed sandwiches to open-grilled steaks and vegetables, eliminating stovetop monitoring while delivering consistent, restaurant-quality results.
What Makes It Stand Out: The floating hinge automatically adjusts to sandwich thickness, accommodating everything from thin grilled cheese to stacked deli creations. When opened flat, it doubles as a 180-degree grill, effectively providing two cooking surfaces. The removable drip tray and tilt-up feet enable effortless grease management, while the non-stick plates clean easily without scrubbing. UL approval and a 1-year assurance provide peace of mind.
Value for Money: At $41.56, this is the most expensive option but offers unique electric convenience. It eliminates the need for stove supervision and multiple tools, potentially replacing several appliances. For frequent sandwich makers or those seeking push-button operation, the time savings and versatility justify the premium over manual alternatives.
Strengths and Weaknesses: Strengths include rapid, even heating, adjustable hinge, easy cleaning, compact storage, and dual-mode functionality. The electric operation suits dorm rooms and offices. Weaknesses include higher price, dependency on electricity, and potentially shorter lifespan than cast iron. The 4-slice capacity may still limit larger families, and it lacks the high-heat searing capability of cast iron.
Bottom Line: For $41.56, the Chefman delivers unmatched convenience for frequent users. It’s ideal for busy households, offices, and dorm rooms where speed and simplicity matter. While manual purists may prefer cast iron, this press excels for those prioritizing ease over tradition.
6. Lodge Manufacturing Company Lodge Cast Iron 10.5-inch Square Grill Pan, Black

Overview: The Lodge Cast Iron 10.5-inch Square Grill Pan brings legendary cast iron performance to indoor grilling. This pre-seasoned workhorse from America’s oldest cast iron manufacturer delivers exceptional heat retention and those signature grill marks on steaks, vegetables, and sandwiches. The square design maximizes cooking surface on your stovetop, while the included red silicone handle holder provides essential protection when handling this heavyweight pan.
What Makes It Stand Out: Unlike most bare-bones cast iron pans, this combo pack includes a heat-resistant silicone sleeve that solves the primary safety concern of hot handles. The dual assist handles make lifting and maneuvering much easier despite the pan’s heft. Its remarkable versatility allows use on any cooking surface—from induction stovetops to campfires—making it equally at home in urban kitchens and wilderness cookouts.
Value for Money: At $23.90, this represents exceptional value. Comparable cast iron grill pans typically cost $30-40 without accessories. The pre-seasoning means it’s ready to use immediately, saving time and effort. When properly maintained, this pan will outlast dozens of non-stick alternatives, essentially paying for itself within a year of regular use.
Strengths and Weaknesses: Strengths include superior heat retention, natural non-stick properties that improve with age, incredible durability, and unmatched versatility across heat sources. The assist handles provide secure grip points. Weaknesses involve significant weight (nearly 7 pounds), requiring hand-washing and periodic re-seasoning, and the grill ridges can trap food particles, making cleaning more labor-intensive than flat pans.
Bottom Line: For cooks seeking authentic grill flavor without firing up an outdoor grill, this Lodge pan is an unbeatable value. It’s perfect for carnivores, vegetarians, and campfire enthusiasts who appreciate cookware that improves with age and will last generations. Just be prepared for the maintenance cast iron demands.
7. Hamilton Beach Panini Press, Sandwich Maker & Electric Indoor Grill, Upright Storage, Nonstick Easy Clean Grids, Stainless Steel (25410)
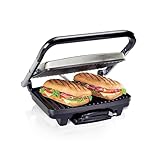
Overview: The Hamilton Beach Panini Press transforms your kitchen into a sandwich shop, delivering hot pressed sandwiches and grilled meals in under 10 minutes. This electric indoor grill features 95 square inches of nonstick cooking surface across top and bottom plates, ensuring both sides of your food cook simultaneously. The stainless steel construction and cafe-style floating hinged lid accommodate everything from thin grilled cheese to thick Cuban sandwiches.
What Makes It Stand Out: The innovative upright storage design with a lid latch sets this apart from competitors that demand permanent countertop real estate. The floating hinge automatically adjusts to sandwich thickness without manual intervention, while the slide-out drip tray captures excess fat, promoting healthier cooking. The included spatula/scraper tool simplifies cleanup of the nonstick grids.
Value for Money: At $56.99, this press sits in the sweet spot between budget models and premium $100+ alternatives. The combination of dual cooking surfaces, vertical storage capability, and dishwasher-safe components justifies the price point. For households preparing 2-3 sandwiches daily, it pays for itself within months by eliminating takeout costs.
Strengths and Weaknesses: Strengths include rapid cooking times, even heat distribution, space-saving storage, and genuinely easy cleanup. The nonstick coating performs well when properly maintained. Weaknesses include a larger footprint than compact models, potential durability concerns with the hinge mechanism over years of use, and the nonstick surface may degrade if abrasive cleaners are used. The power cord could be longer for some kitchen layouts.
Bottom Line: This Hamilton Beach press excels for families and sandwich enthusiasts wanting restaurant-quality results without premium pricing. The upright storage is a game-changer for small kitchens. If you value versatility, easy cleaning, and plan to use it several times weekly, this is a smart investment that delivers consistent performance.
8. Chefman Electric Panini Press Grill and Gourmet Sandwich Maker w/ Non-Stick Coated Plates, Opens 180 Degrees to Fit Any Type or Size Food, Dishwasher Safe Removable Drip Tray, Stainless Steel/Black

Overview: The Chefman Electric Panini Press Grill offers remarkable versatility at an accessible price point, functioning as both a traditional sandwich press and a full grill when opened flat to 180 degrees. This 1000-watt appliance features a compact footprint ideal for apartments, dorm rooms, or offices where space is premium. The floating hinge accommodates various sandwich thicknesses, while the nonstick coated plates ensure easy food release.
What Makes It Stand Out: The ability to fully open into a lay-flat grill doubles its functionality without doubling the cost. Tilt-up, skid-resistant feet angle the cooking surface to channel grease efficiently into the removable drip tray. At just $34.99, it’s one of the most affordable presses offering true 180-degree operation. The 1-year assurance provides peace of mind rarely included at this price tier.
Value for Money: This represents exceptional value, undercutting most competitors by $20-40 while delivering comparable power and features. The dual cooking modes effectively provide two appliances for the price of one. For students, young professionals, or occasional users, the price-to-performance ratio is outstanding. The removable drip tray eliminates messy cleanup, saving time and paper towels.
Strengths and Weaknesses: Strengths include versatile 180-degree opening, compact storage, rapid heating, effortless cleaning, and outstanding affordability. The nonstick coating is effective for low-fat cooking. Weaknesses include a smaller closed cooking surface (5.5" x 8.75") that may only fit one large sandwich, lighter construction than premium models, and the brand lacks the long-term reputation of Hamilton Beach or Cuisinart. The exterior stainless steel can show fingerprints.
Bottom Line: Perfect for budget-conscious buyers and small-space dwellers who want maximum versatility. The Chefman delivers solid performance for occasional to moderate use. If you’re grilling for one or two people and value flexibility over brand name, this press punches well above its weight class and deserves serious consideration.
9. Panini Press Grill, 1000W Sandwich Maker with Non-Stick Coated Plates, Opens 180 Degrees for Any Size of Food, 3-in-1 Sandwich Press Electric Grill, Stainless Steel Surface and Removable Drip Tray

Overview: This 1000W Panini Press Grill delivers impressive functionality with its 3-in-1 design, operating as a traditional press, 90-degree grill, or fully opened 180-degree flat grill. The large cooking plates accommodate two thick sandwiches simultaneously, while intelligent temperature control prevents burning by automatically cycling power. Built-in ready lights eliminate guesswork, glowing green when the plates reach optimal cooking temperature.
What Makes It Stand Out: The intelligent temperature control system is a standout feature rarely found in sub-$40 presses, preventing scorched sandwiches and ensuring consistent results. The flexible opening angles (90° or 180°) provide more options than typical budget models. Skid-resistant tilt-up feet actively channel grease into the oil guide groove, an engineering detail that demonstrates thoughtful design beyond the generic branding.
Value for Money: At $39.99, this press offers premium features at a budget price point. The temperature control alone justifies the $5 premium over the Chefman model, while the indicator lights add user-friendly convenience. For novice cooks who need visual cues and automated temperature management, this provides peace of mind without the $60+ investment required for name-brand alternatives with similar features.
Strengths and Weaknesses: Strengths include intelligent temperature control, fast preheating, dual-angle opening capability, effective nonstick surface, and clear indicator lights. The stainless steel exterior cleans easily. Weaknesses center on the unknown brand reputation, potentially inconsistent quality control, and questions about long-term durability of the hinge and heating elements. Customer service support may be limited compared to established brands. The power cord is relatively short.
Bottom Line: An excellent choice for tech-savvy budget shoppers who want automated features without premium pricing. The temperature control makes this particularly appealing for beginners. If you’re willing to trade brand recognition for advanced functionality, this press delivers outstanding bang for your buck.
10. Victoria Cast Iron Grill Pan, Square Grill Pan, Cast Iron Griddle Pan, Seasoned with 100% Kosher-Certified, Non-GMO Flaxseed Oil, Black, 10 Inches

Overview: The Victoria Cast Iron Grill Pan brings Colombian craftsmanship to your kitchen with a 10-inch square design seasoned using 100% kosher-certified, non-GMO flaxseed oil. This chemical-free alternative to synthetic nonstick coatings offers purists a natural cooking surface that only improves with use. The raised ridges create perfect grill marks while allowing fat to drain away, making it ideal for indoor grilling of meats, vegetables, and paninis.
What Makes It Stand Out: Victoria’s commitment to natural seasoning using flaxseed oil distinguishes it from competitors using generic vegetable oils or chemical coatings. The company’s eight-decade manufacturing heritage in Colombia ensures traditional casting quality. This pan safely withstands temperatures up to 1,000°F, outperforming many competitors limited to 500°F, making it truly versatile for oven-to-table service and even campfire cooking.
Value for Money: At $25.99, this pan positions itself as a premium alternative to Lodge’s budget-friendly options. The flaxseed oil seasoning and higher temperature tolerance justify the slight price premium for health-conscious consumers. While it lacks the included accessories of some competitors, the superior heat performance and natural seasoning make it a worthwhile investment for those prioritizing chemical-free cooking.
Strengths and Weaknesses: Strengths include natural flaxseed oil seasoning, exceptional heat tolerance, versatile cooking surface compatibility, and the company’s long manufacturing history. The chemical-free construction appeals to health-conscious buyers. Weaknesses include a single long handle that can become hot (no silicone holder included), the need for careful maintenance to preserve the flaxseed seasoning, and limited brand recognition compared to Lodge. The 10-inch size may be small for families.
Bottom Line: Ideal for natural cooking enthusiasts who value chemical-free cookware and high-heat performance. Victoria’s flaxseed oil seasoning offers a genuine alternative to mass-market cast iron. If you’re cooking for one or two people and prioritize natural materials over included accessories, this heirloom-quality pan deserves your consideration.
Why Square Grill Pans Are Perfect for Panini
Square grill pans offer distinct advantages over their round counterparts when it comes to sandwich making. The straight edges create more surface area contact with your bread, ensuring those coveted grill marks extend all the way to the corners. This geometry also makes it easier to position and press multiple sandwiches simultaneously, maximizing your cooking real estate on the stovetop. Unlike round pans where bread corners can hang over the edge and cook unevenly, square pans accommodate standard loaf slices and artisanal bread shapes with precision.
The design also lends itself better to weight distribution when you’re using a press technique. Whether you’re employing a cast-iron bacon press, a heavy skillet, or even a foil-wrapped brick, the square shape provides stable, even pressure across the entire sandwich surface. This consistency is what separates a good panini from a great one—no soggy centers or under-pressed edges, just uniform crispiness from crust to crust.
Key Features to Look for in a Budget-Friendly Grill Pan
When shopping under the $55 price point, prioritization becomes essential. Focus on non-negotiable features that directly impact performance rather than fancy add-ons that inflate cost without adding value. First, examine the pan’s base thickness—anything less than 3mm will likely have hot spots and poor heat retention, leading to uneven grilling and disappointing results. A substantial base is the foundation of consistent cooking.
Next, scrutinize the handle attachment method. Riveted handles generally offer superior durability compared to welded ones in this price range, though they require more cleaning attention around the rivets. Look for handles that stay relatively cool during stovetop use, preferably with a silicone grip or ergonomic design that provides confidence when pressing down on your sandwich. Remember, you’ll be applying pressure, so a wobbly handle isn’t just annoying—it’s a safety hazard.
Finally, consider the pan’s overall weight. While heavier typically means better heat retention, there’s a practical limit for panini making. You need something you can comfortably maneuver and press without feeling like you’re weightlifting. The sweet spot usually falls between 3-5 pounds for a 10-11 inch square pan—substantial enough for thermal mass, light enough for daily use.
Understanding Grill Pan Materials
The material composition of your grill pan dictates everything from heating characteristics to maintenance requirements and longevity. At the sub-$55 price point, you’ll encounter three primary materials, each with distinct pros and cons for panini preparation.
Cast Iron: The Classic Choice
Cast iron remains the gold standard for achieving authentic grill marks and superior heat retention. These pans get screaming hot and stay that way, creating the Maillard reaction magic that gives paninis their characteristic crunch and flavor. A well-seasoned cast iron grill pan develops a natural non-stick surface that improves with age and can last generations. However, cast iron requires commitment—it’s heavy, needs proper seasoning maintenance, and heats slowly. For panini making, the weight actually works in your favor, providing built-in pressing power.
The downside? Bare cast iron can react with acidic ingredients like tomato sauce or pickled peppers, potentially imparting a metallic taste. Enameled cast iron solves this problem but rarely falls under the $55 threshold unless you find a remarkable sale. If you choose cast iron, budget an extra $10-15 for a silicone handle cover, as the handle gets furnace-hot during use.
Hard-Anodized Aluminum: Lightweight and Efficient
Hard-anodized aluminum pans offer excellent heat conductivity at a fraction of cast iron’s weight. These pans heat up rapidly and respond quickly to temperature adjustments, giving you precise control over your sandwich’s doneness. The anodization process hardens the aluminum surface, making it more durable and non-reactive than raw aluminum. Most options in this category feature a non-stick coating applied over the anodized base.
For panini enthusiasts, the lighter weight means you’ll need to apply external pressure for proper pressing, but the superior heat distribution virtually eliminates hot spots. These pans typically cost less than cast iron, leaving room in your budget for accessories. The trade-off is longevity—while durable, they won’t outlive you like cast iron, and the non-stick coating will eventually wear, especially under the high-heat conditions ideal for panini making.
Non-Stick Coatings: Convenience on a Budget
Modern ceramic and PTFE-based non-stick coatings have come a long way, offering impressive release properties that make cleanup a breeze. For panini making, this means cheese melts and drips wipe away effortlessly. However, not all non-stick surfaces handle high heat well—many degrade above 400°F, which is below the optimal temperature for creating crispy panini crusts.
Look for pans advertising “diamond-reinforced” or “titanium-infused” coatings, as these typically withstand higher temperatures and resist scratching better. Even with robust coatings, avoid metal utensils and aggressive scrubbing. The real advantage here is user-friendliness: minimal oil needed, easy maintenance, and immediate results for beginners. Just understand that in the sub-$55 range, you’re looking at a 2-5 year lifespan with regular panini making, not a lifetime investment.
The Importance of Grill Ridges
Those distinctive raised ridges aren’t just for show—they’re engineered to create the perfect panini experience. The design directly impacts everything from moisture management to aesthetic appeal and structural integrity of your sandwich.
Ridge Height and Spacing
Optimal ridge height typically measures between 1.5mm and 2mm. Taller ridges create more pronounced grill marks and better elevation above the pan’s base, preventing your bread from steaming in its own moisture. However, excessively tall ridges (above 2.5mm) can cut through softer breads and create fragile, over-defined marks that crack apart.
Spacing matters equally. Ridges set 8-12mm apart strike the ideal balance—wide enough to create distinct, appetizing marks, but close enough to provide adequate support for the bread’s structure. Wider spacing can lead to sagging bread that dips between ridges, resulting in uneven toasting and potential tearing when you flip or remove your sandwich.
Drainage Channels
The valleys between ridges serve a critical function: moisture management. As cheese melts and ingredients release steam and oils, these channels collect excess liquid, preventing your bread from becoming soggy. Look for pans with gently sloped channels that direct fluids toward a pour spout or the pan’s edges. Some budget models feature flat-bottomed channels that trap liquid, essentially creating a shallow frying effect rather than true grilling.
For panini perfection, you want channels deep enough to handle the runoff from two slices of bread plus fillings—roughly 2-3mm depth minimum. The channel design should also facilitate easy cleaning; sharp corners collect debris while rounded channels release food particles with a simple swipe of a brush.
Handle Design and Safety Considerations
When pressing paninis, you’ll apply significant downward force, making handle integrity paramount. Dual-riveted handles provide the most secure attachment, distributing stress across four connection points rather than two. Test the handle’s stability by imagining yourself pressing firmly—any wiggle or flex in the store (or in product photos) will only worsen with use.
Handle angle affects leverage and safety. A slightly upward-angled handle (about 10-15 degrees above the pan’s rim) gives you better mechanical advantage when pressing and keeps your knuckles further from the heat source. Avoid handles that curve sharply downward, as they force your hand uncomfortably close to the hot pan surface.
Silicone-coated handles offer the best of both worlds: oven-safe up to certain temperatures (usually 400-450°F) and comfortable grip during stovetop use. Pure metal handles last forever but require pot holders for every interaction. Plastic handles stay cool but limit your pan’s oven capability and can melt if left too close to a hot burner—an all-too-common mistake when you’re focused on perfecting that sandwich.
Size Matters: Choosing the Right Dimensions
A 10x10 inch square grill pan hits the sweet spot for most home cooks. This size comfortably fits two standard sandwiches simultaneously or one large artisanal panini without crowding. Anything smaller than 9x9 inches forces you to cook one sandwich at a time—impractical for families or hungry couples. Conversely, pans larger than 11x11 inches become unwieldy on standard stovetops and waste energy heating unused surface area.
Consider your bread choices. If you primarily use standard sandwich bread, a 9x9 inch pan suffices. But for rustic sourdough rounds, ciabatta, or elongated baguette sections, the extra inch or two prevents overhang and ensures complete contact with the grill ridges. Depth matters too—1.5 to 2 inches of sidewall height contains any cheese overflow while still allowing easy spatula access for sandwich flipping.
Storage is another practical consideration. Square pans stack reasonably well but take up more cabinet space than round ones. Measure your storage area before purchasing, especially if you’re considering a pan with a helper handle opposite the main one, as these can be awkward to stow.
Heat Distribution and Performance
Even heat distribution separates frustrating cooking experiences from joyful ones. The best budget grill pans minimize hot spots through either material thickness or construction design. Cast iron naturally excels here once fully heated, though it requires a longer preheat period—typically 5-7 minutes over medium heat. Aluminum pans heat faster but can develop hot spots if the base is too thin or poorly engineered.
The “water drop test” reveals a pan’s heat uniformity. Once preheated, flick a few water droplets onto the surface—they should dance and evaporate evenly across the entire cooking area. If droplets instantly vaporize in some spots while pooling in others, you’ve got uneven heating that will produce unevenly toasted paninis. This test is particularly important for aluminum pans in the budget category, where quality control varies significantly.
For panini making, you want consistent heat across the entire cooking surface, not just the center. A pan that runs cooler around the edges will leave your sandwich’s perimeter pale and soft while the center crisps perfectly. This is why base thickness matters more than side thickness—heat needs to spread laterally from the heat source to the pan’s edges efficiently.
Compatibility with Your Cooktop
Your stovetop type directly influences which grill pans will perform best. Gas ranges offer the most flexibility, providing immediate heat adjustment and compatibility with all pan materials. The open flame licks up the pan’s sides, helping heat the ridges more effectively—particularly beneficial for cast iron’s slower heat conduction.
Electric coil stoves require pans with perfectly flat bases. Any warp or imperfection creates air gaps that severely impair heat transfer. Cast iron’s heft helps maintain flatness over time, while thinner aluminum pans can warp under high heat. Test flatness by placing a straight edge across the pan’s bottom—any rocking or gaps spell trouble.
Glass-top electric and induction ranges demand specific considerations. For glass tops, smooth, flat bases are essential to prevent scratching. Avoid cast iron with rough, sand-cast bottoms unless you don’t mind micro-scratches on your cooktop. Induction requires magnetic properties, limiting you to cast iron or stainless-steel-clad aluminum pans. Many budget aluminum pans aren’t induction-compatible, so verify this specification before purchasing.
Maintenance and Care Tips
Proper maintenance dramatically extends your grill pan’s lifespan and preserves its panini-making prowess. For cast iron, the “clean, dry, oil” mantra is non-negotiable. After cooking, scrub with hot water and a stiff brush—no soap unless absolutely necessary. Dry immediately over low heat, then apply a thin film of oil to prevent rust. Those grill ridges trap food particles, so a dedicated ridge cleaning brush (a cheap bamboo rice paddle with notches works brilliantly) makes maintenance far less tedious.
Hard-anodized and non-stick pans require gentler treatment. Avoid abrasive scrubbers and harsh detergents that degrade the surface. A paste of baking soda and water removes stuck-on cheese without scratching. Never plunge a hot pan into cold water—thermal shock can warp the base or crack non-stick coatings. Let it cool naturally before cleaning.
Storage matters too. Hang cast iron pans if possible; stacking can trap moisture and promote rust. If you must stack, place a paper towel between pans to absorb humidity and protect surfaces. For non-stick pans, use pan protectors or soft cloths between stacked items to prevent scratching the cooking surface.
Common Mistakes to Avoid
Even the best grill pan underperforms when used incorrectly. The number one mistake is insufficient preheating. A lukewarm pan steams your sandwich rather than searing it, resulting in soggy bread and unmelted cheese. Give your pan a full 5 minutes over medium heat before adding butter or oil. The surface should be hot enough that a drop of water sizzles immediately.
Using too much fat is another frequent error. Paninis aren’t fried; they’re grilled. A light brush of oil on the bread itself, not a puddle in the pan, creates crispness without greasiness. Excess oil pools in the channels and essentially deep-fries the bread’s underside, producing a heavy, oily result rather than a light, crisp crust.
Overfilling sandwiches ranks high on the mistake list. While it’s tempting to load up on meats, cheeses, and veggies, excessive fillings prevent proper heat transfer to the bread’s center. The sandwich becomes too thick to press effectively, and ingredients squeeze out the sides, creating a burnt mess in your pan’s channels. Stick to 2-3 thin layers of filling maximum for structural integrity and even cooking.
Beyond Panini: Versatile Uses for Your Grill Pan
A quality square grill pan earns its cabinet space through versatility. Those same ridges that create perfect panini marks excel at searing steaks, chicken breasts, and pork chops with authentic grill flavor. The elevated design allows fat to drain away from proteins, mimicking outdoor grilling without the weather dependency. A $55 pan that replaces both a sandwich press and a countertop grill delivers exceptional value.
Vegetables transform under a grill pan’s intense, direct heat. Asparagus, zucchini, bell peppers, and portobello mushrooms develop caramelized char marks and smoky flavor in minutes. The square shape accommodates more vegetable pieces than a round pan, making it practical for family meals. Preheat the pan until smoking hot, toss veggies with minimal oil, and sear without stirring for 2-3 minutes to develop those signature marks.
Breakfast becomes more exciting too. Grill marks on toast elevate simple avocado toast to café status. Halved tomatoes, cut side down, blister beautifully. Even hash browns benefit from the ridged surface, developing crispy peaks and tender valleys. The pan’s ability to drain moisture prevents steamed, soggy potatoes—a common breakfast frustration.
Budget-Friendly Shopping Strategies
Scoring a quality grill pan under $55 requires strategic shopping. First, consider factory seconds or outlet stores. Minor cosmetic imperfections like a small scratch on the pan’s exterior or a slightly misaligned handle often don’t affect cooking performance but slash prices by 30-50%. These deals frequently appear at kitchen outlet malls or online clearance sections.
Timing your purchase matters. Black Friday, early January (post-holiday clearance), and late summer (dorm room season) see significant discounts on cookware. Set price alerts on major retail sites for grill pans in your target range. Many retailers offer first-time buyer discounts of 10-20% when you subscribe to their email list—an instant saving that brings mid-tier pans into your budget.
Don’t overlook store brands from reputable kitchen retailers. These “private label” pans are often manufactured by the same factories producing name-brand cookware, just with different branding. Read specifications carefully—matching materials, thickness, and construction details to premium models can reveal hidden gems. Online marketplaces also offer direct-from-manufacturer options that cut out retail markup, though verify return policies before committing.
Warranty and Brand Reputation
Even at under $55, a warranty provides valuable protection and indicates manufacturer confidence. Look for at least a one-year limited warranty covering defects in materials and workmanship. Some brands offer lifetime warranties on their budget lines, though these often exclude non-stick coatings and require registration within 30 days of purchase. Read the fine print—“lifetime” sometimes means the product’s expected lifespan, not yours.
Brand reputation in the budget category varies widely. Established cookware companies with budget lines typically maintain quality control standards from their premium products, even if materials are downgraded. Newer direct-to-consumer brands might offer impressive specifications but lack long-term durability testing. Check recent reviews (within the last year) specifically mentioning panini making or high-heat use, as these stress-test a pan’s construction more than gentle sautéing.
Customer service accessibility matters too. A company that offers live chat, phone support, or responsive email service stands behind their product. Test this before purchasing by sending a question about the pan’s specifications. Their response time and helpfulness preview your experience if you encounter issues later.
Seasoning Your Grill Pan
If you opt for bare cast iron, proper seasoning transforms a rough metal surface into a slick, non-stick cooking machine. Start by scrubbing the pan thoroughly with hot soapy water to remove factory coating—yes, soap this once. Dry completely, then apply a paper-thin layer of high-smoke-point oil (flaxseed, grapeseed, or canola) to every surface, including the ridges and handle. Buff away all excess until the pan looks dry, not greasy.
Bake upside-down in a 450°F oven for one hour with a foil-lined sheet below to catch drips. This polymerizes the oil, creating that hard, protective layer. Repeat this process 3-4 times for a robust initial seasoning. For grill pans, pay special attention to the ridges—use a pastry brush to work oil into every nook, then buff thoroughly to prevent sticky buildup.
Between uses, stovetop seasoning maintains the surface. After cleaning and drying, heat the pan over medium heat, add a teaspoon of oil, and rub it into the warm surface with a paper towel held by tongs. Heat until the oil just begins to smoke, then remove from heat and let cool. This quick process repairs minor wear and maintains non-stick performance.
Preheating Techniques for Perfect Results
The preheating ritual makes or breaks your panini. For cast iron, place the cold pan over medium-low heat for 3 minutes, then increase to medium for another 4-5 minutes. This gradual heating prevents thermal shock and ensures even expansion. Test readiness by sprinkling water—droplets should dance and evaporate in seconds, not instantly steam or just sit and boil.
Aluminum and non-stick pans heat faster but benefit from a similar gradual approach. Start at medium-low for 2 minutes, then medium for 3-4 minutes. These materials can develop hot spots if blasted on high heat immediately. For all pan types, add your fat only after preheating. Cold oil in a hot pan creates a better cooking surface than heating oil with the pan, reducing sticking and promoting even browning.
Consider preheating your press weight too. If using a cast iron skillet as a press, heat it separately on another burner or in the oven. A hot press cooks both sides simultaneously, cutting cooking time in half and ensuring the filling heats through before the bread burns. Just remember to use oven mitts—hot presses are unforgiving.
Frequently Asked Questions
1. Can I really get good panini results without an actual panini press?
Absolutely. A quality square grill pan plus a heavy press (like another skillet or cast iron weight) produces results rivaling dedicated presses. The key is even heat, proper preheating, and consistent pressure. Many chefs prefer this method for greater control over temperature and pressure.
2. What’s the best material for a grill pan if I only have $55 to spend?
For most home cooks, hard-anodized aluminum offers the best balance of performance, weight, and price in this budget. It heats quickly, distributes heat evenly, and typically includes a durable non-stick surface. Cast iron is superior for heat retention but requires more maintenance and usually costs more when you factor in accessories.
3. How do I prevent cheese from sticking to the grill ridges?
Ensure your pan is properly preheated and lightly brush oil directly on the bread, not just the pan. For cast iron, maintain a good seasoning. For non-stick, avoid high heat that degrades the coating. If cheese does stick, let the pan cool completely, then soak with warm water before gentle scrubbing with a soft brush.
4. Can I use my square grill pan on an induction cooktop?
Only if it’s specifically labeled induction-compatible. This requires a magnetic base, so cast iron always works, but many aluminum pans don’t unless they have a stainless steel plate bonded to the bottom. Check product specifications carefully—induction capability is always clearly advertised.
5. How long should a budget grill pan last with regular panini making?
With proper care, a cast iron pan lasts indefinitely. Hard-anodized aluminum typically performs well for 3-5 years of weekly use before the non-stick coating degrades. Ceramic non-stick pans may last 2-4 years. Longevity depends heavily on using appropriate utensils, avoiding thermal shock, and cleaning gently.
6. Is it better to press my panini with another pan or a dedicated weight?
Both work excellently. A second cast iron skillet distributes weight evenly and adds cooking surface from above. Dedicated grill presses are more compact and often have textured bottoms that add extra grill marks. For budget shoppers, a foil-wrapped brick or heavy saucepan filled with dry beans provides an effective, nearly free alternative.
7. Why are my paninis coming out soggy instead of crispy?
The culprit is usually insufficient preheating or overcrowding. Your pan must be hot enough to instantly sear the bread upon contact. Also, too many fillings release steam and moisture that gets trapped. Use less filling, press firmly to expel moisture, and ensure your pan’s drainage channels aren’t clogged with oil or debris.
8. Can I put my grill pan in the oven to finish cooking paninis?
Most cast iron pans are oven-safe to any temperature. Hard-anodized aluminum is typically oven-safe to 400-450°F, but plastic handles limit this. Check your specific pan’s specifications. Oven-finishing is excellent for thick paninis that need extra melting time without burning the bread.
9. What’s the ideal sandwich thickness for panini making?
Aim for 1.5 to 2 inches total thickness before pressing. This allows the heat to penetrate to the center and melt cheese without burning the exterior. Thicker sandwiches often result in cold centers and broken structural integrity. Build layers thin and wide rather than tall and narrow.
10. How do I clean between the grill ridges effectively?
Invest in a dedicated grill pan brush with stiff bristles and a notched design that fits between ridges. Clean while the pan is still warm (not screaming hot) for easier debris removal. For stubborn bits, make a paste of coarse salt and water, scrub with a brush, then rinse. Avoid steel wool on non-stick surfaces—it instantly voids any warranty and destroys the coating.