Home brewing has evolved from a niche hobby into a sophisticated craft, and by 2026, the landscape of essential equipment looks remarkably different than it did even five years ago. While starter kits provide the basics, serious brewers understand that specialty tools—those precision instruments and purpose-built accessories—are what transform inconsistent batches into repeatable, professional-quality beer. The good news? You don’t need to drain your savings account to access game-changing gear. With strategic investments under $200, you can build a arsenal of specialty equipment that addresses temperature control, water chemistry, efficient cooling, and fermentation management.
This guide focuses on the specialty cooking equipment that bridges the gap between amateur and advanced home brewing. We’re not talking about your basic fermenters or stockpots here—these are the force multipliers that solve specific brewing challenges. Each recommendation prioritizes features that deliver measurable improvements to your process while respecting the sub-$200 budget constraint that most homebrewers face. Whether you’re scaling from extract to all-grain or simply tired of guesswork ruining your IPAs, these equipment categories represent the smartest specialty investments for 2026.
Top 10 Specialty Cooking Equipment
Detailed Product Reviews
1. The Food Substitutions Bible: 8,000 Substitutions for Ingredients, Equipment and Techniques

Overview: This comprehensive reference guide is an indispensable kitchen companion for anyone who’s ever mid-recipe realized they’re missing a crucial ingredient. With 8,000 substitutions covering not just ingredients but also equipment and techniques, this bible transforms cooking emergencies into creative opportunities and saves countless trips to the store.
What Makes It Stand Out: The sheer scope is staggering—most substitution guides cover only basic pantry staples, but this tome includes equipment alternatives (no stand mixer? Use this method) and technique swaps. The third edition status proves its reliability and thoroughness, having been refined through years of professional and home kitchen testing.
Value for Money: At $32.04, this single volume replaces dozens of specialty cookbooks and countless Google searches. Consider the cost of ruined dishes from failed experimental substitutions or last-minute grocery runs. For serious home cooks and culinary students, it pays for itself within months by reducing waste and expanding cooking confidence.
Strengths and Weaknesses: Pros: Exhaustive coverage, scientifically-tested substitutions, saves money and reduces food waste, excellent index for quick reference. Cons: Physical book occupies counter space, some niche ingredients still won’t have perfect substitutes, and the density can overwhelm casual cooks who prefer visual guides.
Bottom Line: Whether you’re a beginner building confidence or a seasoned cook improvising with pantry staples, this bible deserves a permanent spot in your kitchen. It’s particularly valuable for those with dietary restrictions, limited kitchen storage, or who frequently cook in vacation rentals.
2. The Home Bartender: The Third Edition: 200+ Cocktails Made with Four Ingredients or Less

Overview: This streamlined cocktail manual democratizes mixology by focusing on simplicity without sacrificing flavor. The third edition delivers over 200 recipes that require four ingredients or fewer, making professional-quality drinks accessible to any home enthusiast with basic spirits and minimal equipment.
What Makes It Stand Out: The constraint-based approach is brilliant—by limiting ingredients, the book teaches fundamental flavor principles and encourages creative improvisation. The updated edition includes modern classics and contemporary twists, reflecting current trends while maintaining its accessible core philosophy that less can be more.
Value for Money: At just $9.82, it’s cheaper than two craft cocktails at a bar. The book pays for itself after your first home gathering, and the simplified shopping list means you won’t waste money on obscure liqueurs that gather dust in your cabinet for years.
Strengths and Weaknesses: Pros: Extremely beginner-friendly, budget-conscious, reduces bar cart clutter, quick reference format, builds confidence through achievable recipes. Cons: Advanced mixologists may find it too basic, lacks complex layered cocktails, and the simplicity constraint means some classic recipes are necessarily omitted.
Bottom Line: Perfect for apartment dwellers, party hosts, and cocktail newcomers who want impressive results without professional training. If you’re building a home bar from scratch or tired of complicated recipes requiring fifteen ingredients, this is your essential starting point.
3. Craft Coffee: A Manual: Brewing a Better Cup at Home

Overview: This manual serves as a deep dive into the science and art of manual coffee brewing, elevating home coffee from routine to ritual. It covers pour-over, French press, AeroPress, and other methods with the precision of a coffee competition judge, making it ideal for enthusiasts frustrated with inconsistent results.
What Makes It Stand Out: Unlike coffee table books filled with photos, this is a true manual focusing on extraction science, water chemistry, and grind particle distribution. The author breaks down why each variable matters, empowering readers to diagnose and fix their own brewing problems rather than just following recipes blindly.
Value for Money: At $15.06, it costs less than five café beverages but delivers knowledge that saves thousands over years of home brewing. The book pays for itself by helping you optimize equipment you already own and avoid unnecessary upgrades based on marketing hype rather than actual need.
Strengths and Weaknesses: Pros: Scientific yet accessible, equipment-agnostic approach, troubleshooting focus, excellent for understanding coffee fundamentals. Cons: Requires commitment to learning, may necessitate purchasing additional tools like gooseneck kettles, not suited for those wanting quick tips or pod machine users.
Bottom Line: Essential reading for anyone serious about coffee quality who owns manual brewing equipment. If you’re frustrated with inconsistent results or want to understand what makes great coffee great, this manual will transform your morning cup into a daily achievement and save you money long-term.
4. Tangoowal Culinary Specialty Tools Set,Professional Chef Cooking Plating Kit, 7 Pieces, Stainless Steel

Overview: This seven-piece stainless steel plating kit transforms home presentations into restaurant-quality artistry. The set includes offset spatulas, decorating spoons, saucier spoons, and three precision tweezers—everything needed for meticulous plate composition and elegant food styling in one package.
What Makes It Stand Out: The variety of tools addresses every plating need, from saucing with the offset spatula to micro-adjusting delicate garnishes with curved tweezers. Machined finger grips and grooved tips demonstrate professional-grade design, while the dishwasher-safe construction balances durability with everyday convenience for busy kitchens.
Value for Money: At $22.99 for seven professional tools, this set costs less than a single high-end spatula from premium brands. For culinary students or serious home cooks, it eliminates the piecemeal purchasing that often costs twice as much while delivering comparable quality and versatility.
Strengths and Weaknesses: Pros: Comprehensive selection, stainless steel durability, ergonomic grips, easy cleaning, excellent gift potential. Cons: Overkill for casual cooks, requires practice to master, storage case not included, tweezers may feel too specialized for some home chefs who plate infrequently.
Bottom Line: This kit is a no-brainer for culinary students, food bloggers, or home chefs passionate about presentation. If you’ve ever wanted to recreate restaurant plating or elevate dinner parties, these tools provide the precision you need at an accessible price point that professional kitchens would approve.
5. NU-View Concession & Food Equipment & Multi-Purpose Cleaner, Removes Cooking Oil, Grease, Sugar, Starch & Protein Residues, 18 OZ
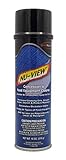
Overview: This specialized degreasing foam tackles the toughest food equipment cleaning challenges. Designed for concession stands and commercial kitchens, its clinging foam formula removes baked-on carbon, protein residues, and sticky sugars that standard liquid cleaners leave behind, making scrubbing obsolete.
What Makes It Stand Out: The foam’s vertical cling technology is a game-changer for cleaning popcorn poppers, steamers, and other upright equipment where liquids immediately run off. The non-toxic formulation achieves professional results without harsh fumes, while its multi-surface safety protects stainless steel, aluminum, plexiglass, and plastics from chemical damage.
Value for Money: At $11.77 for 18 ounces ($0.66/ounce), this professional-grade cleaner costs less than many specialized products while delivering superior cling and residue removal. One can lasts surprisingly long since the foam expands and stays where sprayed, reducing waste and the need for repeat applications.
Strengths and Weaknesses: Pros: Excellent cling action, non-toxic formula, multi-surface safe, made in USA, effective on baked-on grime. Cons: 18oz may be small for heavy commercial use, specific food equipment focus limits general household appeal, requires dwell time for best results on stubborn buildup.
Bottom Line: Essential for food truck operators, concession stand owners, and anyone with specialty cooking equipment. If you battle stubborn grease and sugar buildup on vertical surfaces, this foam cleaner will save you hours of scrubbing and protect your equipment investment for years to come.
6. Smokehouse Handbook: Comprehensive Techniques & Specialty Recipes for Smoking Meat, Fish & Vegetables

Overview: The Smokehouse Handbook positions itself as the definitive guide for home smoking enthusiasts, offering a deep dive into the art and science of preserving and flavoring proteins and vegetables through smoke. This comprehensive manual covers everything from basic cold and hot smoking techniques to advanced specialty recipes that elevate backyard smoking from hobby to craft.
What Makes It Stand Out: Unlike basic grilling books that merely touch on smoking, this handbook provides exhaustive coverage of multiple proteins—meat, fish, and even vegetables—making it exceptionally versatile. The specialty recipes demonstrate professional-level applications, while the technique-focused approach ensures readers understand the “why” behind each method, enabling improvisation and mastery rather than mere recipe following.
Value for Money: At $24.95, this handbook delivers substantial value for anyone serious about smoking. Comparable culinary technique books often retail for $30-$40, and the specialized knowledge here saves countless hours of trial and error. For the cost of a few pounds of premium smoking wood, you gain permanent access to professional smoking wisdom.
Strengths and Weaknesses: Pros: Comprehensive technique coverage; diverse recipe applications across proteins and vegetables; builds fundamental understanding for creative smoking; durable reference format. Cons: May overwhelm absolute beginners with technical depth; lacks video demonstrations that digital platforms offer; physical book format limits portability compared to digital versions.
Bottom Line: This handbook is an essential investment for serious smoking enthusiasts ready to move beyond basic recipes. While beginners might find it intensive, those committed to mastering smoking will appreciate its thoroughness and long-term reference value.
7. Uno Casa - XL Pie Irons Cast Iron Sandwich Maker - Mountain Japanese Sandwich Maker with Recipe Book - Durable Campfire Cooking Equipment for Toasted Pies, and More

Overview: The Uno Casa XL Pie Iron reimagines campfire cooking with a robust, oversized cast iron design that transforms simple ingredients into gourmet toasted creations. This versatile tool combines traditional hobo pie functionality with modern ergonomic improvements, making it an indispensable companion for outdoor cooking adventures from backyard gatherings to backcountry expeditions.
What Makes It Stand Out: The exceptional XL size doubles standard pie iron capacity, while the innovative removable handle system (13.8" and 21.6" options) solves storage and portability challenges that plague traditional cast iron cookers. The flavor-enhancing grill grid interior creates authentic sear marks and prevents sticking, and its dual functionality as a Japanese sandwich maker expands culinary possibilities far beyond typical campfire fare.
Value for Money: At $32.50, this pie iron delivers remarkable durability and versatility that outlasts cheaper aluminum alternatives by decades. Comparable quality cast iron cookers cost $40-$60 without the ergonomic handle innovation. The included recipe e-book adds immediate value, jumpstarting creativity without additional investment.
Strengths and Weaknesses: Pros: Pre-seasoned cast iron provides natural non-stick performance; interchangeable handles optimize portability; XL capacity feeds more people efficiently; lifetime durability with proper care; multi-functional design. Cons: Cast iron weight may challenge lightweight backpackers; requires maintenance to prevent rust; larger size needs more storage space; learning curve for heat management.
Bottom Line: For car campers and outdoor cooking enthusiasts, this XL pie iron is a game-changer that justifies its weight with unmatched versatility and durability. The smart handle design and superior construction make it worth every penny for those who regularly cook outdoors.
8. All-Clad Specialty Stainless Steel Universal Steamer for Cooking 3 Quart Food Steamer, Steamer Basket Silver
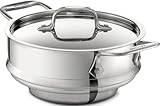
Overview: All-Clad’s 3-quart universal steamer represents the brand’s commitment to professional-grade kitchen tools, delivering precision steaming capabilities for health-conscious cooks. Designed to integrate seamlessly with existing All-Clad cookware, this insert transforms standard saucepans into efficient steamers, preserving nutrients and flavors while maintaining the brand’s signature durability and performance standards.
What Makes It Stand Out: The precision engineering ensures a secure fit on 8-inch All-Clad saucepans and casseroles (3-4 quart capacities), eliminating wobbling and steam loss that plague universal designs. Heavy-gauge stainless steel construction provides exceptional heat distribution, while riveted handles offer secure grip even when hot. The included lid completes the system, creating a self-contained steaming environment that maximizes efficiency.
Value for Money: Priced at $89.95, this steamer commands a premium but delivers genuine All-Clad quality backed by a Limited Lifetime Warranty. While generic steamers cost $20-$40, they lack the precise fit, durability, and warranty protection. For All-Clad cookware owners, this integration justifies the investment through seamless performance and longevity.
Strengths and Weaknesses: Pros: Perfect compatibility with All-Clad 8-inch cookware; heavy-duty stainless steel ensures decades of use; riveted handles provide safety and confidence; dishwasher safe; lifetime warranty protection. Cons: Premium price point restricts accessibility; limited to specific All-Clad dimensions; made in China despite US design; unnecessary without compatible All-Clad pans.
Bottom Line: This steamer is essential for All-Clad devotees seeking perfect integration and professional results. The price stings initially, but lifetime durability and flawless performance make it a worthwhile investment for those already invested in the All-Clad ecosystem.
9. The Joy Of Coffee: The Essential Guide to Buying, Brewing, and Enjoying - Revised and Updated – The Complete Source for Beans and Home Espresso Equipment

Overview: This revised edition of “The Joy of Coffee” serves as a comprehensive bible for coffee enthusiasts, demystifying the journey from bean selection to perfect extraction. Covering everything from sourcing premium beans to mastering home espresso equipment, this guide addresses the complete coffee experience with authority and accessibility for both novices and seasoned home baristas.
What Makes It Stand Out: The book’s holistic approach distinguishes it from single-topic coffee guides by covering buying, brewing, AND equipment in one volume. The revised edition incorporates modern developments in specialty coffee and home espresso technology, making it current despite the format’s longevity. Its reputation as a “complete source” suggests depth that fragmented online resources cannot match.
Value for Money: At just $12.37, this represents exceptional value—less than the cost of two specialty coffee drinks. Comparable coffee textbooks and guides typically range from $20-$35, making this an accessible entry point for anyone serious about elevating their coffee game without financial barrier.
Strengths and Weaknesses: Pros: Comprehensive coverage of entire coffee process; revised content stays relevant; affordable price point; builds foundational knowledge; trusted reference format. Cons: Physical book may lack visual depth of video tutorials; cannot update as rapidly as online resources; espresso equipment section may become dated; limited by publishing date.
Bottom Line: An unbeatable value for coffee lovers seeking structured knowledge, this guide punches far above its price class. While digital natives might prefer multimedia learning, the comprehensive scope and affordability make it a must-have reference for building true coffee expertise.
10. Taste of Home What Can I Cook in My Instant Pot, Air Fryer, Waffle Iron…?: Get Geared Up, Great Cooking Starts Here (Taste of Home Quick & Easy)

Overview: Taste of Home addresses the modern cook’s dilemma of underutilized small appliances with this practical guide spanning Instant Pots, air fryers, waffle irons, and more. The book targets busy home cooks seeking to maximize their gadget investments through quick, approachable recipes that transform intimidating appliances into daily-use tools for efficient, flavorful meals.
What Makes It Stand Out: The multi-appliance focus is brilliantly practical—rather than single-device cookbooks that clutter shelves, this single volume unlocks multiple kitchen tools. The “Quick & Easy” series pedigree ensures tested, reliable recipes with accessible ingredients. The “What Can I Cook” framing directly answers the question most owners ask after the initial excitement fades.
Value for Money: At $15.43, this book offers tremendous utility by consolidating guidance for multiple appliances into one affordable resource. Individual appliance cookbooks typically cost $15-$20 each, making this a cost-effective solution for owners of 2-3 devices who need inspiration without accumulating single-use books.
Strengths and Weaknesses: Pros: Covers multiple popular appliances in one volume; Taste of Home reliability and testing; quick and easy recipe focus; helps justify appliance purchases; accessible for busy cooks. Cons: Limited depth for any single appliance; recipes may sacrifice complexity for speed; physical format less convenient than digital for kitchen use; assumes basic appliance familiarity.
Bottom Line: Perfect for appliance owners suffering from recipe fatigue, this guide delivers practical inspiration across multiple devices at an excellent price. While serious enthusiasts may want dedicated deep-dives, busy cooks will appreciate the convenience and variety this single volume provides.
Understanding the $200 Home Brewing Equipment Budget
Before diving into specific gear categories, it’s crucial to reframe how you think about a $200 equipment budget. This isn’t about finding the cheapest version of each tool—it’s about identifying where strategic spending delivers the highest return on investment for your brewing process. A single $180 purchase that eliminates a chronic problem (like fermentation temperature swings) often provides more value than five separate $40 gadgets that marginally improve convenience.
The 2026 market has matured significantly, with Chinese manufacturing innovation and increased competition driving down prices on precision instruments. Digital sensors, stainless steel fabrication, and silicone components that cost triple a decade ago now fit comfortably within a modest budget. Focus on equipment that addresses the “three pillars of brewing consistency”: temperature control, measurement accuracy, and contamination prevention. When evaluating any sub-$200 purchase, calculate its potential impact on these pillars first.
Digital Temperature Controllers: Your Fermentation Guardian
Fermentation temperature management remains the single most impactful variable in home brewing, and a dedicated digital temperature controller is the specialist tool that automates this critical process. Unlike the basic thermostats included in starter kits, modern controllers offer dual-stage functionality, simultaneously managing heating and cooling devices to maintain your yeast’s ideal environment within ±1°F.
Key Features to Evaluate
When selecting a controller under $200, prioritize units with programmable temperature ramps—essential for lagers and diacetyl rests. Look for controllers offering at least two relay outputs, a large LED display visible from across your brewery, and probe cords longer than six feet for flexible placement. The 2026 standard includes waterproof probe connectors and memory backup that retains settings during power outages, features that were premium-only just two years ago.
Installation and Compatibility Considerations
Your controller must interface with your existing fermentation chamber, whether that’s a converted chest freezer, mini-fridge, or insulated cabinet. Verify the amperage rating matches your cooling unit—most compact fridges draw under 10 amps, but full-size freezers may exceed 15. Consider controllers with both cooling and heating outlets; a simple $15 seedling heat mat connected to the heating relay can maintain ale temperatures during winter basement brewing. The best models include compressor delay protection, preventing short-cycling that destroys refrigeration units.
Precision pH Meters: Water Chemistry Mastery
Water chemistry separates good beer from great beer, and a precision pH meter is the specialist instrument that removes guesswork from mash and sparge adjustments. Paper strips and color-change kits lack the accuracy needed for repeatable results—a proper meter provides ±0.01 pH resolution, letting you dial in mash pH to the exact tenth for optimal enzyme activity and flavor extraction.
Calibration and Maintenance Requirements
Budget-friendly pH meters under $200 now include automatic temperature compensation (ATC) and two-point calibration, typically at pH 4.0 and 7.0. The hidden cost isn’t the meter itself—it’s replacement probes, which degrade every 12-18 months. Look for models with user-replaceable probes costing under $40; sealed-unit meters become expensive paperweights when their probes fail. Proper storage solution and regular cleaning with electrode storage solution (not distilled water) will extend probe life significantly.
Accuracy Standards for Brewing
For brewing applications, accuracy below ±0.05 pH is non-negotiable. Mash pH targets around 5.2-5.6 require this precision; broader tolerances render measurements useless. Meters should stabilize readings within 30 seconds and display both pH and temperature simultaneously. The 2026 market offers Bluetooth connectivity in some sub-$200 units, logging readings to your smartphone for batch-to-batch comparison—valuable for dialing in your house recipes.
Immersion Wort Chillers: Time-Saving Cooling Solutions
Rapid wort chilling is critical for producing clear beer with stable cold break proteins, and an efficient immersion chiller is the specialty tool that accomplishes this in minutes rather than hours. The 2026 market offers two primary materials, each with distinct thermal properties and price points that both fall well under our $200 ceiling.
Material Science: Copper vs. Stainless Steel
Copper chillers offer superior thermal conductivity—approximately 20 times more efficient than stainless steel—meaning faster cooling with less water usage. A 50-foot copper coil can chill five gallons from boiling to pitch temperature in 10-15 minutes. Stainless steel, while slower, provides durability and corrosion resistance that appeals to brewers using aggressive cleaning chemicals or brewing high-sulfate beers. Both materials are viable under $200; copper typically costs 30-40% less for equivalent length.
Length and Diameter Specifications
Chiller efficiency scales with surface area. For five-gallon batches, target at least 50 feet of 3/8-inch tubing; ten-gallon brewers should consider 75-foot models. The 2026 trend toward “low-profile” chillers with tighter coil spacing maximizes heat transfer in shallow kettles. Verify the chiller diameter fits your kettle—most standard models are 10-12 inches wide, but narrow-tall kettles may require custom dimensions. Look for pre-attached garden hose fittings; they’re more reliable than barb fittings that require separate clamps.
Refractometers: Gravity Readings with Minimal Waste
Hydrometers waste 4-8 ounces of precious wort per reading and risk contamination. A refractometer requires just 2-3 drops and delivers instant specific gravity measurements during mash, boil, and fermentation. Modern brewing refractometers under $200 include features that address traditional limitations, making them essential for process control.
Automatic Temperature Compensation Explained
ATC is non-negotiable in 2026. Mash and wort samples vary from 150°F to room temperature, and ATC ensures readings remain accurate without cooling samples. The best models compensate across 50-86°F (10-30°C), adequate for most brewing scenarios. Be aware that ATC corrects for instrument temperature, not sample temperature—extremely hot samples can still damage the prism. Develop the habit of taking readings from cooled samples when possible to protect your investment.
Brix-to-SG Conversion Considerations
Most refractometers display Brix values, requiring conversion to specific gravity. The 2026 standard includes dual-scale models showing both Brix and SG, but these are often less accurate than dedicated Brix meters with smartphone app integration. Quality apps now account for alcohol interference during fermentation, providing corrected FG readings that approach hydrometer accuracy. When evaluating refractometers, check if the manufacturer provides a calibrated conversion chart or companion app—this adds significant value to a $60-90 purchase.
Fermentation Vessel Upgrades: Beyond Basic Carboys
Your fermentation vessel is where beer transforms, and specialty upgrades turn passive containers into active process management tools. While the vessel itself may exceed $200, critical accessories that enhance functionality remain well within budget and dramatically improve yeast management, sampling, and transfers.
Spigot and Sampling Port Integration
Adding a weldless spigot to an existing fermenter costs $25-45 and eliminates siphoning contamination risks. Look for 304 stainless steel ball valves with 1/2-inch NPT threads, which accept standard brewing fittings. The 2026 innovation is the “sample port”—a separate, smaller valve with a built-in sterile sampling chamber that lets you pull hydro samples without exposing the batch to oxygen. When installing, ensure the spigot sits 1-2 inches above the yeast cake line for five-gallon batches to minimize trub pickup.
Material Options: Glass, PET, and Stainless Trade-offs
Glass carboys offer oxygen impermeability but shatter risk. PET carboys are lightweight and shatterproof but scratch easily, harboring bacteria. Stainless steel provides the best long-term value but exceeds our $200 vessel budget. The specialty equipment solution? PET carboys with stainless reinforcement rings and ported closures, combining safety and functionality under $100. For glass users, invest in a $30-40 “brew hauler” carrier and a ported stopper system—these accessories prevent the accidents that make glass dangerous.
Auto-Siphon Mechanisms: Transferring Without Contamination
The auto-siphon revolutionized home brewing by eliminating mouth-siphoning and reducing oxidation during transfers. Modern designs under $20-40 include features that address the original’s durability and sanitation concerns, making them non-negotiable specialty equipment for any serious brewer.
Sanitation-Friendly Design Elements
Look for one-piece racking canes without internal seals or gaskets that trap bacteria. The 2026 standard includes models with smooth, polished interiors and removable tips for thorough cleaning. Avoid auto-siphons with separate “siphon hoses” that require assembly—the fewer connection points, the lower the contamination risk. Some advanced models include a sterile air filter on the pump action, preventing environmental contamination during priming.
Size Matching for Different Batch Volumes
One-gallon brewers need 3/8-inch diameter canes; five-gallon brewers should use 1/2-inch models for faster transfers that minimize oxygen exposure. The siphon tube length must reach within an inch of your fermenter bottom while extending into your receiving vessel. Measure your carboy and bottling bucket heights before purchasing. Consider a two-size kit for $30-35 if you brew varied batch sizes—the versatility justifies the modest cost increase.
Mash Tun Insulation Systems: Efficiency on a Budget
Heat loss during 60-90 minute mashes destroys conversion efficiency and creates temperature stratification. Specialty insulation solutions maintain stable mash temperatures within 1-2°F, improving extract efficiency by 5-10% and ensuring consistent enzymatic activity throughout the grain bed.
DIY vs. Pre-Fabricated Solutions
Pre-fabricated mash tun jackets cost $60-90 and offer clean aesthetics with Velcro closures and reinforced seams. DIY solutions using reflective bubble insulation run $20-30 and perform equally well but require custom cutting and tape. The 2026 middle ground is adjustable “wrap” insulation with built-in thermowell ports, costing $40-55. These systems accommodate different tun sizes and include probe access points, eliminating the need to lift insulation for temperature checks.
Heat Retention Performance Metrics
Quality insulation should maintain mash temperature within 2°F over 60 minutes in a 65°F ambient environment. Look for materials with R-values of 4-6; reflective aluminum surfaces add radiative heat barrier benefits. For cooler climates, consider systems with supplementary heating capability—some wraps include pockets for 12V heating pads that draw 30-40 watts, perfect for maintaining temperature during winter brewing in unheated garages.
High-Precision Digital Scales: Ingredient Accuracy
Hop additions measured by volume rather than weight create irreproducible bitterness and aroma profiles. A high-precision digital scale is the specialist tool that ensures your 0.5 oz Centennial addition at 10 minutes is exactly 0.50 oz, not 0.45 or 0.55. This precision becomes critical when scaling recipes or brewing high-IBU styles where small variations dramatically impact balance.
Capacity vs. Resolution Trade-offs
Brewing scales must handle at least 11 lbs (5 kg) for grain bills while resolving to 0.05 oz (1 gram) for hop additions. The 2026 market offers dual-range scales that automatically switch from high-capacity (11 lbs × 0.1 oz) to precision mode (1 lb × 0.01 oz) when measuring smaller quantities. This dual functionality eliminates needing separate grain and hop scales. Ensure the weighing platform is at least 6×6 inches to comfortably hold a grain bowl, and verify the display is backlit for visibility in dim brewery lighting.
Waterproofing and Brew Day Durability
Brew days involve spills, humidity, and temperature fluctuations. IP65-rated splash resistance is minimum; IP67 (brief immersion protection) is ideal. Look for sealed buttons and a removable stainless steel platform that cleans easily. Battery life matters—scales that auto-shutoff after 2-3 minutes prevent mid-brew power loss, but the delay should extend to 5+ minutes when actively adding ingredients to avoid frustrating shutdowns during complex hop schedules.
High-Temperature Silicone Tubing: The Unsung Hero
Vinyl tubing degrades above 158°F, leaching plasticizers and imparting flavors while becoming brittle and crack-prone. High-temperature platinum-cured silicone tubing handles boiling wort transfers, CIP (clean-in-place) operations with 180°F sanitizer, and remains flexible at freezing temperatures. This $30-50 investment protects every batch from contamination and off-flavors.
Wall Thickness and Pressure Ratings
Standard silicone tubing uses 1/16-inch walls adequate for gravity transfers, but pump systems require 3/32-inch or 1/8-inch walls to prevent collapse under suction. Verify the tubing is rated for at least 10 psi working pressure at 200°F. The 2026 improvement is “braided” silicone tubing—reinforced with polyester mesh that prevents kinking and handles 30+ psi, ideal for pressurized transfers and CIP pumps, all while remaining under $2 per foot.
Color-Coding for System Organization
Brewery organization prevents costly cross-contamination mistakes. Invest in multiple colors: clear for wort transfers, red for hot water, blue for cold water, and opaque white for sanitizer lines. Some brewers use green for finished beer lines. Quality tubing includes ink-printed temperature and pressure ratings along its length—avoid unmarked bulk tubing where specifications are uncertain. Pre-cut 10-foot sections in color-coded bundles cost $35-45 and provide enough length for a typical five-gallon setup with spare for replacements.
Enhanced Brew Kettles: Features Worth Investing In
While a basic 8-gallon kettle suffices for extract brewing, specialty enhancements transform it into a precision brewing instrument. These additions—most under $50 each—address volume measurement, temperature monitoring, and safe draining, collectively improving process control and brew day safety.
Volume Marking Methodologies
Etched internal volume markings are permanent and accurate but add $40-60 to kettle cost. For existing kettles, stainless steel volume markers (small screws or welded dimples) cost under $15 but require careful placement and calibration. The 2026 specialty solution is heat-resistant adhesive volume rulers—vinyl strips with gradient markings that adhere to kettle exteriors, costing $8-12 and removable if you upgrade kettles. For accuracy, calibrate these with measured water additions rather than trusting factory markings.
Ball Valve and Thermometer Integration
A weldless ball valve kit ($30-45) enables no-siphon transfers and kettle cleaning without lifting hot liquids. Look for 3-piece valves that disassemble for cleaning—2-piece designs trap bacteria. For thermometers, invest in a 3-inch dial thermometer with a 6-inch probe and adjustable angle, costing $25-35. Digital thermometers with remote probes are tempting but often fail in steamy kettle environments; mechanical dial thermometers remain reliable and calibration-adjustable with a simple wrench turn.
Carbonation Control Tools: Precision Dispensing
Forced carbonation and kegging require pressure management, but specialty tools under $200 significantly improve control over carbonation levels and serving consistency. These aren’t full kegging systems—they’re the precision regulators and gauges that make kegging predictable rather than experimental.
Pressure Regulator Specifications
A dual-gauge CO2 regulator with a 0-60 PSI output range and 0-3000 PSI tank gauge costs $60-85. The critical feature is the output pressure adjustability in 1-2 PSI increments; coarse adjustments make dialing in precise carbonation levels impossible. Look for regulators with built-in check valves that prevent beer backflow into the regulator body—a $15-20 repair that ruins a brew day. The 2026 improvement is “micro-adjust” knobs with 20-turn precision, allowing 0.5 PSI changes for perfect English ale carbonation levels.
Disconnect Systems and Compatibility
Ball lock and pin lock disconnects aren’t interchangeable, and mixing them creates frustration. Standardize on one system—ball lock is more common but pin lock kegs are often cheaper. Invest in a set of threaded disconnects ($30-40 for a pair) that accept barbed, flare, or MFL fittings, providing flexibility as your draft system evolves. Quality disconnects include built-in pressure relief valves and ergonomic grips that operate with gloved hands, small details that matter during cold, wet keg changes.
Brewery Organization and Storage Solutions
Specialty equipment loses value when misplaced or damaged. Dedicated storage solutions—though often overlooked—protect your investments and streamline brew days. A $40-60 investment in proper organization pays dividends in equipment longevity and reduced setup time.
Wall-mounted pegboard systems with stainless steel hooks keep immersion chillers, auto-siphons, and tubing off damp floors. Look for kits including 50+ hooks and specialty holders for temperature controllers and pH meters. For small parts—gaskets, clamps, hop bags—invest in clear, stackable bins with gasket-sealed lids that prevent moisture and pest intrusion, costing $25-35 for a multi-bin set. Label everything with waterproof label tape; the 30 minutes spent organizing saves hours searching for that specific O-ring during a critical brew step.
Monitoring and Safety Equipment Essentials
Specialty brewing includes monitoring for hazards beyond contamination. A $30-50 investment in safety equipment prevents property damage and personal injury, making it as essential as any thermometer or scale.
Every brew space needs a wall-mounted CO2 monitor with audible alarm if kegging—CO2 is odorless and displaces oxygen in enclosed spaces. For electric brewing setups, a GFCI-protected power strip is non-negotiable; water and electricity create lethal combinations. Fire extinguishers rated for Class B (flammable liquids) and Class C (electrical) fires should be within 10 feet of your brewing area. These aren’t exciting purchases, but they enable you to brew for decades rather than months.
Frequently Asked Questions
What’s the single most impactful specialty equipment purchase under $200 for a beginner?
A digital temperature controller provides the greatest improvement in batch consistency. Fermentation temperature control eliminates the off-flavors and stalled fermentations that discourage new brewers, delivering professional results with basic recipes and techniques.
How do I verify accuracy when buying budget-friendly pH meters and refractometers?
Purchase certified calibration solutions (pH 4.0 and 7.0 buffers, 20°Brix reference solution) and test your equipment immediately upon arrival. Reputable manufacturers specify accuracy tolerances; if your meter reads outside these ranges after calibration, return it. Many budget units perform excellently—accuracy issues usually stem from improper storage or depleted probes, not manufacturing defects.
Can I use cooking equipment like kitchen thermometers and scales instead of brewing-specific versions?
Kitchen thermometers typically lack the 200°F+ range and accuracy needed for mash temperatures. Kitchen scales often max out at 5 lbs with poor resolution for hops. Brewing-specific equipment uses materials resistant to caustic cleaners and includes features like ATC and waterproofing that kitchen versions lack. The price difference is minimal compared to the cost of ruined batches.
How long should specialty brewing equipment last with proper care?
Stainless steel components (valves, kettles) last decades. Silicone tubing requires replacement every 2-3 years as it becomes cloudy and less flexible. pH meter probes last 12-24 months depending on storage and frequency of use. Digital controllers and refractometers typically function 5-7 years before electronic components degrade. Budget $30-50 annually for maintenance and replacement of wearable items.
Is it better to buy one premium piece or multiple budget items?
For your first specialty purchase, invest in one premium tool that solves your biggest brewing challenge—usually temperature control. After that foundation is set, spreading budget across multiple mid-range items builds versatility faster than accumulating premium single-purpose tools. A $150 controller plus $50 in tubing and clamps beats a $200 refractometer alone.
What’s the best way to clean and maintain silicone tubing?
Flush immediately after use with hot water, then soak in PBW or similar alkaline cleaner for 15-30 minutes. Rinse thoroughly and hang to dry completely—moisture trapped inside promotes biofilm growth. For deep cleaning, use a tubing brush sized to your diameter, but avoid excessive scrubbing that creates micro-scratches. Replace tubing that develops permanent cloudiness or stiffness.
How do I choose between copper and stainless steel immersion chillers within budget?
If you brew frequently (2+ times monthly) and value speed, choose copper for its thermal efficiency. If you use caustic cleaners, brew high-sulfate water profiles, or prioritize durability, stainless steel is worth the 30% premium. Both materials perform adequately; the decision hinges on your cleaning regimen and batch frequency more than performance.
Can specialty equipment improve extract brewing, or is it only for all-grain?
Specialty tools dramatically improve extract brewing. pH meters optimize steeping grain water chemistry, refractometers reduce waste when measuring concentrated wort, and temperature controllers are equally critical for extract fermentation. Many extract brewers see their biggest quality jump after adding precision measurement and control tools, as extract itself is consistent—process variables are what create inconsistency.
What safety certifications should I look for on electrical brewing equipment?
Seek UL (Underwriters Laboratories) or ETL (Intertek) certification for any device plugging into 120V outlets. These marks indicate third-party testing for fire and shock hazards. For temperature controllers, verify the relay is rated for inductive loads (motors/compressors) not just resistive loads (heaters). Check that GFCI protection is built-in or add an inline GFCI adapter for $15-20.
How do I store specialty equipment between brew days to maximize lifespan?
Store pH meters with probe tips immersed in storage solution, never dry or in distilled water. Hang immersion chillers to dry completely, then bag in plastic to prevent dust accumulation. Keep digital controllers in climate-controlled spaces; garage heat cycling degrades electronics. Coil silicone tubing loosely without kinks and store away from UV light. Organize small parts in labeled, sealed containers with desiccant packs to prevent moisture and pest damage.